Để copy giữa máy ảo và máy thật thì có nhiều cách bác ạ. Một trong số đó là cách dùng network share. Hiện tại máy tính cháu ko chạy được vmware nên cháu viết ra các bước vậy.
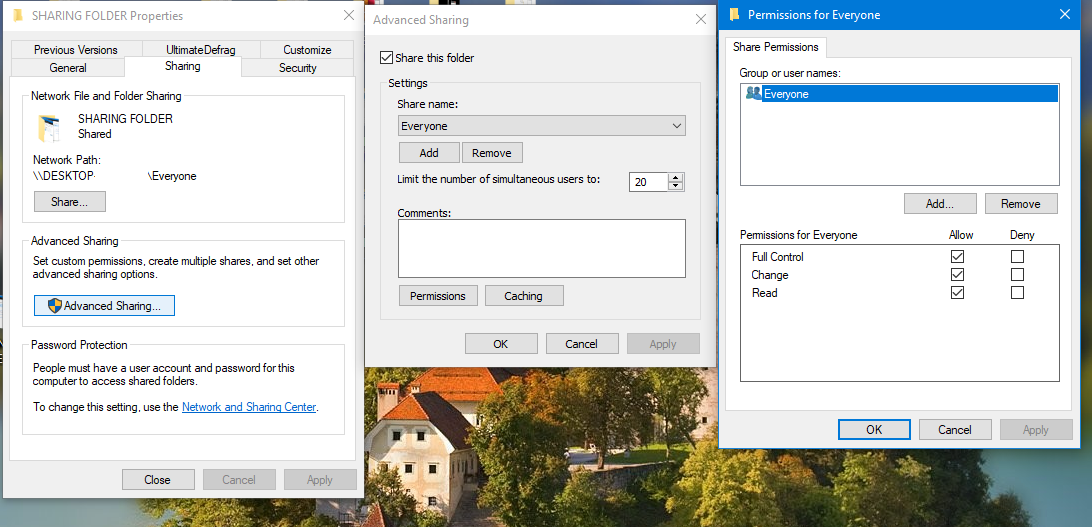
+ Bước 1: Tại máy thật bác tạo 1 folder để share giữa máy ảo và máy thật. Tại folder này bác xét quyền Share là Full Control cho tài khoản Everyone. Bác set quyền share trong tab Sharing và chọn advandce. Sau đó bác qua tab Sercurity bác add tài khoản bác đang đang nhập vào và set quyền full control.
Bước 2: Bác kiểm tra ip của máy bác là bao nhiêu. Bác vào cmd và gõ ipconfig, tại dòng ip address sẽ là ip của máy bác. Bác chú ý tên card mạng nhé. Khi cài vmwae nó sẽ tự add vào hệ thống 2 card mạng ảo. Trong video của cháu thì ip máy thật của cháu là 10.8.8.5. Trong trường hợp này bác không cần quan tâm đến dòng subnet mask và default gateway. Bởi vì khi bác tạo máy ảo thì card mạng add vào máy ảo đã được set mặc định ở chế độ NAT rồi. Ở chế độ này thì bác có thể truy cập dữ liệu từ bên trong máy ảo ra ngoài máy thật bình thường nhưng chiều ngược lại thì không được.
Nếu bác muốn máy bên ngoài cũng truy cập được folder share trong máy ảo thì bác phải set card mạng ở chế độ Bridge. Khi ở chế độ này thì máy ảo sẽ nhận địa chỉ ip của modem cấp.
Bước 3: Tại máy ảo bác vào Run hoặc nhập vào ô tìm kiếm: \\ip_may_that. Trong video của cháu là: \\10.8.8.5.
Bước 4: Trong hộp thoại hỏi nhập username và password thì bác nhập tài khoản và mật khẩu tại máy thật bác đang đăng nhập.
Chúc bác thành công
")
![Audials One 2026 [for PC]](data:image/png;base64,iVBORw0KGgoAAAANSUhEUgAAAAEAAAABCAQAAAC1HAwCAAAAC0lEQVR42mP8Xw8AAoMBgDTD2qgAAAAASUVORK5CYII=)