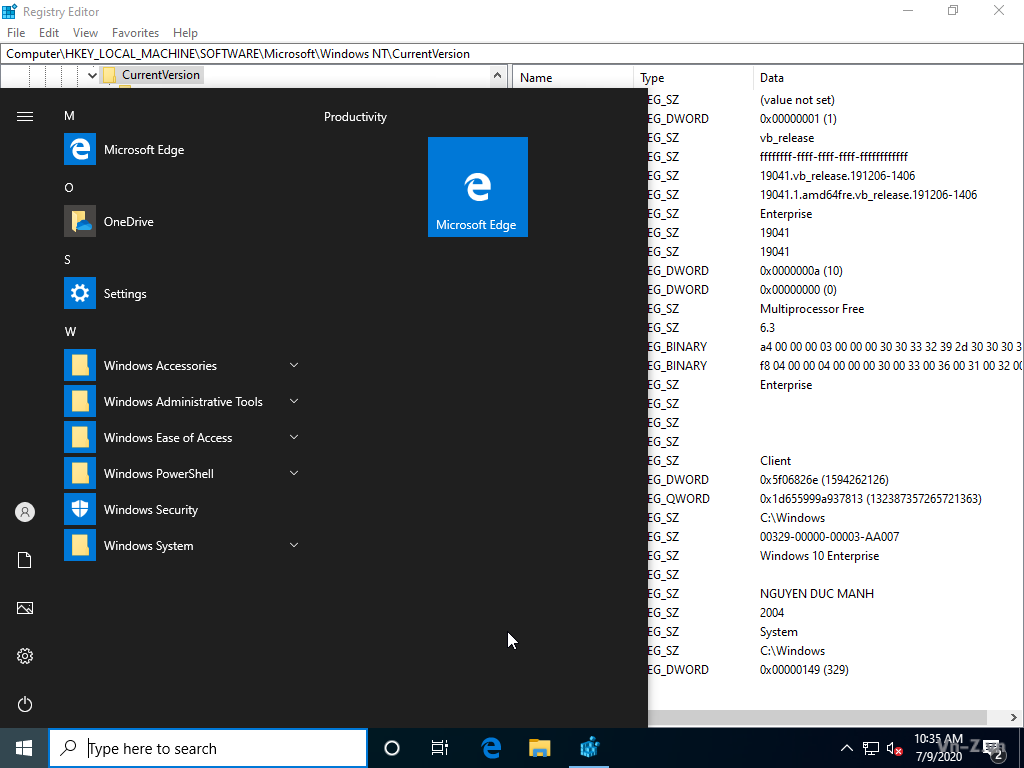
secpol
Rìu Chiến Bạc

Đây là loạt video hướng dẫn rebuild lại bộ cài windows 7 - 8 - 10. Trong loạt video này bao gồm 3 phần:
Phần I: Hướng dẫn thêm bớt các phiên bản windows trong 1 file iso.
Phần II: Hướng dẫn thêm hotfix, driver, langguage và tùy biến windows.
Phần III: Hướng dẫn thêm phần mềm vào bộ cài Windows.
Phần I: Hướng dẫn thêm bớt các phiên bản windows trong 1 file iso
Text:
Phần II: Hướng dẫn thêm hotfix, driver, langguage và tùy biến windows.
Text:
Phần III: Hướng dẫn thêm phần mềm vào bộ cài Windows
Text:
Bonus1: Hướng dẫn xóa Windows Apps
New version:
Bonus2: Hướng dẫn cấu hình file trả lời tự động
Trong Bonus2 này mình có tham khảo tài liệu ở https://docs.microsoft.com và các forum nước ngoài.
New version:
Tổng hợp các bản windows 10, 8.1 và 7 do mình build từ bản gốc:
Phần I: Hướng dẫn thêm bớt các phiên bản windows trong 1 file iso.
Phần II: Hướng dẫn thêm hotfix, driver, langguage và tùy biến windows.
Phần III: Hướng dẫn thêm phần mềm vào bộ cài Windows.
NỘI DUNG
Phần I: Hướng dẫn thêm bớt các phiên bản windows trong 1 file iso
Text:
Mã:
https://manhpc.com/huong-dan-rebuild-bo-cai-windows-phan-1/Phần II: Hướng dẫn thêm hotfix, driver, langguage và tùy biến windows.
Text:
Mã:
https://manhpc.com/huong-dan-rebuild-bo-cai-windows-phan-2/Lịch sử cập nhật Windows: https://support.microsoft.com/vi-vn/help/4529964/windows-10-update-history
MSMG Toolkit: https://msmgtoolkit.in/
Dism++: https://www.chuyu.me/en/index.html
Driver (pass: manhpc.com): Script: Language pack:
Pass nếu có: manhpc.com
MSMG Toolkit: https://msmgtoolkit.in/
Dism++: https://www.chuyu.me/en/index.html
Driver (pass: manhpc.com): Script: Language pack:
Pass nếu có: manhpc.com
Phần III: Hướng dẫn thêm phần mềm vào bộ cài Windows
Text:
Mã:
https://manhpc.com/huong-dan-rebuild-bo-cai-windows-phan-3/Chúc bạn thành công !
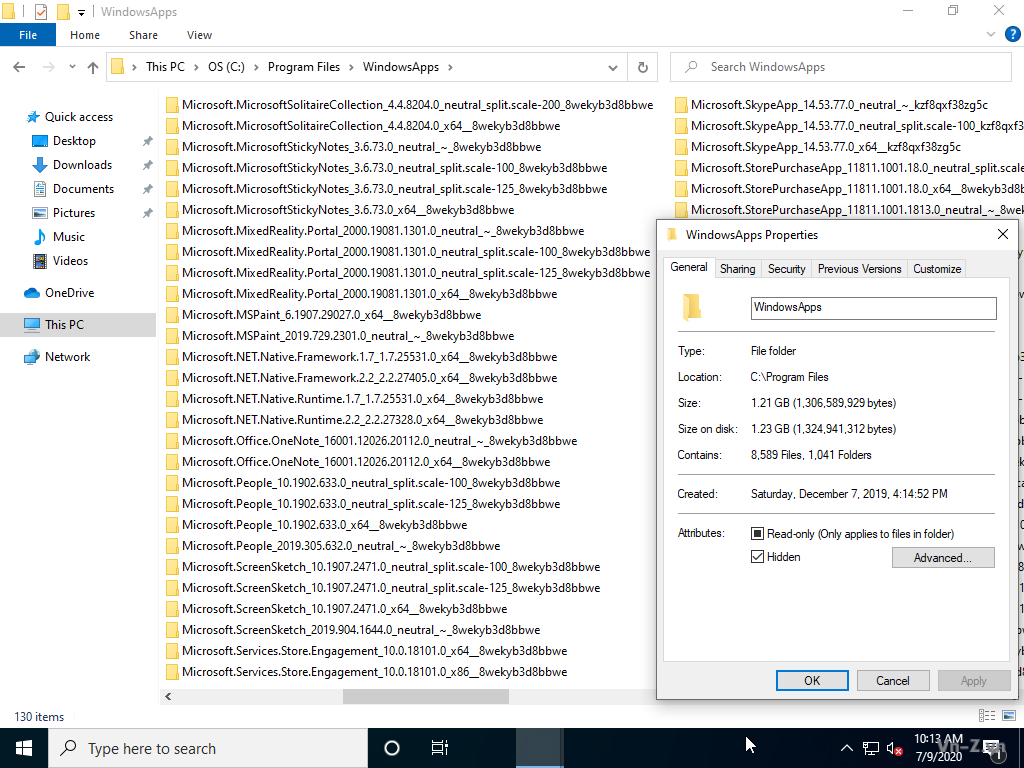
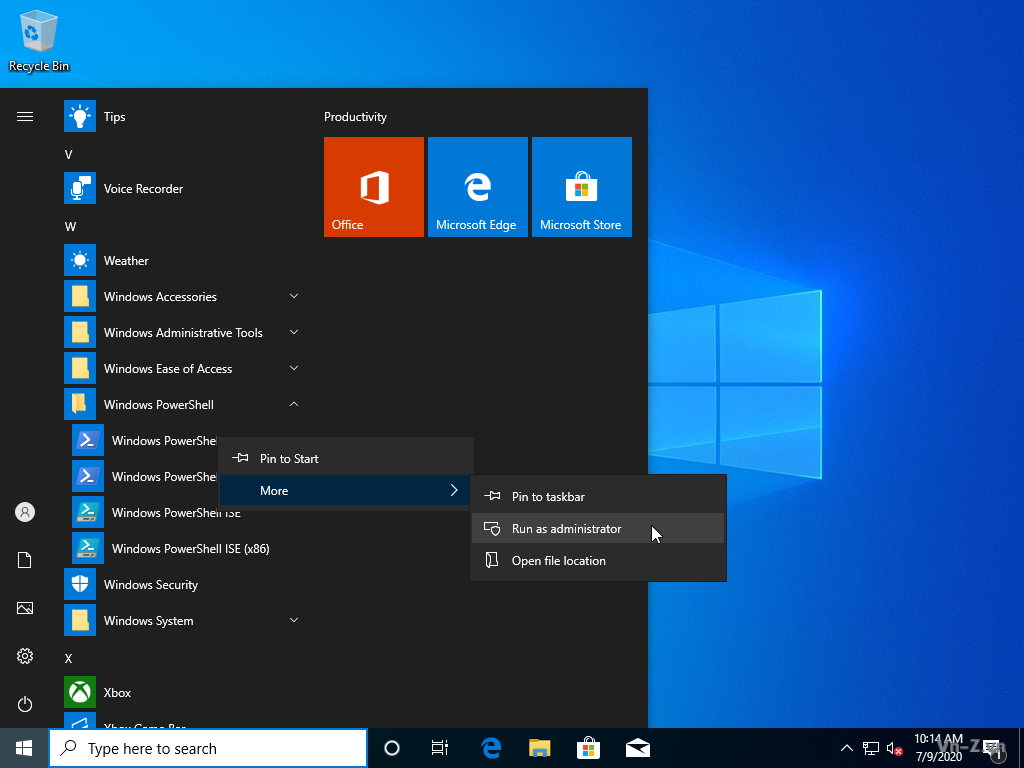
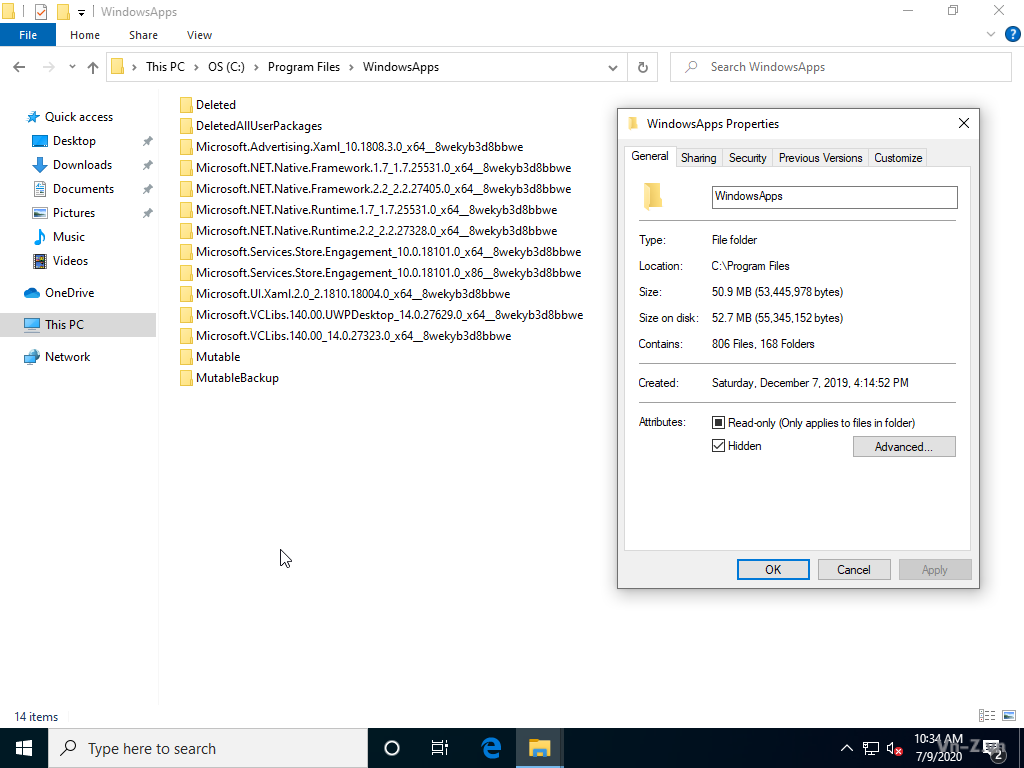
Bonus1: Hướng dẫn xóa Windows Apps
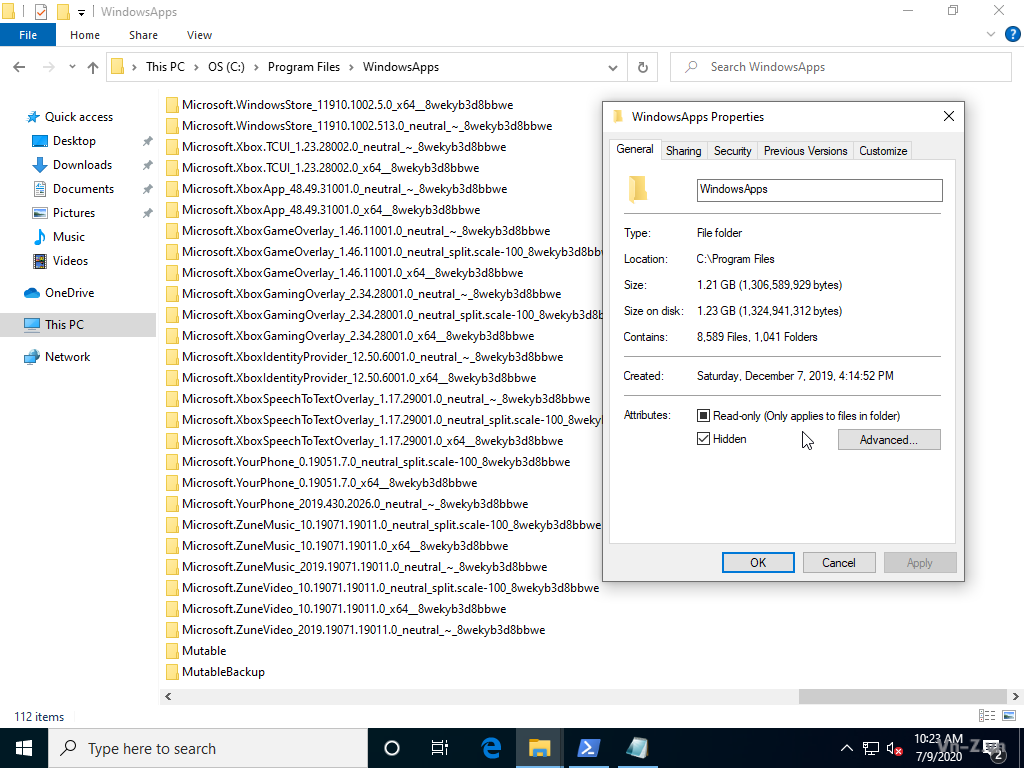
Bước 1: Review

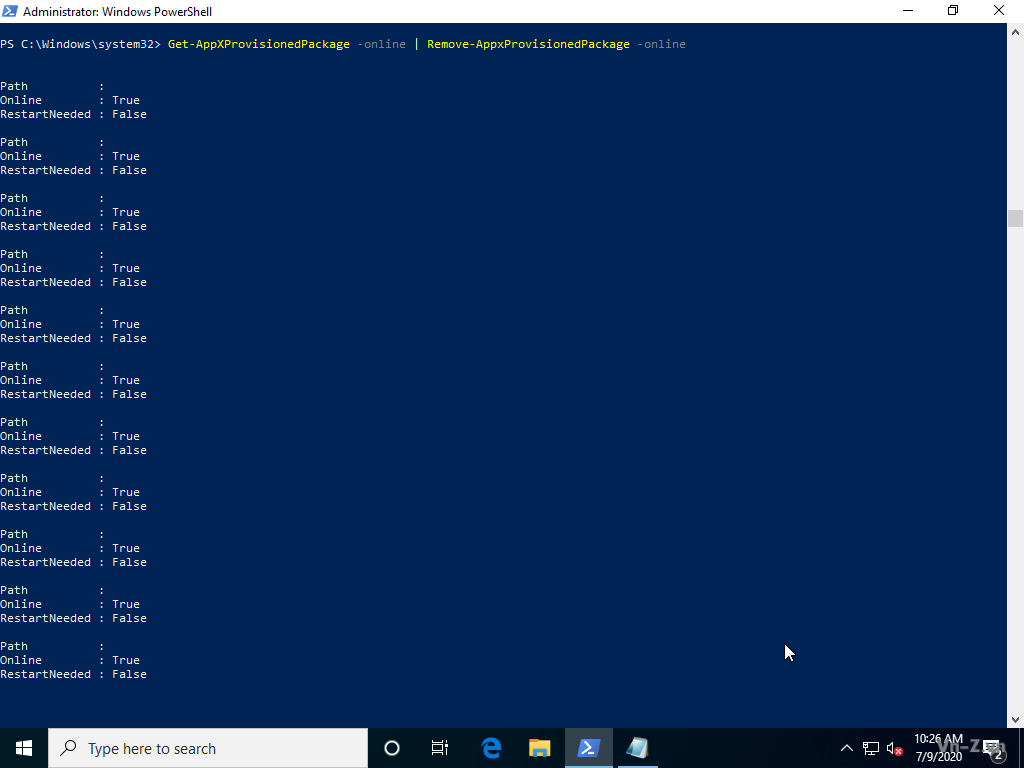
Bước 2: Mở Windows PowerShell với quyền Administrator
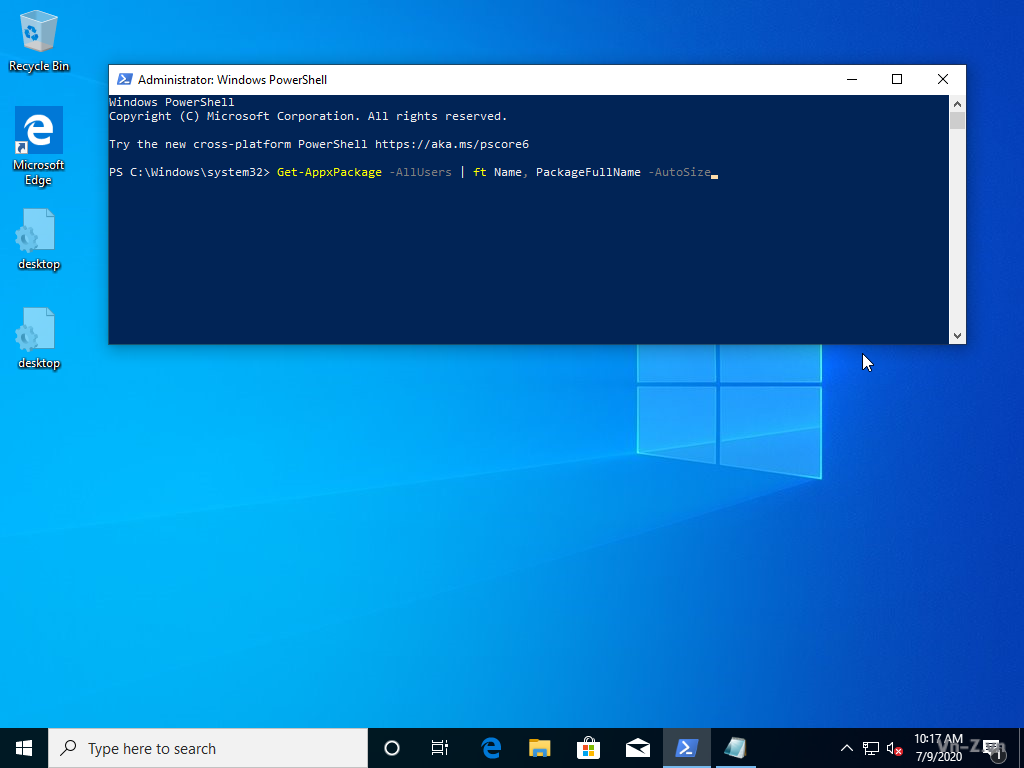
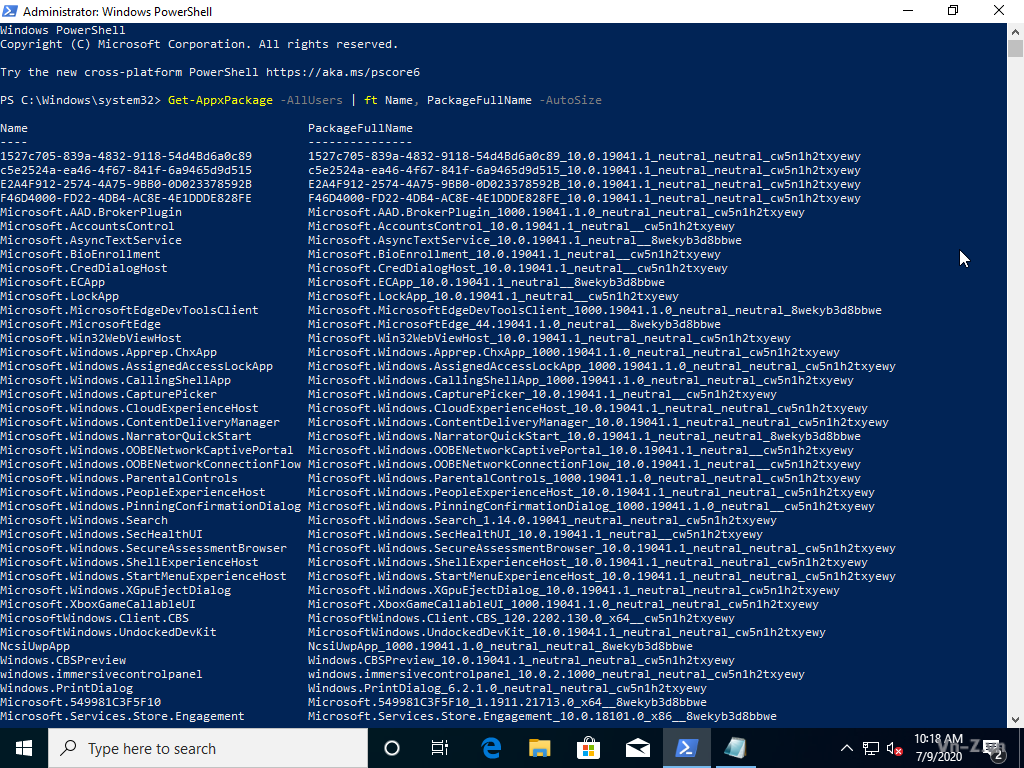
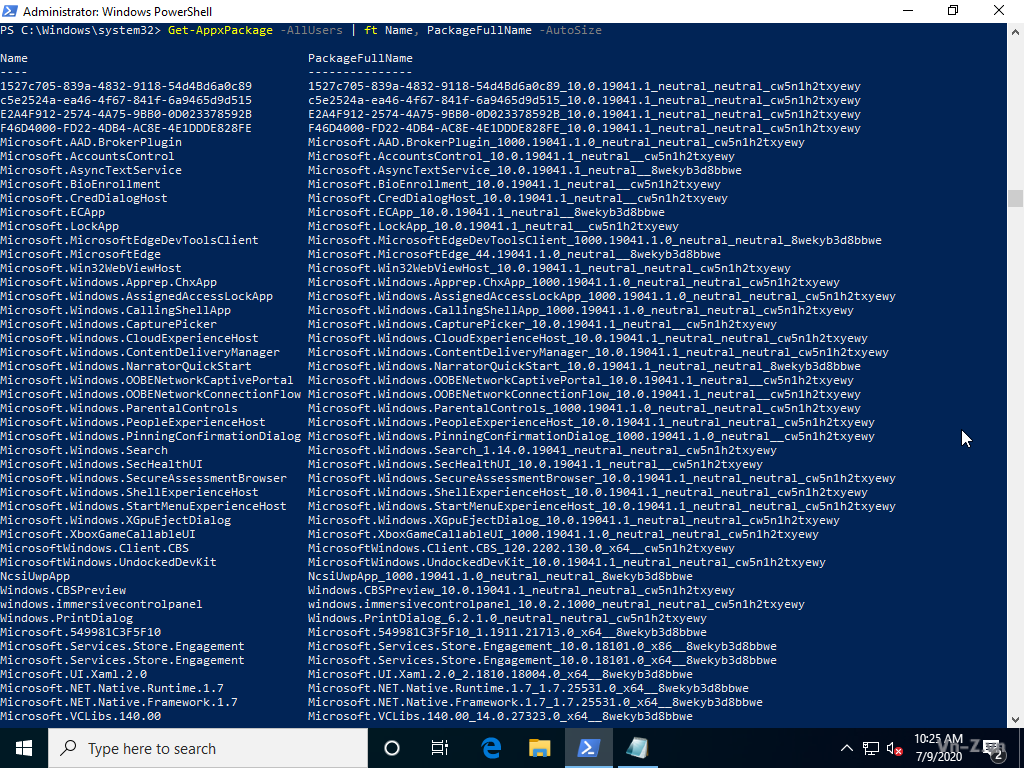
Bước 3: Review Windows Apps
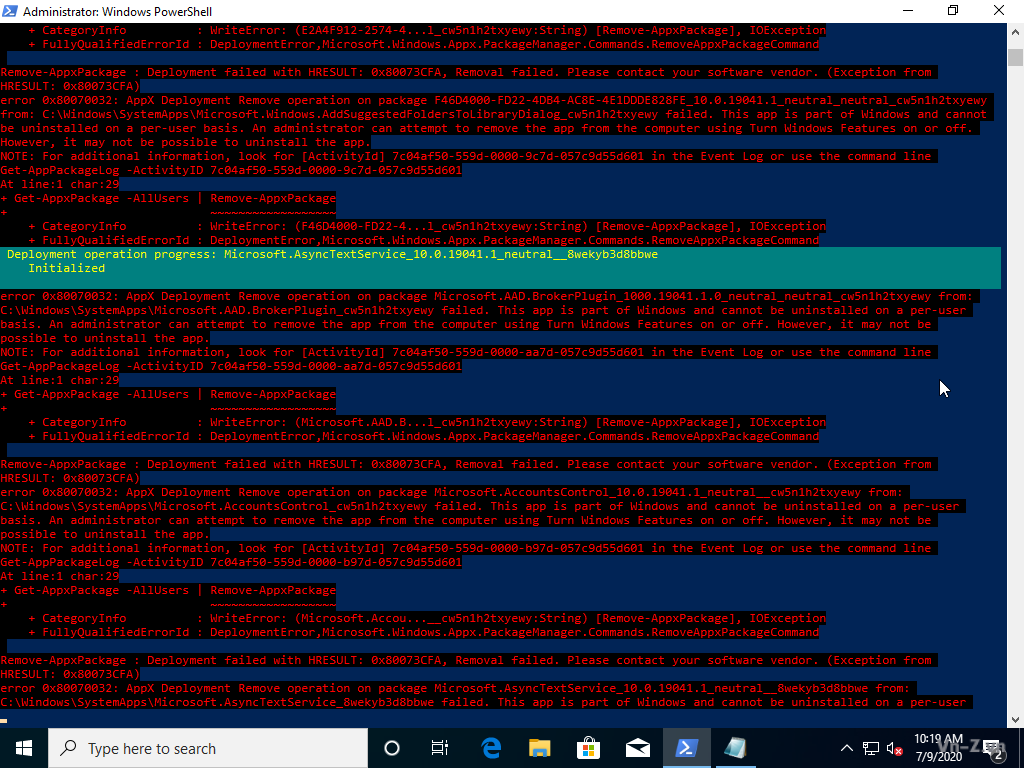
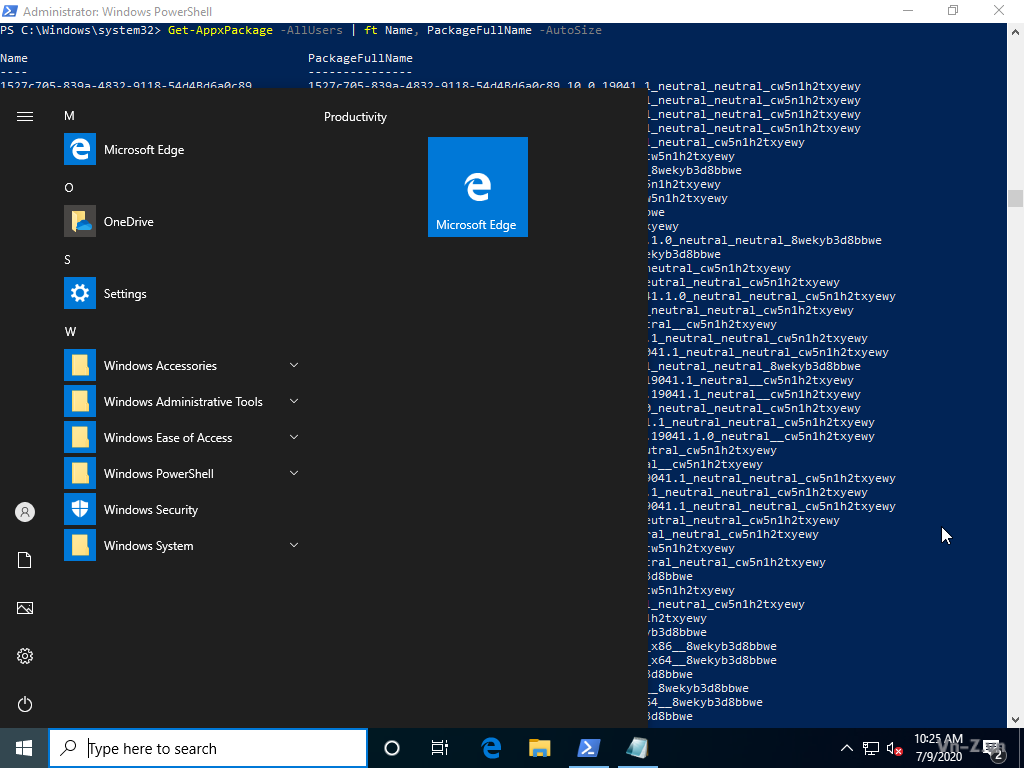
Bước 4: Xóa all apps ở all users
Sau khi xóa dung lượng folder WindowsApps không thay đổi, chứng tỏ các Apps này nó vẫn nằm trong ổ cứng. Lệnh xóa này chỉ gỡ các Apps khỏi Start Menu ở tất cả các user hiện có trong máy.
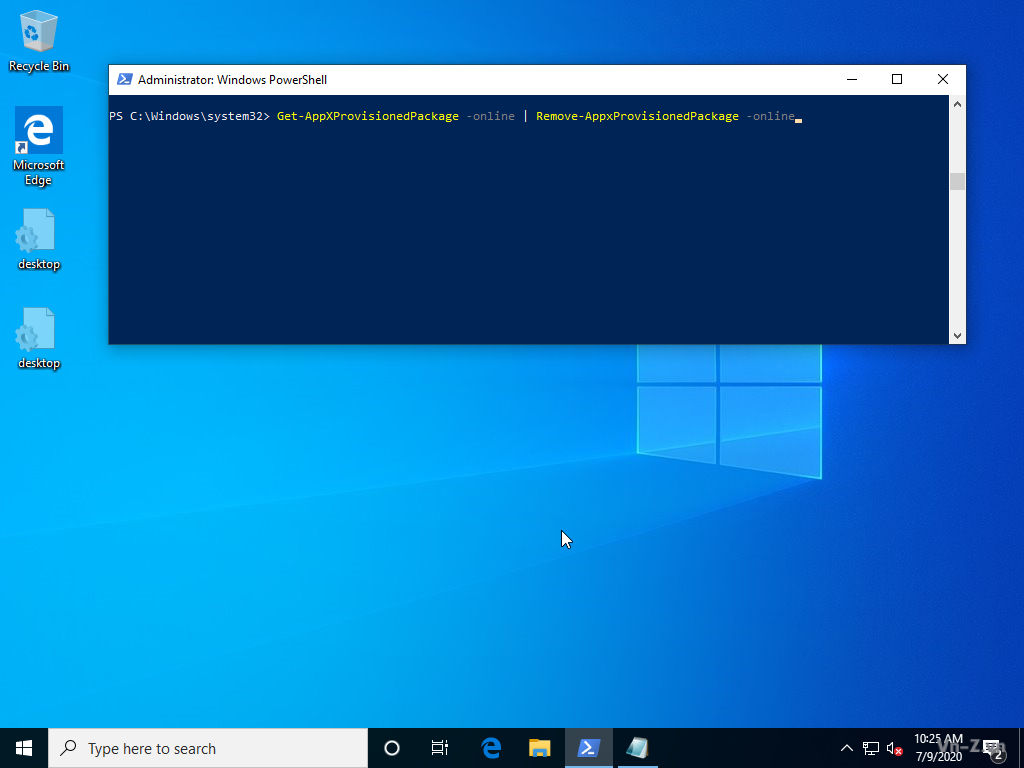
Bước 5: Xóa (deleted) hẳn các Apps.
Dung lượng còn lại sau khi xóa hẳn.
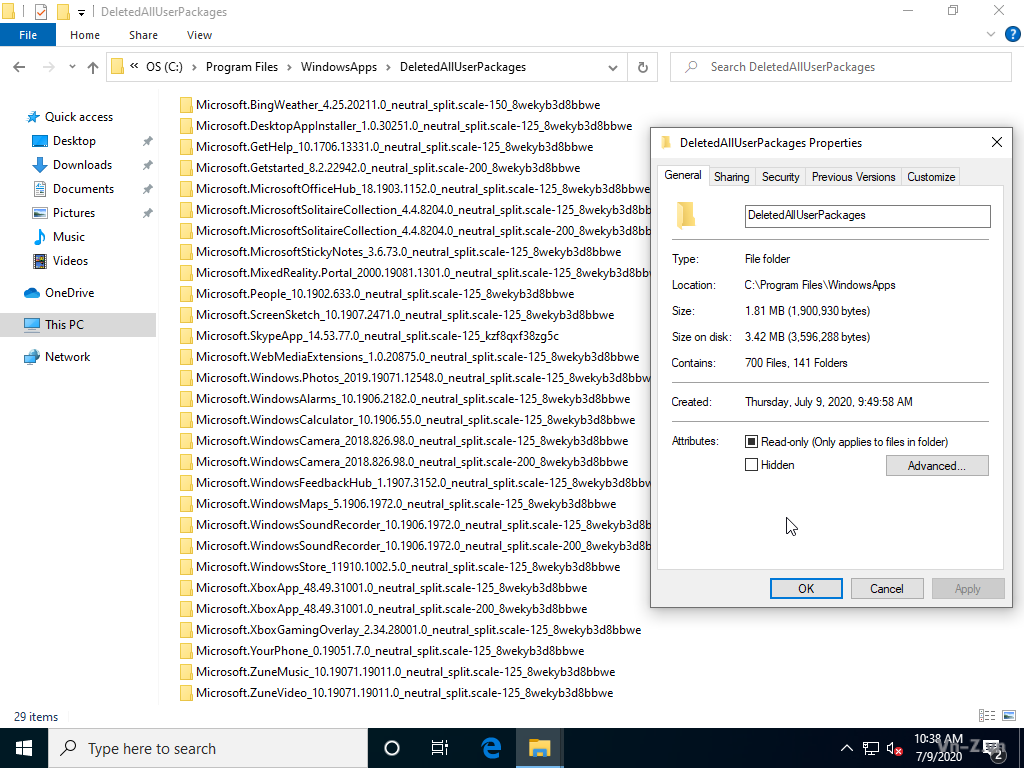
Deleted All User Packages
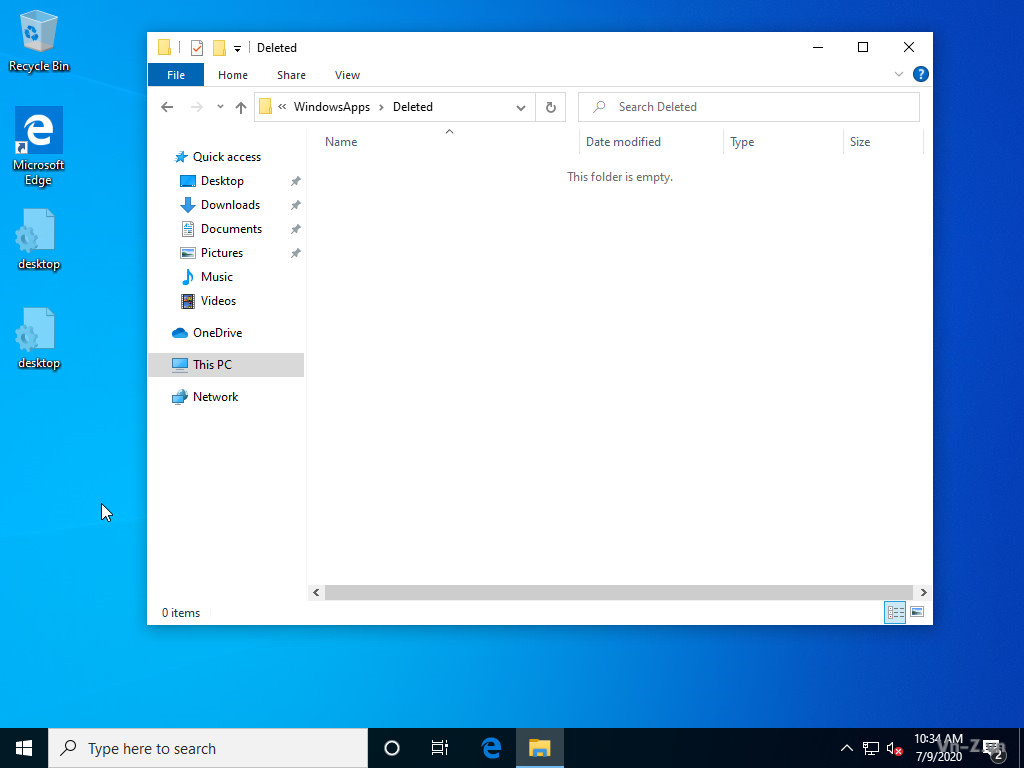
Folder Deleted trống.
Successful !
Sau khi xóa hẳn các Apps rồi thì bạn có thể đóng gói lại và triển khai ở máy tính mới. Tại máy tính mới đó sẽ không có Windows Apps. Nếu muốn có lại thì các bạn cài lại Store, sau đó vào Store cài những Apps bạn muốn. Cách cài Store giống hệt như khi cài Store cho Windows 10 LTSC.
Bước 2: Mở Windows PowerShell với quyền Administrator
Bước 3: Review Windows Apps
Bước 4: Xóa all apps ở all users


Sau khi xóa dung lượng folder WindowsApps không thay đổi, chứng tỏ các Apps này nó vẫn nằm trong ổ cứng. Lệnh xóa này chỉ gỡ các Apps khỏi Start Menu ở tất cả các user hiện có trong máy.
Bước 5: Xóa (deleted) hẳn các Apps.
Dung lượng còn lại sau khi xóa hẳn.
Deleted All User Packages
Folder Deleted trống.
Successful !
Sau khi xóa hẳn các Apps rồi thì bạn có thể đóng gói lại và triển khai ở máy tính mới. Tại máy tính mới đó sẽ không có Windows Apps. Nếu muốn có lại thì các bạn cài lại Store, sau đó vào Store cài những Apps bạn muốn. Cách cài Store giống hệt như khi cài Store cho Windows 10 LTSC.
Mã:
https://manhpc.com/huong-dan-go-bo-ung-dung-windows-apps/Bonus2: Hướng dẫn cấu hình file trả lời tự động
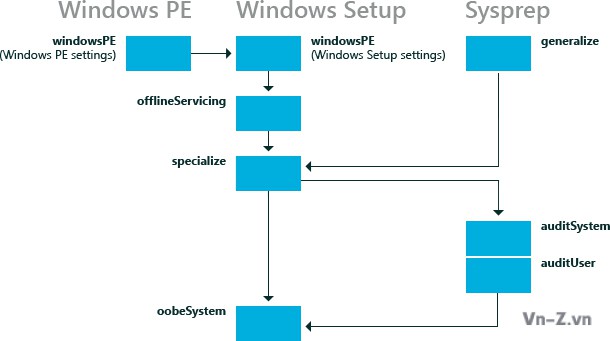
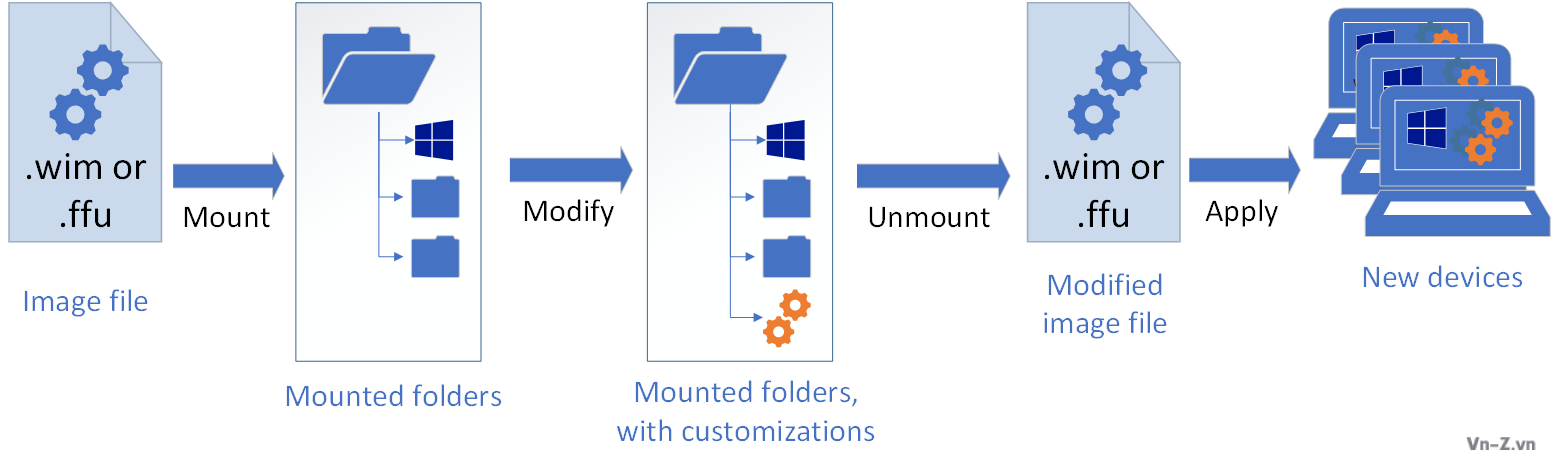
Để làm được ra file trả lời tự động thì trước hết các bạn phải hiểu rõ được quá trình windows được cài đặt như nào? Quá trình cài Windows được mô tả như trong hình bên dưới:
Khái niệm của Microsoft:
Chi tiết các pass: windowsPE, offlineServicing, specialize, generalize, auditSystem, auditUser, oobeSystem là gì các bạn đọc tại link: https://docs.microsoft.com/en-us/windows-hardware/manufacture/desktop/how-configuration-passes-work
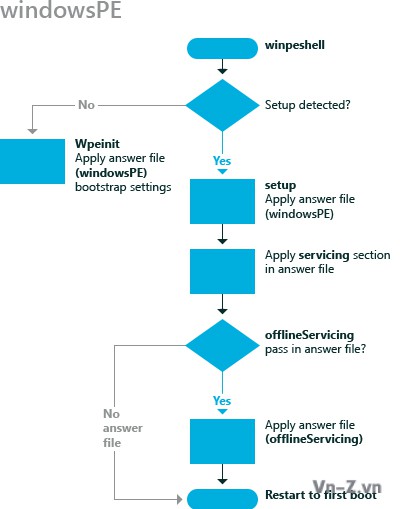
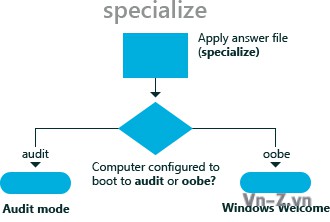
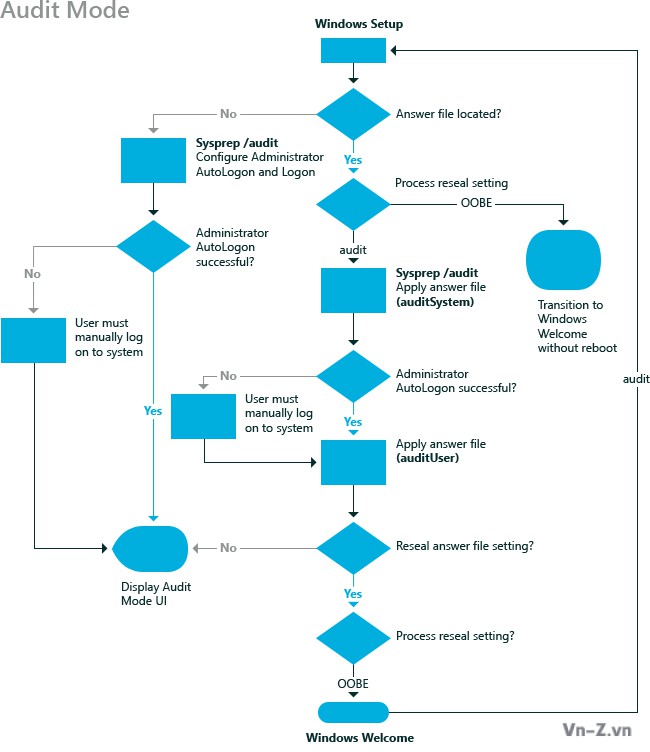
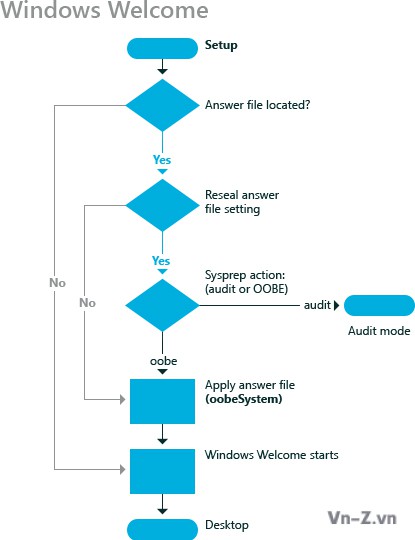
Một số hình ảnh về chi tiết vê các Configuration Passes:
Pass 1 WindowsPE:
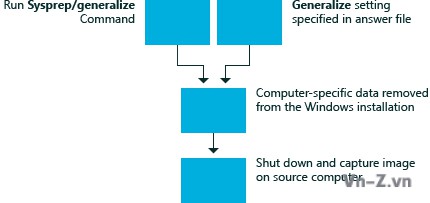
Pass 3 Generalize:
Offline-servicing
Pass 4 Specialize:
Auditmode:
Pass 7 OobeSystem:
Khái niệm của Microsoft:
Configuration passes are the phases of a Windows® installation during which you can customize an image. Windows unattended installation settings can be applied in one or more configuration passes, depending on the setting you use. Understanding how and when configuration passes run is very important in developing a Windows deployment strategy.
Chi tiết các pass: windowsPE, offlineServicing, specialize, generalize, auditSystem, auditUser, oobeSystem là gì các bạn đọc tại link: https://docs.microsoft.com/en-us/windows-hardware/manufacture/desktop/how-configuration-passes-work
Một số hình ảnh về chi tiết vê các Configuration Passes:
Pass 1 WindowsPE:
Pass 3 Generalize:
Offline-servicing
Pass 4 Specialize:
Auditmode:
Pass 7 OobeSystem:
Hầu hết các bạn chuyên gia đều đã quen thuộc với Sysprep, hay còn được gọi chính thức là Công cụ chuẩn bị hệ thống Windows (Windows System Preparation Tool), lần đầu tiên nó được giới thiệu ở Windows NT 4.0. Nó được dùng cho cả Windows client và Windows Server để tạo ra một ảnh cài đặt tùy chỉnh của hệ điều hành.
Một số tính năng chính của sysprep:
Sysprep giúp bạn giải quyết các mục tiêu kinh doanh như:
Một số tính năng chính của sysprep:
- Xóa thông tin dành riêng cho PC ra khỏi Windows Image, bao gồm cả số nhận dạng bảo mật (SID) của máy. Điều này cho phép bạn capture và apply nó cho các máy tính khác. Điều này được gọi là generalizing máy tính.
- Gỡ cài đặt trình điều khiển dành riêng cho máy tính ra khỏi Windows Image.
- Chuẩn bị máy tính để giao cho khách hàng bằng cách cài đặt máy tính khởi động vào OOBE.
- Cho phép bạn thêm cài đặt tệp trả lời tự động (không cần cài đặt) vào cài đặt hiện có.
Sysprep giúp bạn giải quyết các mục tiêu kinh doanh như:
- Giúp bạn quản lý nhiều PC bằng cách tạo một hình ảnh chung có thể được sử dụng trên nhiều phần cứng.
- Triển khai các máy tính bằng cách chụp và triển khai hình ảnh với các số nhận dạng bảo mật (SID) duy nhất.
- Tinh chỉnh thiết lập của từng máy tính bằng cách thêm vào ứng dụng, ngôn ngữ hoặc trình điều khiển trong chế độ audit mode. Để biết thêm thông tin bạn xem tại link: https://docs.microsoft.com/en-us/windows-hardware/manufacture/desktop/audit-mode-overview
- Cung cấp các máy tính đáng tin cậy hơn bằng cách thử nghiệm ở chế độ audit mode trước khi giao chúng cho khách hàng.
Trong phần này mình sẽ hướng dẫn bằng 2 cách là dùng giao diện và dùng trực tiếp file mẫu từ microsoft.
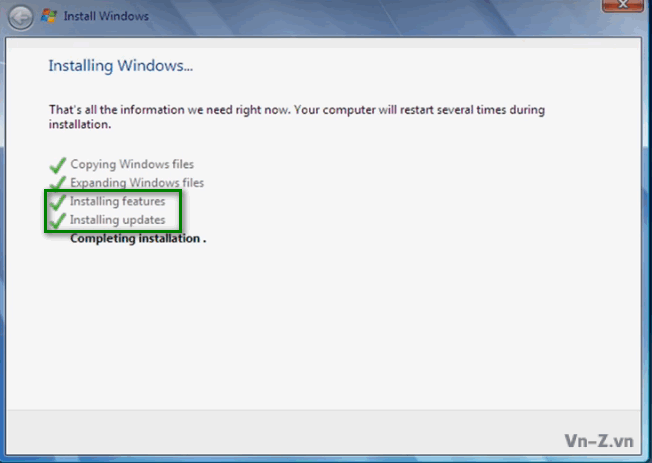
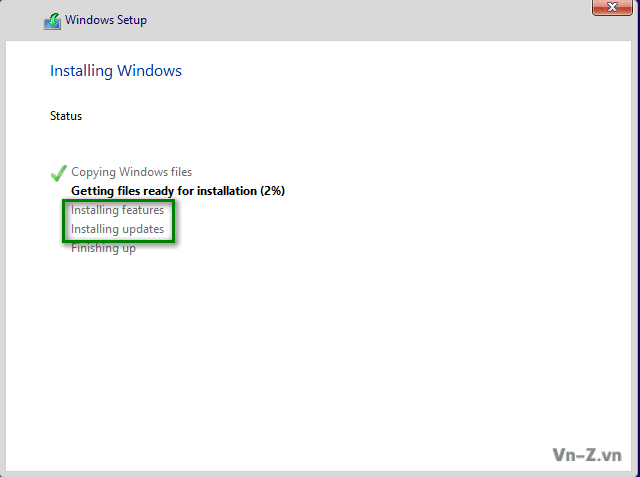
Quá trình cài đặt Windows được thực hiện trong ba giai đoạn:
- Khởi động từ phương tiện cài đặt, chạy Windows Setup (khi hoàn tất bắt buộc phải khởi động lại)
- Cấu hình thiết bị phần cứng (2 lần khởi động lại)
- Windows Welcome (OOBE)
Trong quá trình cài đặt sạch thông thường, thì cần có sự tương tác của người dùng trong giai đoạn 1 và 3, giai đoạn 2 được chạy tự động mà không cần sự tương tác của người cài. Trong giai đoạn 1, người dùng chọn cài đặt ngôn ngữ và bố cục bàn phím cho quá trình cài và tài khoản hệ thống, nhập key cho phiên bản cụ thể hoặc chọn phiên bản theo cách thủ công và chấp nhận giấy phép nếu key không được nhập ở giai đoạn này, đồng thời chọn đĩa và phân vùng để cài đặt Windows. Khi giai đoạn 1 hoàn tất, Windows khởi động lại sang giai đoạn 2 được thực hiện mà không cần có sự tương tác của người dùng và khi sẵn sàng sẽ tự động khởi động lại giai đoạn 3.
Trong giai đoạn 3, người dùng chọn cài đặt khu vực và ngôn ngữ cho tài khoản người dùng, tạo tài khoản người dùng quản trị ban đầu, cài đặt quyền riêng tư và tài khoản khác và cuối cùng khởi động vào máy tính để bắt đầu sử dụng.
Để hoàn toàn tự động cài đặt Windows 10 chúng ta cần chuẩn bị các tệp trả lời được gọi là tệp trả lời tự động cho cả Windows Setup (giai đoạn 1) và Windows Welcome (OOBE, giai đoạn 3). Để tìm hiểu chi tiết về file trả lời bạn đọc thêm trong link: https://docs.microsoft.com/en-us/previous-versions/windows/it-pro/windows-vista/cc749113(v=ws.10)
Trong bài này, mình sẽ tạo một tệp trả lời có tên autounattend.xml, khi được thêm vào thư mục gốc của file ISO, ổ USB và ổ DVD thì nó sẽ tự động xử lý vùng tài khoản hệ thống Windows, lựa chọn bàn phím, chấp nhận giấy phép, xóa sạch đĩa cứng, phân vùng lại theo ý muốn của người dùng và cuối cùng bắt đầu Thiết lập Windows. Bài viết này khá dài và có thể trông phức tạp nếu bạn chưa từng làm việc này, nhưng bạn có thể thao tác rất nhanh chóng và dễ dàng.
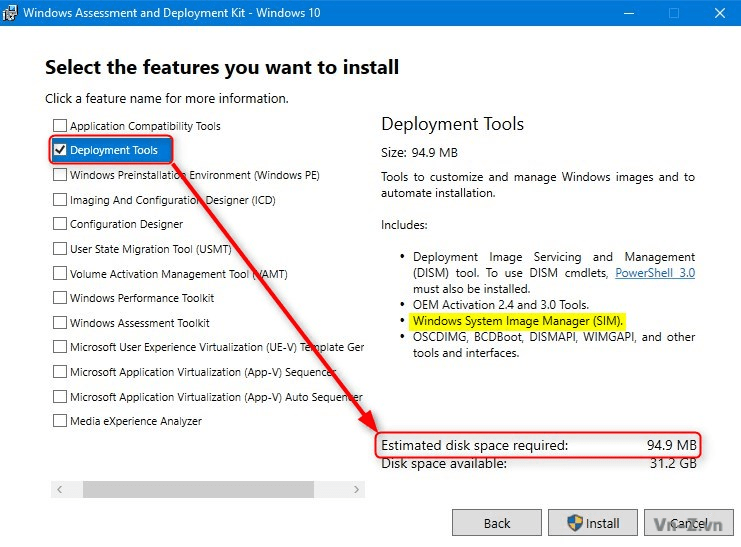
Để bắt đàu bạn cần cài Windows 10 ADK (Assesment and Deployment Kit) để tạo file autounattend.xml: https://docs.microsoft.com/en-us/windows-hardware/get-started/adk-install
Trong bộ Windows 10 ADK này có rất nhiều công cụ nhưng công cụ mà chúng ta cần để tạo file là Windows SIM (System Image Manager):
Sau khi cài đặt bạn mở nó lên bằng cách: Start > W > Windows Kits > Windows System Image Manager.
1. Distribution Share
2. Windows Image
3. Answer File
4. Properties
5. Messages
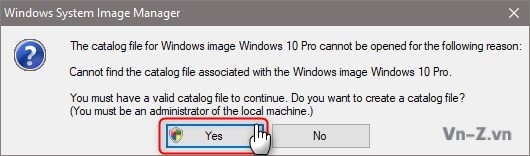
Trong bài viết này, chúng ta sẽ làm việc với các ô từ 2 đến 5. Để bắt đầu, chúng ta cần tạo một catalog file. Catalog file là tệp nhị phân có phần mở rộng .clg, bên trong có chứa các cài đặt cho một phiên bản Windows cụ thể. Catalog file không bắt buộc để cài đặt Windows, nhưng chúng rất cần thiết khi tạo tệp trả lời. Catalog file có thể được tạo bằng tệp install.wim của Windows 10.
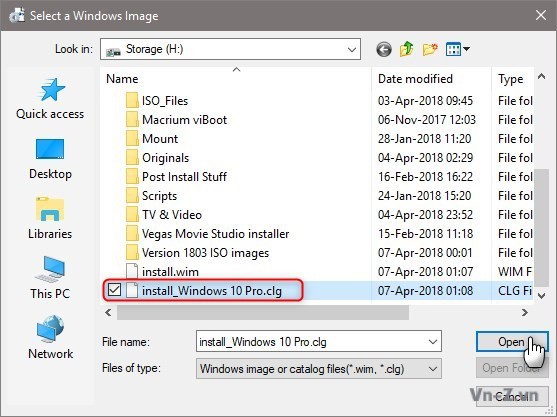
Để tạo catalog file, bạn hãy copy tệp install.wim từ phương tiện cài đặt Windows 10 vào đĩa cứng hoặc ổ đĩa flash USB (không thể tạo catalog file từ tệp WIM không cho phép ghi). Chọn File > New Answer File, Click Yes và tìm đến file install.wim file:
Click Yes
Các catalog file được tạo trong cùng một thư mục chứa tệp install.wim ban đầu. Chúng có thể tái sử dụng, bạn chỉ cần tạo catalog file một lần, để làm việc với các tệp trả lời bổ sung, bạn có thể chỉ cần chọn catalog file thay vì tạo một file mới từ file WIM.
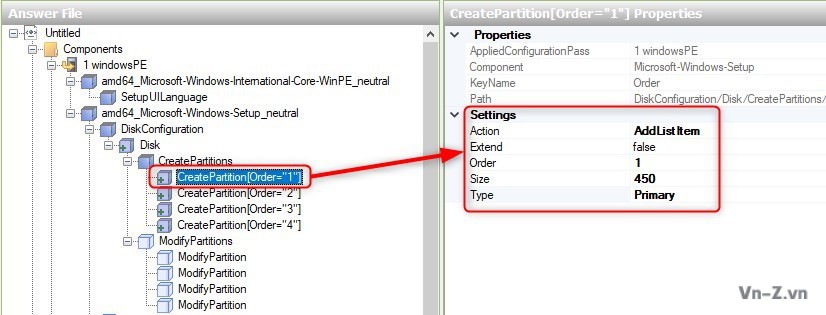
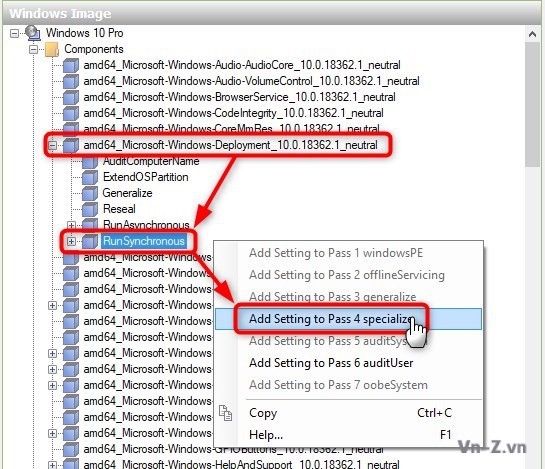
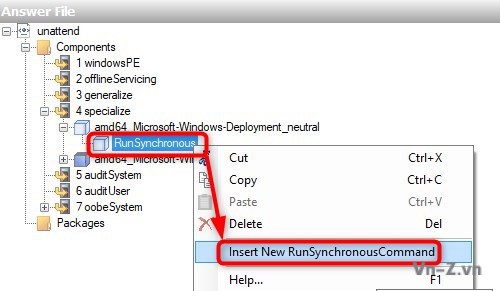
Thêm components vào file trả lời autounattend.xml
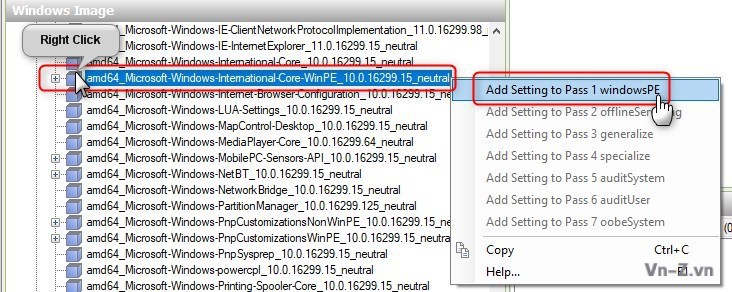
Trên Windows Image dưới cùng bên trái, mở rộng Components. Click phải chuột lên Microsoft-Windows-International-Core-WinPE, thêm nó vào configuration Pass 1 WindowsPE:
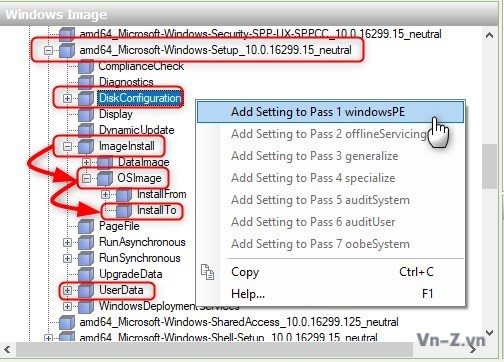
Tiếp theo, mở rộng Microsoft-Windows-Setup trên Windows Image pane. Thêm thành phần DiskConfiguration vào Pass 1 bằng cách click phải chuột DiskConfiguration và lựa chọn Add Setting to Pass 1, mở rộng ImageInstall > OSImage và thêm InstallTo vào Pass 1, và thêm thành phần UserData vào Pass 1.
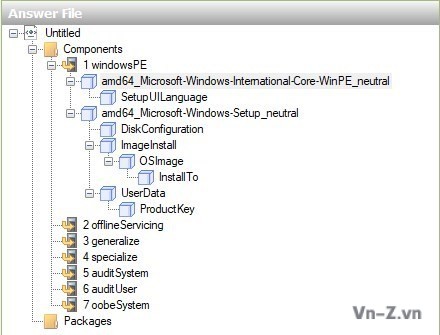
Ô file trả lời ở trên cùng giữa bây giờ sẽ trông như thế này khi tất cả các thành phần đã được mở rộng:
Thiết lập vùng và ngôn ngữ
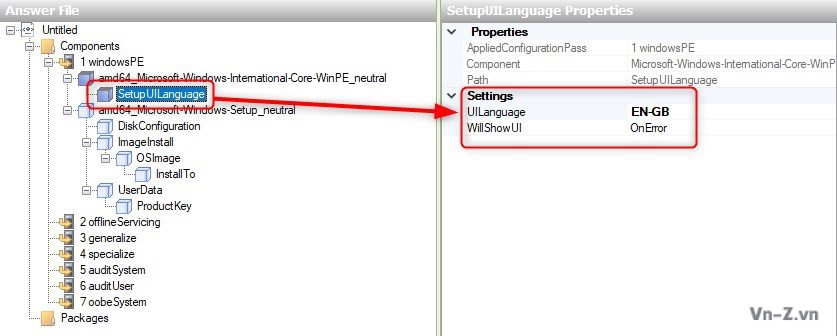
Trước tiên, chúng ta sẽ thêm ngôn ngữ hiển thị Windows UI bao gồm ngôn ngữ cài đặt và bố cục bàn phím. Lựa chọn Microsoft-Windows-International-Core-WinPE trên ô Answer File, chỉnh sửa các thuộc tính của nó ở panel trên cùng bên phải.
Brazil – Portuguese > 0416:00000416, pt-BR
Canada – English > 1009:00000409, en-CA
Canada – French > 0c0c:00011009, fr-CA
France – French > 040c:0000040c, fr-FR
Germany – German > 0407:00000407, de-DE
UK – English > 0809:00000809, en-GB
USA – English > 0409:00000409, en-US
Default Input Profiles: https://docs.microsoft.com/en-gb/wi...ault-input-locales-for-windows-language-packs
Tiếp theo, chúng ta mở rộng Microsoft-Windows-International-Core-WinPE bên trong ô Answer File, chọn SetupUILanguage, và thiết lập thuộc tính properties cho UILanguage.
Phân vùng đĩa cứng
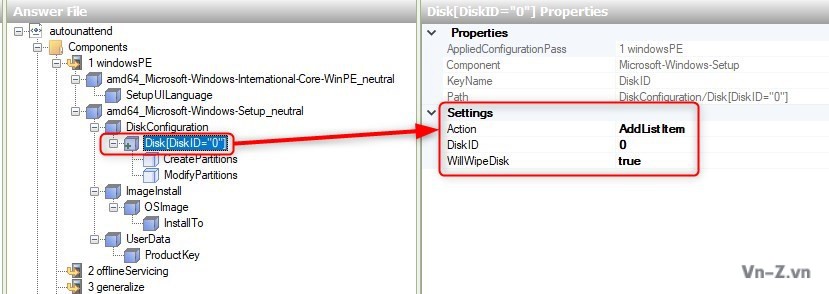
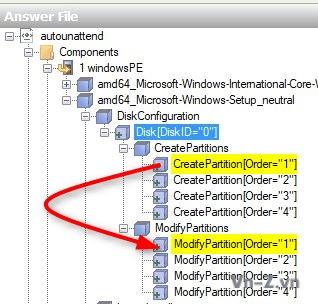
Click phải chuột lên DiskConfiguration bên dưới Microsoft-Windows-Setup trong ô Answer File, sau đó chọn Insert New Disk
Tiếp theo, chọn đĩa mới trong ô Answer File và chỉnh sửa các thuộc tính của nó. DiskID cho biết đĩa cứng nào sẽ được Windows Setup sử dụng để cài Windows, trong đó DiskID 0 là primary disk (DiskID 1 = ổ cứng thứ 2, ....). Đặt giá trị WillWipeDisk thành TRUE để xóa toàn bộ đĩa cứng khi cài Windows. Việc này cũng tương tự bạn thức hiện lệnh DISKPART > SEL DISK 0 > CLEAN.
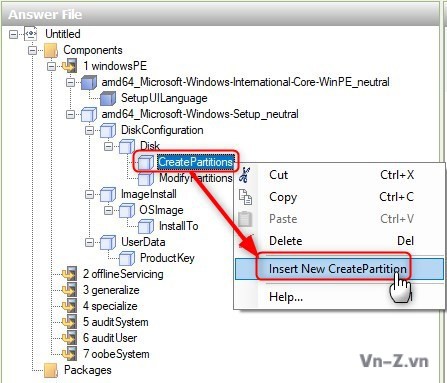
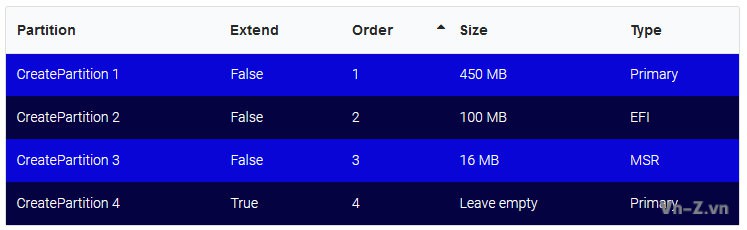
Tiếp theo chúng ta sẽ phân vùng đĩa cứng. Khi bạn cài Windows trên hệ thống GPT partitioned / UEFI system thì chúng ta cần 4 phân vùng: WinRE, EFI, MSR, Windows. Còn khi cài trên MBR / BIOS system thi cần duy nhất 2 phân vùng là: System Reserved và Windows. Nhấn phải chuột lên CreatePartitions, sau đó chọn Insert New CreatePartition.
Lặp lại các bước này để tạo bốn phân vùng khi bạn cài đặt GPT / UEFI hoặc hai phân vùng khi cài đặt MBR / BIOS.
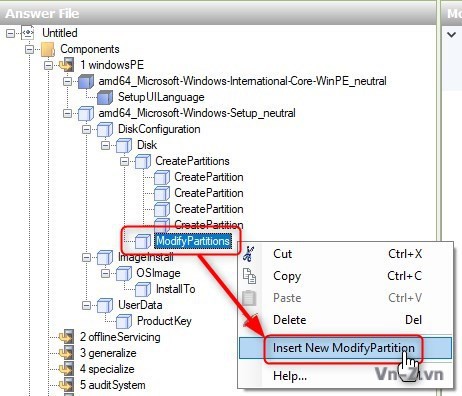
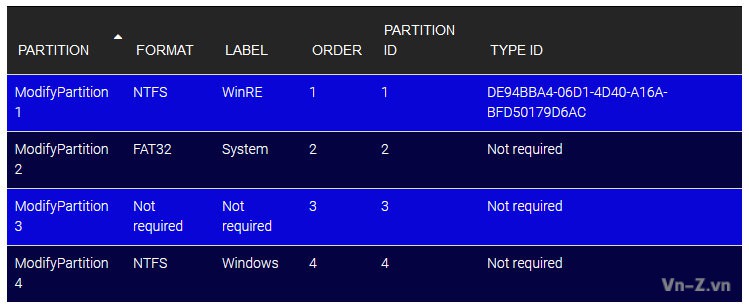
Thao tác bên trên chỉ tạo mới các phân vùng. Còn để cho Windows Setup biết định dạng mỗi phân vùng là gì thì chúng ta phải định dạng nó bằng cách thêm ModifyPartition vào mỗi phân vùng đã được thêm ở trên. Nhấn phải chuột vào Modify Partitions bên trong ô Answer File chọn Insert New ModifyPartition.
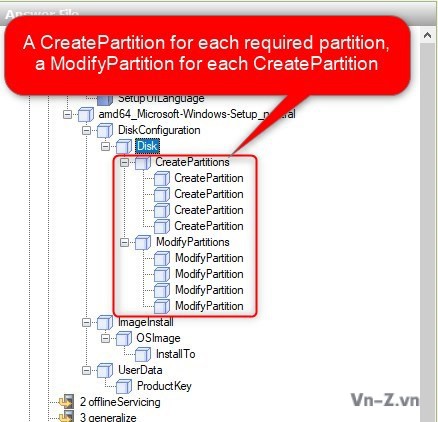
Lặp lại bước này cho đến khi mỗi 1 ModifyPartition tương ứng với 1 CreatePartition.
Bây giờ lần lượt lựa chọn từng CreatePartition bên trong ô Answer File và chỉnh sửa các thuộc tính của nó như hình bên dưới (GPT partitions).
Chỉnh sửa giá trị CreatePartition trên MBR disk
Giá trị Extend = TRUE cho partition 4 (GPT disk) hoặc partition 2 (MBR disk) (Windows partition), có ngĩa là hệ thống sẽ sử dụng toàn bộ dung lượng ổ cứng còn lại để tạo phân vùng cài Windows sau khi các phân vùng hệ thống được tạo. Nếu bạn muốn tạo phân vùng dữ liệu, bạn sẽ cần phải đặt kích thước cụ thể cho phân vùng cài Windows và sau đó thêm phân vùng bổ sung (ngay bây giờ hoặc sau khi cài xong Windows). Chỉ duy nhất phân vùng cuối cùng hoặc ngoài cùng bên phải thì bạn có thể set được extend.
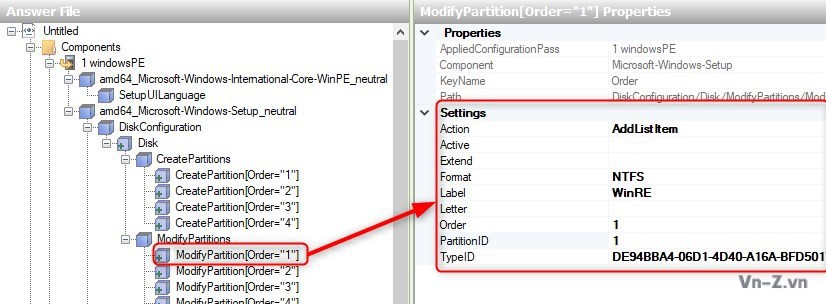
Tiếp theo chúng ta cần chỉnh sửa thuộc tính ModifyPartition cho mỗi CreatePartition như bảng bên dưới (GPT partitions).
Chú ý phân vùng 3 với dung lượng 16 MB (GPT disk), MSR hoặc Microsoft Reserved Partition bạn không định dạng hay đặt tên cho nó. Ví dụ bên dưới mình chỉnh sửa một ModifyPartition mẫu và hiển thị các thuộc tính cho phân vùng WinRE
Giá trị ModifyPartition cho MBR disk
Với ổ cứng MBR bạn cần phải active phân vùng 1: System Reserved partition. Để tạo thêm phân vùng dữ liệu bạn cần đặt giá trị EXTEND cho phân vùng Windows là FALSE, và đặt dung lượng cụ thể cho nó. Nếu bạn không muốn tạo phân vùng chứa data trên đĩa cứng này thì bạn set EXTEND = TRUE và khi đó Windows sẽ sử dụng toàn bộ phân vùng trống còn lại sau khi tạo xong phân vùng hệ thống.
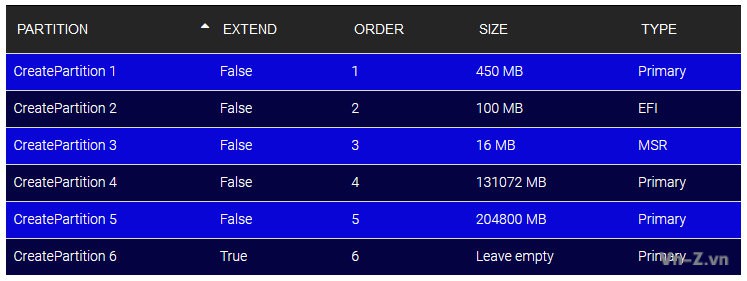
Bên dưới là 1 ví dụ khi sử dụng answer file ổ cứng GPT. Chúng ta sẽ tạo tạo phân vùng Windows có dung lượng là 128 GB (131.072 MB), phân vùng Dữ liệu là 200 GB (204.800), sau đó sử dụng phần còn lại của ổ cứng cho phân vùng Games. Trong trường hợp này chúng ta sẽ cần tạo 6 CreatePartitions và 6 ModifyPartitions và thiết lập thuộc tính như hình bên dưới.
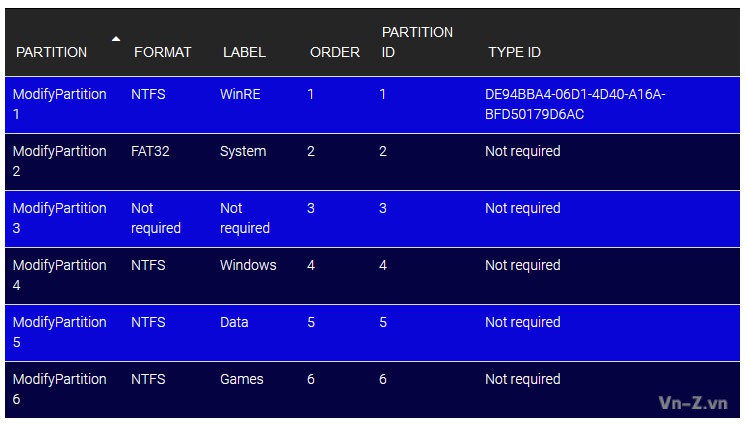
Giá trị ModifyPartition cho 6 phân vùng sẽ hiển thị như bản bên dưới
Có 1 điều quan trọng mà bạn cần phải nhớ ở đây là ứng với mỗi CreatePartition được tạo thì bạn cần thiết lập thuộc tính ModifyPartition tương ứng.
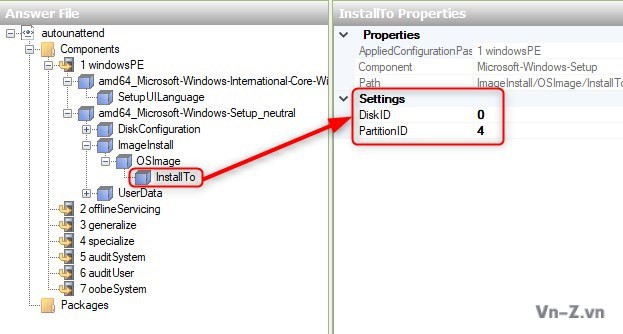
Cuối cùng là chúng ta báo cho Windows Setup biết nơi sẽ cài Windows. Mở rộng Microsoft-Windows-Setup > ImageInstall> OSImage ô Answer File, sau đó chọn InstallTo. Đặt thuộc tính cho nó là DiskID = 0 (nếu cài đặt vào đĩa cứng chính), PartitionID = 4 (GPT / UEFI) hoặc PartitionID = 2 (MBR / BIOS)
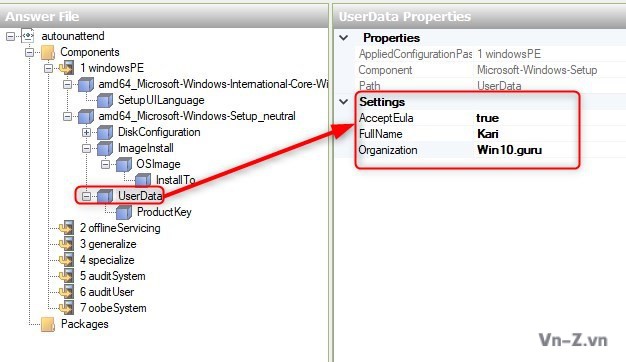
User Data & Product Key
Để thiết lập thuộc tính này chúng ta vào Microsoft-Windows-Setup > UserData:
Điều cuối cùng mà file trả lời tự động cần là product key. Bạn có thể sử dụng bất kỳ product key số lượng lớn nào nếu có hoặc chỉ đơn giản là generic key. Nếu bạn sử dụng generic key, Windows sẽ tự động được kích hoạt khi được cài đặt nếu máy có giấy phép kỹ thuật số hợp lệ cho phiên bản Windows 10 đó. Nếu không, việc kích hoạt phải được thực hiện theo cách thủ công với product key hợp lệ sau khi cài xong.
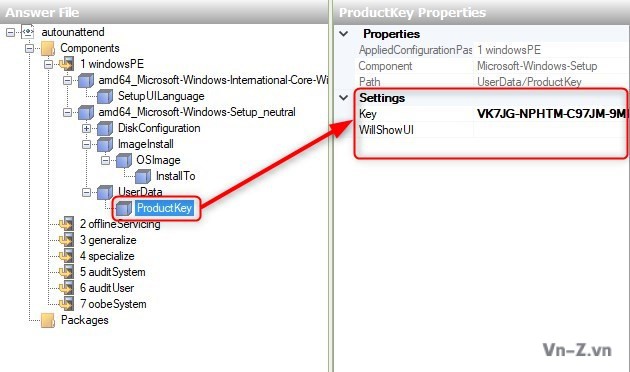
Mở rộng Microsoft-Windows-Setup > UserData, chọn ProductKey. Nhập key:
Bên dưới là 1 số generic product keys mà bạn có thể thêm vào file autounattend.xml:
+ Windows 10 Home Single Language: 7HNRX-D7KGG-3K4RQ-4WPJ4-YTDFH
+ Windows 10 Home: TX9XD-98N7V-6WMQ6-BX7FG-H8Q99
+ Windows 10 Pro: VK7JG-NPHTM-C97JM-9MPGT-3V66T
Với các phiên bản Education, Enterprise và Server bạn xem tại đây:https://docs.microsoft.com/en-us/pr...ows-server-2012-R2-and-2012/jj612867(v=ws.11)
Note: Đây là những key để cài chứ không phải key để activate.
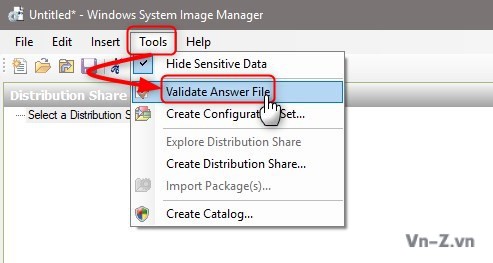
Tiếp theo, bạn phải xác thực nó để xem nó có bất kỳ lỗi nào không:
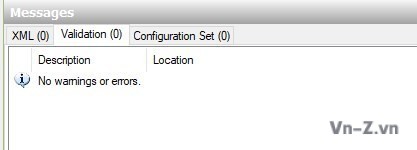
Kiểm tra Messages ở ô dưới cùng ở giữa. Nếu không có cảnh báo, bạn hãy lưu file trả lời dưới dạng autounattend.xml (File > Save As).
Bạn đưa file autounattend.xml vào ngang hàng với file setup.exe trong bộ cài để sử dụng nó.
- Khởi động từ phương tiện cài đặt, chạy Windows Setup (khi hoàn tất bắt buộc phải khởi động lại)
- Cấu hình thiết bị phần cứng (2 lần khởi động lại)
- Windows Welcome (OOBE)
Trong quá trình cài đặt sạch thông thường, thì cần có sự tương tác của người dùng trong giai đoạn 1 và 3, giai đoạn 2 được chạy tự động mà không cần sự tương tác của người cài. Trong giai đoạn 1, người dùng chọn cài đặt ngôn ngữ và bố cục bàn phím cho quá trình cài và tài khoản hệ thống, nhập key cho phiên bản cụ thể hoặc chọn phiên bản theo cách thủ công và chấp nhận giấy phép nếu key không được nhập ở giai đoạn này, đồng thời chọn đĩa và phân vùng để cài đặt Windows. Khi giai đoạn 1 hoàn tất, Windows khởi động lại sang giai đoạn 2 được thực hiện mà không cần có sự tương tác của người dùng và khi sẵn sàng sẽ tự động khởi động lại giai đoạn 3.
Trong giai đoạn 3, người dùng chọn cài đặt khu vực và ngôn ngữ cho tài khoản người dùng, tạo tài khoản người dùng quản trị ban đầu, cài đặt quyền riêng tư và tài khoản khác và cuối cùng khởi động vào máy tính để bắt đầu sử dụng.
Để hoàn toàn tự động cài đặt Windows 10 chúng ta cần chuẩn bị các tệp trả lời được gọi là tệp trả lời tự động cho cả Windows Setup (giai đoạn 1) và Windows Welcome (OOBE, giai đoạn 3). Để tìm hiểu chi tiết về file trả lời bạn đọc thêm trong link: https://docs.microsoft.com/en-us/previous-versions/windows/it-pro/windows-vista/cc749113(v=ws.10)
Trong bài này, mình sẽ tạo một tệp trả lời có tên autounattend.xml, khi được thêm vào thư mục gốc của file ISO, ổ USB và ổ DVD thì nó sẽ tự động xử lý vùng tài khoản hệ thống Windows, lựa chọn bàn phím, chấp nhận giấy phép, xóa sạch đĩa cứng, phân vùng lại theo ý muốn của người dùng và cuối cùng bắt đầu Thiết lập Windows. Bài viết này khá dài và có thể trông phức tạp nếu bạn chưa từng làm việc này, nhưng bạn có thể thao tác rất nhanh chóng và dễ dàng.
Để bắt đàu bạn cần cài Windows 10 ADK (Assesment and Deployment Kit) để tạo file autounattend.xml: https://docs.microsoft.com/en-us/windows-hardware/get-started/adk-install
Trong bộ Windows 10 ADK này có rất nhiều công cụ nhưng công cụ mà chúng ta cần để tạo file là Windows SIM (System Image Manager):
Sau khi cài đặt bạn mở nó lên bằng cách: Start > W > Windows Kits > Windows System Image Manager.

1. Distribution Share
2. Windows Image
3. Answer File
4. Properties
5. Messages
Trong bài viết này, chúng ta sẽ làm việc với các ô từ 2 đến 5. Để bắt đầu, chúng ta cần tạo một catalog file. Catalog file là tệp nhị phân có phần mở rộng .clg, bên trong có chứa các cài đặt cho một phiên bản Windows cụ thể. Catalog file không bắt buộc để cài đặt Windows, nhưng chúng rất cần thiết khi tạo tệp trả lời. Catalog file có thể được tạo bằng tệp install.wim của Windows 10.
Để tạo catalog file, bạn hãy copy tệp install.wim từ phương tiện cài đặt Windows 10 vào đĩa cứng hoặc ổ đĩa flash USB (không thể tạo catalog file từ tệp WIM không cho phép ghi). Chọn File > New Answer File, Click Yes và tìm đến file install.wim file:
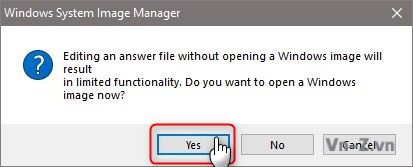
Click Yes
Các catalog file được tạo trong cùng một thư mục chứa tệp install.wim ban đầu. Chúng có thể tái sử dụng, bạn chỉ cần tạo catalog file một lần, để làm việc với các tệp trả lời bổ sung, bạn có thể chỉ cần chọn catalog file thay vì tạo một file mới từ file WIM.
Thêm components vào file trả lời autounattend.xml
Trên Windows Image dưới cùng bên trái, mở rộng Components. Click phải chuột lên Microsoft-Windows-International-Core-WinPE, thêm nó vào configuration Pass 1 WindowsPE:
Tiếp theo, mở rộng Microsoft-Windows-Setup trên Windows Image pane. Thêm thành phần DiskConfiguration vào Pass 1 bằng cách click phải chuột DiskConfiguration và lựa chọn Add Setting to Pass 1, mở rộng ImageInstall > OSImage và thêm InstallTo vào Pass 1, và thêm thành phần UserData vào Pass 1.
Ô file trả lời ở trên cùng giữa bây giờ sẽ trông như thế này khi tất cả các thành phần đã được mở rộng:
Thiết lập vùng và ngôn ngữ
Trước tiên, chúng ta sẽ thêm ngôn ngữ hiển thị Windows UI bao gồm ngôn ngữ cài đặt và bố cục bàn phím. Lựa chọn Microsoft-Windows-International-Core-WinPE trên ô Answer File, chỉnh sửa các thuộc tính của nó ở panel trên cùng bên phải.

Brazil – Portuguese > 0416:00000416, pt-BR
Canada – English > 1009:00000409, en-CA
Canada – French > 0c0c:00011009, fr-CA
France – French > 040c:0000040c, fr-FR
Germany – German > 0407:00000407, de-DE
UK – English > 0809:00000809, en-GB
USA – English > 0409:00000409, en-US
Default Input Profiles: https://docs.microsoft.com/en-gb/wi...ault-input-locales-for-windows-language-packs
Tiếp theo, chúng ta mở rộng Microsoft-Windows-International-Core-WinPE bên trong ô Answer File, chọn SetupUILanguage, và thiết lập thuộc tính properties cho UILanguage.
Phân vùng đĩa cứng
Click phải chuột lên DiskConfiguration bên dưới Microsoft-Windows-Setup trong ô Answer File, sau đó chọn Insert New Disk

Tiếp theo, chọn đĩa mới trong ô Answer File và chỉnh sửa các thuộc tính của nó. DiskID cho biết đĩa cứng nào sẽ được Windows Setup sử dụng để cài Windows, trong đó DiskID 0 là primary disk (DiskID 1 = ổ cứng thứ 2, ....). Đặt giá trị WillWipeDisk thành TRUE để xóa toàn bộ đĩa cứng khi cài Windows. Việc này cũng tương tự bạn thức hiện lệnh DISKPART > SEL DISK 0 > CLEAN.
Tiếp theo chúng ta sẽ phân vùng đĩa cứng. Khi bạn cài Windows trên hệ thống GPT partitioned / UEFI system thì chúng ta cần 4 phân vùng: WinRE, EFI, MSR, Windows. Còn khi cài trên MBR / BIOS system thi cần duy nhất 2 phân vùng là: System Reserved và Windows. Nhấn phải chuột lên CreatePartitions, sau đó chọn Insert New CreatePartition.
Lặp lại các bước này để tạo bốn phân vùng khi bạn cài đặt GPT / UEFI hoặc hai phân vùng khi cài đặt MBR / BIOS.
Thao tác bên trên chỉ tạo mới các phân vùng. Còn để cho Windows Setup biết định dạng mỗi phân vùng là gì thì chúng ta phải định dạng nó bằng cách thêm ModifyPartition vào mỗi phân vùng đã được thêm ở trên. Nhấn phải chuột vào Modify Partitions bên trong ô Answer File chọn Insert New ModifyPartition.
Lặp lại bước này cho đến khi mỗi 1 ModifyPartition tương ứng với 1 CreatePartition.
Bây giờ lần lượt lựa chọn từng CreatePartition bên trong ô Answer File và chỉnh sửa các thuộc tính của nó như hình bên dưới (GPT partitions).
Chỉnh sửa giá trị CreatePartition trên MBR disk

Giá trị Extend = TRUE cho partition 4 (GPT disk) hoặc partition 2 (MBR disk) (Windows partition), có ngĩa là hệ thống sẽ sử dụng toàn bộ dung lượng ổ cứng còn lại để tạo phân vùng cài Windows sau khi các phân vùng hệ thống được tạo. Nếu bạn muốn tạo phân vùng dữ liệu, bạn sẽ cần phải đặt kích thước cụ thể cho phân vùng cài Windows và sau đó thêm phân vùng bổ sung (ngay bây giờ hoặc sau khi cài xong Windows). Chỉ duy nhất phân vùng cuối cùng hoặc ngoài cùng bên phải thì bạn có thể set được extend.
Tiếp theo chúng ta cần chỉnh sửa thuộc tính ModifyPartition cho mỗi CreatePartition như bảng bên dưới (GPT partitions).
Chú ý phân vùng 3 với dung lượng 16 MB (GPT disk), MSR hoặc Microsoft Reserved Partition bạn không định dạng hay đặt tên cho nó. Ví dụ bên dưới mình chỉnh sửa một ModifyPartition mẫu và hiển thị các thuộc tính cho phân vùng WinRE
Giá trị ModifyPartition cho MBR disk

Với ổ cứng MBR bạn cần phải active phân vùng 1: System Reserved partition. Để tạo thêm phân vùng dữ liệu bạn cần đặt giá trị EXTEND cho phân vùng Windows là FALSE, và đặt dung lượng cụ thể cho nó. Nếu bạn không muốn tạo phân vùng chứa data trên đĩa cứng này thì bạn set EXTEND = TRUE và khi đó Windows sẽ sử dụng toàn bộ phân vùng trống còn lại sau khi tạo xong phân vùng hệ thống.
Bên dưới là 1 ví dụ khi sử dụng answer file ổ cứng GPT. Chúng ta sẽ tạo tạo phân vùng Windows có dung lượng là 128 GB (131.072 MB), phân vùng Dữ liệu là 200 GB (204.800), sau đó sử dụng phần còn lại của ổ cứng cho phân vùng Games. Trong trường hợp này chúng ta sẽ cần tạo 6 CreatePartitions và 6 ModifyPartitions và thiết lập thuộc tính như hình bên dưới.
Giá trị ModifyPartition cho 6 phân vùng sẽ hiển thị như bản bên dưới
Có 1 điều quan trọng mà bạn cần phải nhớ ở đây là ứng với mỗi CreatePartition được tạo thì bạn cần thiết lập thuộc tính ModifyPartition tương ứng.
Cuối cùng là chúng ta báo cho Windows Setup biết nơi sẽ cài Windows. Mở rộng Microsoft-Windows-Setup > ImageInstall> OSImage ô Answer File, sau đó chọn InstallTo. Đặt thuộc tính cho nó là DiskID = 0 (nếu cài đặt vào đĩa cứng chính), PartitionID = 4 (GPT / UEFI) hoặc PartitionID = 2 (MBR / BIOS)
User Data & Product Key
Để thiết lập thuộc tính này chúng ta vào Microsoft-Windows-Setup > UserData:
- AcceptEula = TRUE
- FullName = Bạn đặt tên tùy ý và có thể để trống
- Organization = Bạn đặt tên tùy ý và có thể để trống
Điều cuối cùng mà file trả lời tự động cần là product key. Bạn có thể sử dụng bất kỳ product key số lượng lớn nào nếu có hoặc chỉ đơn giản là generic key. Nếu bạn sử dụng generic key, Windows sẽ tự động được kích hoạt khi được cài đặt nếu máy có giấy phép kỹ thuật số hợp lệ cho phiên bản Windows 10 đó. Nếu không, việc kích hoạt phải được thực hiện theo cách thủ công với product key hợp lệ sau khi cài xong.
Mở rộng Microsoft-Windows-Setup > UserData, chọn ProductKey. Nhập key:
Bên dưới là 1 số generic product keys mà bạn có thể thêm vào file autounattend.xml:
+ Windows 10 Home Single Language: 7HNRX-D7KGG-3K4RQ-4WPJ4-YTDFH
+ Windows 10 Home: TX9XD-98N7V-6WMQ6-BX7FG-H8Q99
+ Windows 10 Pro: VK7JG-NPHTM-C97JM-9MPGT-3V66T
Với các phiên bản Education, Enterprise và Server bạn xem tại đây:https://docs.microsoft.com/en-us/pr...ows-server-2012-R2-and-2012/jj612867(v=ws.11)
Note: Đây là những key để cài chứ không phải key để activate.
Tiếp theo, bạn phải xác thực nó để xem nó có bất kỳ lỗi nào không:
Kiểm tra Messages ở ô dưới cùng ở giữa. Nếu không có cảnh báo, bạn hãy lưu file trả lời dưới dạng autounattend.xml (File > Save As).
Bạn đưa file autounattend.xml vào ngang hàng với file setup.exe trong bộ cài để sử dụng nó.
Bên dưới đây là 3 file autounattend.xml gốc từ MS. Các bạn copy và save thành file autounattend.xml và sử dụng.
Autounattend_x64_BIOS_sample.xml
Autounattend_x64-UEFI_sample.xml
Autounattend_x86_BIOS_sample.xml
Autounattend_x64_BIOS_sample.xml
XML:
<?xml version="1.0" encoding="utf-8"?>
<unattend xmlns="urn:schemas-microsoft-com:unattend">

<!-- Autounattend_x64_BIOS_sample.xml

This file automates the Windows installation.

     Before using this file:
      * Replace ProductKey with a product key for the edition of Windows you are installing
        (example: Windows 8.1 Pro)
        Note:
           The product key used in Microsoft-Windows-Setup\UserData\ProductKey\Key
           can be used many times in different installations and is not used to activate Windows.
           It is only used to choose which edition of Windows to install.

           The individual product key is either specified by the user, or by setting
           Microsoft-Windows-Shell-Setup\ProductKey.
     * Set the default language to your own:
       Replace "en-US" with your language code in Microsoft-Windows-International-Core-WinPE\SetupUILanguage.
       For a list of languages, see http://go.microsoft.com/fwlink/?LinkId=206620.
     * OEMs: Replace OEMInformation with your support information

     To use this file:

        Save this file on the root of a USB flash drive with the filename: Autounattend.xml
        Put the Windows DVD and the USB key into a new x64-BIOS PC.


-->


    <settings pass="specialize">
        <component name="Microsoft-Windows-Shell-Setup" processorArchitecture="amd64" publicKeyToken="31bf3856ad364e35" language="neutral" versionScope="nonSxS" xmlns:wcm="http://schemas.microsoft.com/WMIConfig/2002/State" xmlns:xsi="http://www.w3.org/2001/XMLSchema-instance">
            <OEMInformation>
                <Manufacturer>[ REPLACE WITH COMPANY NAME ]</Manufacturer>
                <SupportURL>[ REPLACE WITH SUPPORT WEBSITE ]</SupportURL>
            </OEMInformation>
        </component>
    </settings>
    <settings pass="windowsPE">
        <component name="Microsoft-Windows-International-Core-WinPE" processorArchitecture="amd64" publicKeyToken="31bf3856ad364e35" language="neutral" versionScope="nonSxS" xmlns:wcm="http://schemas.microsoft.com/WMIConfig/2002/State" xmlns:xsi="http://www.w3.org/2001/XMLSchema-instance">
            <SetupUILanguage>
                <UILanguage>en-US</UILanguage>
            </SetupUILanguage>
            <InputLocale>en-US</InputLocale>
            <SystemLocale>en-US</SystemLocale>
            <UILanguage>en-US</UILanguage>
            <UserLocale>en-US</UserLocale>
        </component>
        <component name="Microsoft-Windows-Setup" processorArchitecture="amd64" publicKeyToken="31bf3856ad364e35" language="neutral" versionScope="nonSxS" xmlns:wcm="http://schemas.microsoft.com/WMIConfig/2002/State" xmlns:xsi="http://www.w3.org/2001/XMLSchema-instance">
            <DiskConfiguration>
                <Disk wcm:action="add">
                    <CreatePartitions>

                        <!-- System partition -->
                        <CreatePartition wcm:action="add">
                            <Order>1</Order>
                            <Size>350</Size>
                            <Type>Primary</Type>
                        </CreatePartition>

                        <!-- Windows partition -->
                        <CreatePartition wcm:action="add">
                            <Order>2</Order>
                            <Extend>true</Extend>
                            <Type>Primary</Type>
                        </CreatePartition>
                    </CreatePartitions>

                    <ModifyPartitions>
                        <ModifyPartition wcm:action="add">
                            <Order>1</Order>
                            <PartitionID>1</PartitionID>
                            <Label>System</Label>
                            <Format>NTFS</Format>
                            <Active>true</Active>
                        </ModifyPartition>
                        <ModifyPartition wcm:action="add">
                            <Order>2</Order>
                            <PartitionID>2</PartitionID>
                            <Format>NTFS</Format>
                            <Label>Windows</Label>
                        </ModifyPartition>
                    </ModifyPartitions>
                    <DiskID>0</DiskID>
                    <WillWipeDisk>true</WillWipeDisk>
                </Disk>
                <WillShowUI>OnError</WillShowUI>
            </DiskConfiguration>
            <ImageInstall>
                <OSImage>
                    <InstallTo>
                        <DiskID>0</DiskID>
                        <PartitionID>2</PartitionID>
                    </InstallTo>
                </OSImage>
            </ImageInstall>
            <UserData>
                <ProductKey>
                    <WillShowUI>OnError</WillShowUI>
                    <Key>[ REPLACE WITH PRODUCT KEY ]</Key>
                </ProductKey>
                <AcceptEula>true</AcceptEula>
            </UserData>
        </component>
    </settings>
</unattend>
Autounattend_x64-UEFI_sample.xml
XML:
<?xml version="1.0" encoding="utf-8"?>
<unattend xmlns="urn:schemas-microsoft-com:unattend">

<!-- Autounattend_x64-UEFI_sample.xml

This file automates the Windows installation.

     Before using this file:
      * Replace ProductKey with a product key for the edition of Windows you are installing
        (example: Windows 8.1 Pro)
        Note:
           The product key used in Microsoft-Windows-Setup\UserData\ProductKey\Key
           can be used many times in different installations and is not used to activate Windows.
           It is only used to choose which edition of Windows to install.

           The individual product key is either specified by the user, or by setting
           Microsoft-Windows-Shell-Setup\ProductKey.
     * Set the default language to your own:
       Replace "en-US" with your language code in Microsoft-Windows-International-Core-WinPE\SetupUILanguage.
       For a list of languages, see http://go.microsoft.com/fwlink/?LinkId=206620.
     * OEMs: Replace OEMInformation with your support information

     To use this file:
        Save this file on the root of a USB flash drive with the filename: Autounattend.xml
        Put the Windows DVD and the USB key into a new x64-UEFI PC.


-->

    <settings pass="specialize">
        <component name="Microsoft-Windows-Shell-Setup" processorArchitecture="amd64" publicKeyToken="31bf3856ad364e35" language="neutral" versionScope="nonSxS" xmlns:wcm="http://schemas.microsoft.com/WMIConfig/2002/State" xmlns:xsi="http://www.w3.org/2001/XMLSchema-instance">
            <OEMInformation>
                <Manufacturer>[ REPLACE WITH COMPANY NAME ]</Manufacturer>
                <SupportURL>[ REPLACE WITH SUPPORT WEBSITE ]</SupportURL>
            </OEMInformation>
        </component>
    </settings>
    <settings pass="windowsPE">
        <component name="Microsoft-Windows-International-Core-WinPE" processorArchitecture="amd64" publicKeyToken="31bf3856ad364e35" language="neutral" versionScope="nonSxS" xmlns:wcm="http://schemas.microsoft.com/WMIConfig/2002/State" xmlns:xsi="http://www.w3.org/2001/XMLSchema-instance">
            <SetupUILanguage>
                <UILanguage>en-US</UILanguage>
            </SetupUILanguage>
            <InputLocale>en-US</InputLocale>
            <SystemLocale>en-US</SystemLocale>
            <UILanguage>en-US</UILanguage>
            <UserLocale>en-US</UserLocale>
        </component>
        <component name="Microsoft-Windows-Setup" processorArchitecture="amd64" publicKeyToken="31bf3856ad364e35" language="neutral" versionScope="nonSxS" xmlns:wcm="http://schemas.microsoft.com/WMIConfig/2002/State" xmlns:xsi="http://www.w3.org/2001/XMLSchema-instance">

            <DiskConfiguration>
                <Disk wcm:action="add">
                    <CreatePartitions>
                        <!-- Windows RE Tools partition -->
                        <CreatePartition wcm:action="add">
                            <Order>1</Order>
                            <Size>300</Size>
                            <Type>Primary</Type>
                        </CreatePartition>

                        <!-- System partition (ESP) -->
                        <CreatePartition wcm:action="add">
                            <Order>2</Order>
                            <Size>100</Size>
                            <Type>EFI</Type>
                        </CreatePartition>

                        <!-- Microsoft reserved partition (MSR) -->
                        <CreatePartition wcm:action="add">
                            <Order>3</Order>
                            <Size>128</Size>
                            <Type>MSR</Type>
                        </CreatePartition>

                        <!-- Windows partition -->
                        <CreatePartition wcm:action="add">
                            <Order>4</Order>
                            <Extend>true</Extend>
                            <Type>Primary</Type>
                        </CreatePartition>
                    </CreatePartitions>

                    <ModifyPartitions>
                        <!-- Windows RE Tools partition -->
                        <ModifyPartition wcm:action="add">
                            <Order>1</Order>
                            <PartitionID>1</PartitionID>
                            <Label>WINRE</Label>
                            <Format>NTFS</Format>
                            <TypeID>de94bba4-06d1-4d40-a16a-bfd50179d6ac</TypeID>
                        </ModifyPartition>

                        <!-- System partition (ESP) -->
                        <ModifyPartition wcm:action="add">
                            <Order>2</Order>
                            <PartitionID>2</PartitionID>
                            <Label>System</Label>
                            <Format>FAT32</Format>
                        </ModifyPartition>

                        <!-- Microsoft reserved partition (MSR) -->
                        <ModifyPartition wcm:action="add">
                            <Order>3</Order>
                            <PartitionID>3</PartitionID>
                        </ModifyPartition>

                        <!-- Windows partition -->
                        <ModifyPartition wcm:action="add">
                            <Order>4</Order>
                            <PartitionID>4</PartitionID>
                            <Label>Windows</Label>
                            <Format>NTFS</Format>
                        </ModifyPartition>
                    </ModifyPartitions>
                    <DiskID>0</DiskID>
                    <WillWipeDisk>true</WillWipeDisk>
                </Disk>
                <WillShowUI>OnError</WillShowUI>
            </DiskConfiguration>
            <ImageInstall>
                <OSImage>
                    <InstallTo>
                        <DiskID>0</DiskID>
                        <PartitionID>4</PartitionID>
                    </InstallTo>
                </OSImage>
            </ImageInstall>
            <UserData>
                <ProductKey>
                    <WillShowUI>OnError</WillShowUI>
                    <Key>[ REPLACE WITH PRODUCT KEY ]</Key>
                </ProductKey>
                <AcceptEula>true</AcceptEula>
            </UserData>
        </component>
    </settings>
</unattend>
Autounattend_x86_BIOS_sample.xml
XML:
<?xml version="1.0" encoding="utf-8"?>
<unattend xmlns="urn:schemas-microsoft-com:unattend">

<!-- Autounattend_x86_BIOS_sample.xml

This file automates the Windows installation.

     Before using this file:
      * Replace ProductKey with a product key for the edition of Windows you are installing
        (example: Windows 8.1 Pro)
        Note:
           The product key used in Microsoft-Windows-Setup\UserData\ProductKey\Key
           can be used many times in different installations and is not used to activate Windows.
           It is only used to choose which edition of Windows to install.

           The individual product key is either specified by the user, or by setting
           Microsoft-Windows-Shell-Setup\ProductKey.
     * Set the default language to your own:
       Replace "en-US" with your language code in Microsoft-Windows-International-Core-WinPE\SetupUILanguage.
       For a list of languages, see http://go.microsoft.com/fwlink/?LinkId=206620.
     * OEMs: Replace OEMInformation with your support information

     To use this file:
        Save this file on the root of a USB flash drive with the filename: Autounattend.xml
        Put the Windows DVD and the USB key into a new x86-BIOS PC.


-->

    <settings pass="specialize">
        <component name="Microsoft-Windows-Shell-Setup" processorArchitecture="x86" publicKeyToken="31bf3856ad364e35" language="neutral" versionScope="nonSxS" xmlns:wcm="http://schemas.microsoft.com/WMIConfig/2002/State" xmlns:xsi="http://www.w3.org/2001/XMLSchema-instance">
            <OEMInformation>
                <Manufacturer>[ REPLACE WITH COMPANY NAME ]</Manufacturer>
                <SupportURL>[ REPLACE WITH SUPPORT WEBSITE ]</SupportURL>
            </OEMInformation>
        </component>
    </settings>
    <settings pass="windowsPE">
        <component name="Microsoft-Windows-International-Core-WinPE" processorArchitecture="x86" publicKeyToken="31bf3856ad364e35" language="neutral" versionScope="nonSxS" xmlns:wcm="http://schemas.microsoft.com/WMIConfig/2002/State" xmlns:xsi="http://www.w3.org/2001/XMLSchema-instance">
            <SetupUILanguage>
                <UILanguage>en-US</UILanguage>
            </SetupUILanguage>
            <InputLocale>en-US</InputLocale>
            <SystemLocale>en-US</SystemLocale>
            <UILanguage>en-US</UILanguage>
            <UserLocale>en-US</UserLocale>
        </component>
        <component name="Microsoft-Windows-Setup" processorArchitecture="x86" publicKeyToken="31bf3856ad364e35" language="neutral" versionScope="nonSxS" xmlns:wcm="http://schemas.microsoft.com/WMIConfig/2002/State" xmlns:xsi="http://www.w3.org/2001/XMLSchema-instance">
            <DiskConfiguration>
                <Disk wcm:action="add">
                    <CreatePartitions>

                        <!-- System partition -->
                        <CreatePartition wcm:action="add">
                            <Order>1</Order>
                            <Size>350</Size>
                            <Type>Primary</Type>
                        </CreatePartition>

                        <!-- Windows partition -->
                        <CreatePartition wcm:action="add">
                            <Order>2</Order>
                            <Extend>true</Extend>
                            <Type>Primary</Type>
                        </CreatePartition>

                    </CreatePartitions>
                    <ModifyPartitions>
                        <ModifyPartition wcm:action="add">
                            <Order>1</Order>
                            <PartitionID>1</PartitionID>
                            <Label>System</Label>
                            <Format>NTFS</Format>
                            <Active>true</Active>
                        </ModifyPartition>
                        <ModifyPartition wcm:action="add">
                            <Order>2</Order>
                            <PartitionID>2</PartitionID>
                            <Format>NTFS</Format>
                            <Label>Windows</Label>
                        </ModifyPartition>
                    </ModifyPartitions>
                    <DiskID>0</DiskID>
                    <WillWipeDisk>true</WillWipeDisk>
                </Disk>
            </DiskConfiguration>
            <ImageInstall>
                <OSImage>
                    <InstallTo>
                        <DiskID>0</DiskID>
                        <PartitionID>2</PartitionID>
                    </InstallTo>
                </OSImage>
            </ImageInstall>
            <UserData>
                <ProductKey>
                    <Key>[ REPLACE WITH PRODUCT KEY ]</Key>
                </ProductKey>
                <AcceptEula>true</AcceptEula>
            </UserData>
        </component>
    </settings>
</unattend>Trong configuration pass này thì các packages, updates, drivers, or language packs sẽ được apply vào Windows image vừa copy vào ổ cứng.
Ngoài ra, trong pass này cũng apply các settings bên trong <servicing> và <settings pass="offlineServicing"> section bên trong answer file trước khi máy tính khởi động lại lần đầu tiên.
Trong configuration pass này các thông tin dành riêng cho máy tính sẽ được xóa bỏ, từ đó bạn có thể capture và apply sang các máy tính khác. Ví dụ trong pass này thì SID và các driver đã cài sẽ bị loại bỏ.
Để vào pass này chúng ra dùng lệnh sysprep /generalize.
Sau khi pass generalize kết thúc thì trong lần khởi động tiếp theo pass specialize sẽ được chạy. Nếu bạn muốn giữ lại các driver đã cài thì bạn có thể sử dụng thiết lập Microsoft-Windows-PnpSysprep và PersistAllDeviceInstalls trong file trả lời. Bạn có thể xem thêm thông tin 2 thiết lập này tại đây: https://docs.microsoft.com/en-us/wi...t-windows-pnpsysprep-persistalldeviceinstalls và https://docs.microsoft.com/en-us/wi...dows-pnpsysprep-donotcleanupnonpresentdevices
Bên dưới đây là 1 số các thiết lập mà bạn có thể set cho Windows 7 và 10:
Windows 7:
Windows 10:
Nếu bạn muốn giữ lại driver:
Để vào pass này chúng ra dùng lệnh sysprep /generalize.
Sau khi pass generalize kết thúc thì trong lần khởi động tiếp theo pass specialize sẽ được chạy. Nếu bạn muốn giữ lại các driver đã cài thì bạn có thể sử dụng thiết lập Microsoft-Windows-PnpSysprep và PersistAllDeviceInstalls trong file trả lời. Bạn có thể xem thêm thông tin 2 thiết lập này tại đây: https://docs.microsoft.com/en-us/wi...t-windows-pnpsysprep-persistalldeviceinstalls và https://docs.microsoft.com/en-us/wi...dows-pnpsysprep-donotcleanupnonpresentdevices
Bên dưới đây là 1 số các thiết lập mà bạn có thể set cho Windows 7 và 10:
Windows 7:
XML:
<settings pass="generalize">
        <component name="Microsoft-Windows-Security-SPP" processorArchitecture="x86" publicKeyToken="31bf3856ad364e35" language="neutral" versionScope="nonSxS" xmlns:wcm="http://schemas.microsoft.com/WMIConfig/2002/State" xmlns:xsi="http://www.w3.org/2001/XMLSchema-instance">
            <SkipRearm>1</SkipRearm>
        </component>
    </settings>
    <settings pass="generalize">
        <component name="Microsoft-Windows-Security-SPP" processorArchitecture="amd64" publicKeyToken="31bf3856ad364e35" language="neutral" versionScope="nonSxS" xmlns:wcm="http://schemas.microsoft.com/WMIConfig/2002/State" xmlns:xsi="http://www.w3.org/2001/XMLSchema-instance">
            <SkipRearm>1</SkipRearm>
        </component>
    </settings>
Windows 10:
XML:
    <settings pass="generalize">
        <component name="Microsoft-Windows-Security-SPP" processorArchitecture="x86" publicKeyToken="31bf3856ad364e35" language="neutral" versionScope="nonSxS" xmlns:wcm="http://schemas.microsoft.com/WMIConfig/2002/State" xmlns:xsi="http://www.w3.org/2001/XMLSchema-instance">
            <SkipRearm>1</SkipRearm>
        </component>
        <component name="Microsoft-Windows-Security-SPP" processorArchitecture="amd64" publicKeyToken="31bf3856ad364e35" language="neutral" versionScope="nonSxS" xmlns:wcm="http://schemas.microsoft.com/WMIConfig/2002/State" xmlns:xsi="http://www.w3.org/2001/XMLSchema-instance">
            <SkipRearm>1</SkipRearm>
        </component>
        <component name="Microsoft-Windows-WorkstationService" processorArchitecture="x86" publicKeyToken="31bf3856ad364e35" language="neutral" versionScope="nonSxS" xmlns:wcm="http://schemas.microsoft.com/WMIConfig/2002/State" xmlns:xsi="http://www.w3.org/2001/XMLSchema-instance">
            <AllowInsecureGuestAuth>1</AllowInsecureGuestAuth>
        </component>
        <component name="Microsoft-Windows-WorkstationService" processorArchitecture="amd64" publicKeyToken="31bf3856ad364e35" language="neutral" versionScope="nonSxS" xmlns:wcm="http://schemas.microsoft.com/WMIConfig/2002/State" xmlns:xsi="http://www.w3.org/2001/XMLSchema-instance">
            <AllowInsecureGuestAuth>1</AllowInsecureGuestAuth>
        </component>
    </settings>
Nếu bạn muốn giữ lại driver:
XML:
    <settings pass="generalize">
        <component name="Microsoft-Windows-PnpSysprep" processorArchitecture="amd64" publicKeyToken="31bf3856ad364e35" language="neutral" versionScope="nonSxS" xmlns:wcm="http://schemas.microsoft.com/WMIConfig/2002/State" xmlns:xsi="http://www.w3.org/2001/XMLSchema-instance">
            <PersistAllDeviceInstalls>true</PersistAllDeviceInstalls>
            <DoNotCleanUpNonPresentDevices>true</DoNotCleanUpNonPresentDevices>
        </component>
        <component name="Microsoft-Windows-PnpSysprep" processorArchitecture="x86" publicKeyToken="31bf3856ad364e35" language="neutral" versionScope="nonSxS" xmlns:wcm="http://schemas.microsoft.com/WMIConfig/2002/State" xmlns:xsi="http://www.w3.org/2001/XMLSchema-instance">
            <PersistAllDeviceInstalls>true</PersistAllDeviceInstalls>
            <DoNotCleanUpNonPresentDevices>true</DoNotCleanUpNonPresentDevices>
        </component>
</settings>Sau khi Windows boot lên lần đầu tiên thì configuration pass này sẽ được chạy. Pass này dùng để tạo và cấu hình các thông tin trong Windows image, cài đặt các thiết bị phần cứng với các driver mặc định có trong image.
Trong pass này SID sẽ được tạo. Ngoài ra trong pass này bạn có thể cấu hình Windows features, network settings, international settings, và thông tin domain.
Bên dưới đây là 1 số các thiết lập mà bạn có thể set cho Windows 7 và 10:
Windows 7:
Windows 10:
Trong các đoạn xml ở bên trên có 1 số đoạn các bạn cần lưu ý:
1. <copyprofile>true</copyprofile>: Chỉ dùng setting này khi bạn muốn copy các thiết lập từ tài khoản Administrator sang tài khoản mới khi cài Windows.
2. RunSynchronous: Lệnh này dùng để thêm các thiết lập registry vào file unattend.xml. Lệnh này chỉ thêm các thiết lập từ HKEY_LOCAL_MACHINE và HKEY_CLASSES_ROOT.
Trong pass này SID sẽ được tạo. Ngoài ra trong pass này bạn có thể cấu hình Windows features, network settings, international settings, và thông tin domain.
Bên dưới đây là 1 số các thiết lập mà bạn có thể set cho Windows 7 và 10:
Windows 7:
XML:
<settings pass="specialize">
<component name="Microsoft-Windows-Security-SPP-UX" processorArchitecture="x86" publicKeyToken="31bf3856ad364e35" language="neutral" versionScope="nonSxS" xmlns:wcm="http://schemas.microsoft.com/WMIConfig/2002/State" xmlns:xsi="http://www.w3.org/2001/XMLSchema-instance">
<SkipAutoActivation>true</SkipAutoActivation>
</component>
<component name="Microsoft-Windows-Security-SPP-UX" processorArchitecture="amd64" publicKeyToken="31bf3856ad364e35" language="neutral" versionScope="nonSxS" xmlns:wcm="http://schemas.microsoft.com/WMIConfig/2002/State" xmlns:xsi="http://www.w3.org/2001/XMLSchema-instance">
<SkipAutoActivation>true</SkipAutoActivation>
</component>
<component name="Microsoft-Windows-Shell-Setup" processorArchitecture="x86" publicKeyToken="31bf3856ad364e35" language="neutral" versionScope="nonSxS" xmlns:wcm="http://schemas.microsoft.com/WMIConfig/2002/State" xmlns:xsi="http://www.w3.org/2001/XMLSchema-instance">
<copyprofile>true</copyprofile>
<TimeZone>SE Asia Standard Time</TimeZone>
</component>
<component name="Microsoft-Windows-Shell-Setup" processorArchitecture="amd64" publicKeyToken="31bf3856ad364e35" language="neutral" versionScope="nonSxS" xmlns:wcm="http://schemas.microsoft.com/WMIConfig/2002/State" xmlns:xsi="http://www.w3.org/2001/XMLSchema-instance">
<copyprofile>true</copyprofile>
<TimeZone>SE Asia Standard Time</TimeZone>
</component>
<component name="Microsoft-Windows-SystemRestore-Main" processorArchitecture="x86" publicKeyToken="31bf3856ad364e35" language="neutral" versionScope="nonSxS" xmlns:wcm="http://schemas.microsoft.com/WMIConfig/2002/State" xmlns:xsi="http://www.w3.org/2001/XMLSchema-instance">
<DisableSR>1</DisableSR>
</component>
<component name="Microsoft-Windows-SystemRestore-Main" processorArchitecture="amd64" publicKeyToken="31bf3856ad364e35" language="neutral" versionScope="nonSxS" xmlns:wcm="http://schemas.microsoft.com/WMIConfig/2002/State" xmlns:xsi="http://www.w3.org/2001/XMLSchema-instance">
<DisableSR>1</DisableSR>
</component>
<component name="Microsoft-Windows-Deployment" processorArchitecture="x86" publicKeyToken="31bf3856ad364e35" language="neutral" versionScope="nonSxS" xmlns:wcm="http://schemas.microsoft.com/WMIConfig/2002/State" xmlns:xsi="http://www.w3.org/2001/XMLSchema-instance">
<RunSynchronous>
<RunSynchronousCommand wcm:action="add">
<Description>Add Computer Desktop Icon 1</Description>
<Order>1</Order>
<Path>cmd /c reg add HKLM\SOFTWARE\Microsoft\Windows\CurrentVersion\Explorer\HideDesktopIcons\ClassicStartMenu /v {871C5380-42A0-1069-A2EA-08002B30309D}.default /t REG_DWORD /d 0 /f</Path>
</RunSynchronousCommand>
<RunSynchronousCommand wcm:action="add">
<Description>Add Computer Desktop Icon 2</Description>
<Order>2</Order>
<Path>cmd /c reg add HKLM\SOFTWARE\Microsoft\Windows\CurrentVersion\Explorer\HideDesktopIcons\NewStartPanel /v {20D04FE0-3AEA-1069-A2D8-08002B30309D} /t REG_DWORD /d 0 /f</Path>
</RunSynchronousCommand>
<RunSynchronousCommand wcm:action="add">
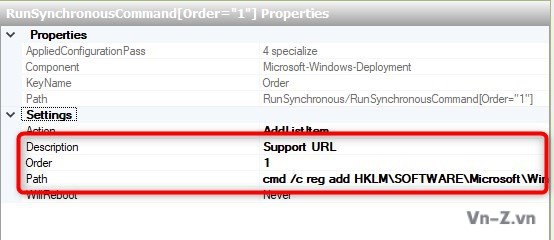
<Description>Support URL</Description>
<Order>3</Order>
<Path>cmd /c reg add HKLM\SOFTWARE\Microsoft\Windows\CurrentVersion\OEMInformation /v Manufacturer /t REG_SZ /d AKIO /f</Path>
</RunSynchronousCommand>
<RunSynchronousCommand wcm:action="add">
<Description>Support URL</Description>
<Order>4</Order>
<Path>cmd /c reg add HKLM\SOFTWARE\Microsoft\Windows\CurrentVersion\OEMInformation /v SupportURL /t REG_SZ /d https://vn-z.vn/tags/manhnd/ /f</Path>
</RunSynchronousCommand>
<RunSynchronousCommand wcm:action="add">
<Description>Support URL</Description>
<Order>5</Order>
<Path>cmd /c reg add HKLM\SOFTWARE\Microsoft\Windows\CurrentVersion\OEMInformation /v SupportHours /t REG_SZ /d 24/7 /f</Path>
</RunSynchronousCommand>
<RunSynchronousCommand wcm:action="add">
<Description>Support URL</Description>
<Order>6</Order>
<Path>cmd /c reg add HKLM\SOFTWARE\Microsoft\Windows\CurrentVersion\OEMInformation /v SupportPhone /t REG_SZ /d "+84 91 664 8537" /f</Path>
</RunSynchronousCommand>
</RunSynchronous>
</component>
<component name="Microsoft-Windows-Deployment" processorArchitecture="amd64" publicKeyToken="31bf3856ad364e35" language="neutral" versionScope="nonSxS" xmlns:wcm="http://schemas.microsoft.com/WMIConfig/2002/State" xmlns:xsi="http://www.w3.org/2001/XMLSchema-instance">
<RunSynchronous>
<RunSynchronousCommand wcm:action="add">
<Description>Add Computer Desktop Icon 1</Description>
<Order>1</Order>
<Path>cmd /c reg add HKLM\SOFTWARE\Microsoft\Windows\CurrentVersion\Explorer\HideDesktopIcons\ClassicStartMenu /v {871C5380-42A0-1069-A2EA-08002B30309D}.default /t REG_DWORD /d 0 /f</Path>
</RunSynchronousCommand>
<RunSynchronousCommand wcm:action="add">
<Description>Add Computer Desktop Icon 2</Description>
<Order>2</Order>
<Path>cmd /c reg add HKLM\SOFTWARE\Microsoft\Windows\CurrentVersion\Explorer\HideDesktopIcons\NewStartPanel /v {20D04FE0-3AEA-1069-A2D8-08002B30309D} /t REG_DWORD /d 0 /f</Path>
</RunSynchronousCommand>
<RunSynchronousCommand wcm:action="add">
<Description>Support URL</Description>
<Order>3</Order>
<Path>cmd /c reg add HKLM\SOFTWARE\Microsoft\Windows\CurrentVersion\OEMInformation /v Manufacturer /t REG_SZ /d AKIO /f</Path>
</RunSynchronousCommand>
<RunSynchronousCommand wcm:action="add">
<Description>Support URL</Description>
<Order>4</Order>
<Path>cmd /c reg add HKLM\SOFTWARE\Microsoft\Windows\CurrentVersion\OEMInformation /v SupportURL /t REG_SZ /d https://vn-z.vn/tags/manhnd/ /f</Path>
</RunSynchronousCommand>
<RunSynchronousCommand wcm:action="add">
<Description>Support URL</Description>
<Order>5</Order>
<Path>cmd /c reg add HKLM\SOFTWARE\Microsoft\Windows\CurrentVersion\OEMInformation /v SupportHours /t REG_SZ /d 24/7 /f</Path>
</RunSynchronousCommand>
<RunSynchronousCommand wcm:action="add">
<Description>Support URL</Description>
<Order>6</Order>
<Path>cmd /c reg add HKLM\SOFTWARE\Microsoft\Windows\CurrentVersion\OEMInformation /v SupportPhone /t REG_SZ /d "+84 91 664 8537" /f</Path>
</RunSynchronousCommand>
</RunSynchronous>
</component>
</settings>Windows 10:
XML:
<settings pass="specialize">
        <component name="Microsoft-Windows-Deployment" processorArchitecture="amd64" publicKeyToken="31bf3856ad364e35" language="neutral" versionScope="nonSxS" xmlns:wcm="http://schemas.microsoft.com/WMIConfig/2002/State" xmlns:xsi="http://www.w3.org/2001/XMLSchema-instance">
            <RunSynchronous>
                <RunSynchronousCommand wcm:action="add">
                    <Description>Allow Insecure Guest Auth</Description>
                    <Order>1</Order>
                    <Path>cmd /c  reg add HKLM\SYSTEM\CurrentControlSet\Services\LanmanWorkstation\Parameters /v AllowInsecureGuestAuth /t REG_DWORD /d 1 /f</Path>
                </RunSynchronousCommand>
                <RunSynchronousCommand wcm:action="add">
                    <Description>Disable Reserves</Description>
                    <Order>2</Order>
                    <Path>cmd /c  reg add HKLM\SOFTWARE\Microsoft\Windows\CurrentVersion\ReserveManager /v ShippedWithReserves /t REG_DWORD /d 0 /f</Path>
                </RunSynchronousCommand>
                <RunSynchronousCommand wcm:action="add">
                    <Description>Disable Acrylic Background On Logon</Description>
                    <Order>3</Order>
                    <Path>cmd /c  reg add HKLM\SOFTWARE\Policies\Microsoft\Windows\System /v DisableAcrylicBackgroundOnLogon /t REG_DWORD /d 1 /f</Path>
                </RunSynchronousCommand>
                <RunSynchronousCommand wcm:action="add">
                    <Description>Copy To folder</Description>
                    <Order>4</Order>
                    <Path>cmd /c  reg add HKCR\AllFilesystemObjects\shellex\ContextMenuHandlers\{C2FBB630-2971-11D1-A18C-00C04FD75D13} /f</Path>
                </RunSynchronousCommand>
                <RunSynchronousCommand wcm:action="add">
                    <Description>Move To folder</Description>
                    <Order>5</Order>
                    <Path>cmd /c  reg add HKCR\AllFilesystemObjects\shellex\ContextMenuHandlers\{C2FBB631-2971-11D1-A18C-00C04FD75D13} /f</Path>
                </RunSynchronousCommand>
                <RunSynchronousCommand wcm:action="add">
                    <Description>Add This PC Desktop Icon 1</Description>
                    <Order>6</Order>
                    <Path>cmd /c  reg add HKLM\SOFTWARE\Microsoft\Windows\CurrentVersion\Explorer\HideDesktopIcons\ClassicStartMenu /v {871C5380-42A0-1069-A2EA-08002B30309D}.default /t REG_DWORD /d 0 /f</Path>
                </RunSynchronousCommand>
                <RunSynchronousCommand wcm:action="add">
                    <Description>Add This PC Desktop Icon 2</Description>
                    <Order>7</Order>
                    <Path>cmd /c  reg add HKLM\SOFTWARE\Microsoft\Windows\CurrentVersion\Explorer\HideDesktopIcons\NewStartPanel /v {20D04FE0-3AEA-1069-A2D8-08002B30309D} /t REG_DWORD /d 0 /f</Path>
                </RunSynchronousCommand>
                <RunSynchronousCommand wcm:action="add">
                    <Description>Support URL</Description>
                    <Order>8</Order>
                    <Path>cmd /c  reg add HKLM\SOFTWARE\Microsoft\Windows\CurrentVersion\OEMInformation /v Manufacturer /t REG_SZ /d AKIO /f</Path>
                </RunSynchronousCommand>
                <RunSynchronousCommand wcm:action="add">
                    <Description>Support URL</Description>
                    <Order>9</Order>
                    <Path>cmd /c  reg add HKLM\SOFTWARE\Microsoft\Windows\CurrentVersion\OEMInformation /v SupportURL /t REG_SZ /d https://vn-z.vn/tags/manhnd/ /f</Path>
                </RunSynchronousCommand>
                <RunSynchronousCommand wcm:action="add">
                    <Description>Support URL</Description>
                    <Order>10</Order>
                    <Path>cmd /c  reg add HKLM\SOFTWARE\Microsoft\Windows\CurrentVersion\OEMInformation /v SupportHours /t REG_SZ /d 24/7 /f</Path>
                </RunSynchronousCommand>
                <RunSynchronousCommand wcm:action="add">
                    <Description>Support URL</Description>
                    <Order>11</Order>
                    <Path>cmd /c  reg add HKLM\SOFTWARE\Microsoft\Windows\CurrentVersion\OEMInformation /v SupportPhone /t REG_SZ /d "+84 91 664 8537" /f</Path>
                </RunSynchronousCommand>
            </RunSynchronous>
        </component>
                <component name="Microsoft-Windows-Deployment" processorArchitecture="x86" publicKeyToken="31bf3856ad364e35" language="neutral" versionScope="nonSxS" xmlns:wcm="http://schemas.microsoft.com/WMIConfig/2002/State" xmlns:xsi="http://www.w3.org/2001/XMLSchema-instance">
            <RunSynchronous>
                <RunSynchronousCommand wcm:action="add">
                    <Description>Allow Insecure Guest Auth</Description>
                    <Order>1</Order>
                    <Path>cmd /c  reg add HKLM\SYSTEM\CurrentControlSet\Services\LanmanWorkstation\Parameters /v AllowInsecureGuestAuth /t REG_DWORD /d 1 /f</Path>
                </RunSynchronousCommand>
                <RunSynchronousCommand wcm:action="add">
                    <Description>Disable Reserves</Description>
                    <Order>2</Order>
                    <Path>cmd /c  reg add HKLM\SOFTWARE\Microsoft\Windows\CurrentVersion\ReserveManager /v ShippedWithReserves /t REG_DWORD /d 0 /f</Path>
                </RunSynchronousCommand>
                <RunSynchronousCommand wcm:action="add">
                    <Description>Disable Acrylic Background On Logon</Description>
                    <Order>3</Order>
                    <Path>cmd /c  reg add HKLM\SOFTWARE\Policies\Microsoft\Windows\System /v DisableAcrylicBackgroundOnLogon /t REG_DWORD /d 1 /f</Path>
                </RunSynchronousCommand>
                <RunSynchronousCommand wcm:action="add">
                    <Description>Copy To folder</Description>
                    <Order>4</Order>
                    <Path>cmd /c  reg add HKCR\AllFilesystemObjects\shellex\ContextMenuHandlers\{C2FBB630-2971-11D1-A18C-00C04FD75D13} /f</Path>
                </RunSynchronousCommand>
                <RunSynchronousCommand wcm:action="add">
                    <Description>Move To folder</Description>
                    <Order>5</Order>
                    <Path>cmd /c  reg add HKCR\AllFilesystemObjects\shellex\ContextMenuHandlers\{C2FBB631-2971-11D1-A18C-00C04FD75D13} /f</Path>
                </RunSynchronousCommand>
                <RunSynchronousCommand wcm:action="add">
                    <Description>Add This PC Desktop Icon 1</Description>
                    <Order>6</Order>
                    <Path>cmd /c  reg add HKLM\SOFTWARE\Microsoft\Windows\CurrentVersion\Explorer\HideDesktopIcons\ClassicStartMenu /v {871C5380-42A0-1069-A2EA-08002B30309D}.default /t REG_DWORD /d 0 /f</Path>
                </RunSynchronousCommand>
                <RunSynchronousCommand wcm:action="add">
                    <Description>Add This PC Desktop Icon 2</Description>
                    <Order>7</Order>
                    <Path>cmd /c  reg add HKLM\SOFTWARE\Microsoft\Windows\CurrentVersion\Explorer\HideDesktopIcons\NewStartPanel /v {20D04FE0-3AEA-1069-A2D8-08002B30309D} /t REG_DWORD /d 0 /f</Path>
                </RunSynchronousCommand>
                <RunSynchronousCommand wcm:action="add">
                    <Description>Support URL</Description>
                    <Order>8</Order>
                    <Path>cmd /c  reg add HKLM\SOFTWARE\Microsoft\Windows\CurrentVersion\OEMInformation /v Manufacturer /t REG_SZ /d AKIO /f</Path>
                </RunSynchronousCommand>
                <RunSynchronousCommand wcm:action="add">
                    <Description>Support URL</Description>
                    <Order>9</Order>
                    <Path>cmd /c  reg add HKLM\SOFTWARE\Microsoft\Windows\CurrentVersion\OEMInformation /v SupportURL /t REG_SZ /d https://vn-z.vn/tags/manhnd/ /f</Path>
                </RunSynchronousCommand>
                <RunSynchronousCommand wcm:action="add">
                    <Description>Support URL</Description>
                    <Order>10</Order>
                    <Path>cmd /c  reg add HKLM\SOFTWARE\Microsoft\Windows\CurrentVersion\OEMInformation /v SupportHours /t REG_SZ /d 24/7 /f</Path>
                </RunSynchronousCommand>
                <RunSynchronousCommand wcm:action="add">
                    <Description>Support URL</Description>
                    <Order>11</Order>
                    <Path>cmd /c  reg add HKLM\SOFTWARE\Microsoft\Windows\CurrentVersion\OEMInformation /v SupportPhone /t REG_SZ /d "+84 91 664 8537" /f</Path>
                </RunSynchronousCommand>
            </RunSynchronous>
        </component>
        <component name="Microsoft-Windows-Shell-Setup" processorArchitecture="amd64" publicKeyToken="31bf3856ad364e35" language="neutral" versionScope="nonSxS" xmlns:wcm="http://schemas.microsoft.com/WMIConfig/2002/State" xmlns:xsi="http://www.w3.org/2001/XMLSchema-instance">
            <copyprofile>true</copyprofile>
        </component>
        <component name="Microsoft-Windows-Shell-Setup" processorArchitecture="x86" publicKeyToken="31bf3856ad364e35" language="neutral" versionScope="nonSxS" xmlns:wcm="http://schemas.microsoft.com/WMIConfig/2002/State" xmlns:xsi="http://www.w3.org/2001/XMLSchema-instance">
            <copyprofile>true</copyprofile>
        </component>
    </settings>
Trong các đoạn xml ở bên trên có 1 số đoạn các bạn cần lưu ý:
1. <copyprofile>true</copyprofile>: Chỉ dùng setting này khi bạn muốn copy các thiết lập từ tài khoản Administrator sang tài khoản mới khi cài Windows.
2. RunSynchronous: Lệnh này dùng để thêm các thiết lập registry vào file unattend.xml. Lệnh này chỉ thêm các thiết lập từ HKEY_LOCAL_MACHINE và HKEY_CLASSES_ROOT.
Trong configuration pass này thì các thiết lập đã được cấu hình trước sẽ được áp dụng cho Windows, trước khi Windows Welcome khởi động.
Pass này thường được sử dụng để cấu ình các các tùy chọn Windows Shell như: thiết lập ngôn ngữ và địa điểm, tạo mới tài khoản người dùng, cấu hình taskbar,...
Cách làm với giao diện thì các bạn thao tác giống như với Phần III về windows setup. Còn ở đây để cho nhanh mình sẽ đưa luôn nội dung file trả lời mà bạn có thể sử dụng được luôn.
Mô tả:
1. component name="Microsoft-Windows-International-Core": Dùng để cấu hình Ngôn ngữ và địa điểm.
2. component name="Microsoft-Windows-Shell-Setup":
+ <FirstLogonCommands>: Chạy một số lệnh khi lần đầu đăng nhập.
+ <OOBE>: cấu hình các thiết lập: EULAPage, NetworkLocation, ProtectYourPC, WirelessSetup.
+ <TaskbarLinks>: Thêm các icon vào taskbar (tối đa 3 icon).
+ <UserAccounts>: Cấu hình tài khoản người dùng mới.
+ <TimeZone>: Thiết lập múi giờ.
Mô tả:
1. component name="Microsoft-Windows-International-Core": Dùng để cấu hình Ngôn ngữ và địa điểm.
2. component name="Microsoft-Windows-Shell-Setup":
+ <FirstLogonCommands>: Chạy một số lệnh khi lần đầu đăng nhập.
+ <OOBE>: Cấu hình các thiết lập: EULAPage, NetworkLocation, ProtectYourPC, AccountScreen, WirelessSetup,...
+ <TaskbarLinks>: Thêm các icon vào taskbar (tối đa 3 icon).
+ <UserAccounts>: Cấu hình tài khoản người dùng mới.
+ <TimeZone>: Thiết lập múi giờ.
Ảnh demo khi tạo tài khoản bằng file trả lời tự động:
Pass này thường được sử dụng để cấu ình các các tùy chọn Windows Shell như: thiết lập ngôn ngữ và địa điểm, tạo mới tài khoản người dùng, cấu hình taskbar,...
Cách làm với giao diện thì các bạn thao tác giống như với Phần III về windows setup. Còn ở đây để cho nhanh mình sẽ đưa luôn nội dung file trả lời mà bạn có thể sử dụng được luôn.
XML:
<settings pass="oobeSystem">
        <component name="Microsoft-Windows-International-Core" processorArchitecture="x86" publicKeyToken="31bf3856ad364e35" language="neutral" versionScope="nonSxS" xmlns:wcm="http://schemas.microsoft.com/WMIConfig/2002/State" xmlns:xsi="http://www.w3.org/2001/XMLSchema-instance">
            <InputLocale>1033:00000409</InputLocale>
            <SystemLocale>en-US</SystemLocale>
            <UILanguage>en-US</UILanguage>
            <UILanguageFallback>en-US</UILanguageFallback>
            <UserLocale>en-US</UserLocale>
        </component>
        <component name="Microsoft-Windows-International-Core" processorArchitecture="amd64" publicKeyToken="31bf3856ad364e35" language="neutral" versionScope="nonSxS" xmlns:wcm="http://schemas.microsoft.com/WMIConfig/2002/State" xmlns:xsi="http://www.w3.org/2001/XMLSchema-instance">
            <InputLocale>1033:00000409</InputLocale>
            <SystemLocale>en-US</SystemLocale>
            <UILanguage>en-US</UILanguage>
            <UILanguageFallback>en-US</UILanguageFallback>
            <UserLocale>en-US</UserLocale>
        </component>
        <component name="Microsoft-Windows-Shell-Setup" processorArchitecture="x86" publicKeyToken="31bf3856ad364e35" language="neutral" versionScope="nonSxS" xmlns:wcm="http://schemas.microsoft.com/WMIConfig/2002/State" xmlns:xsi="http://www.w3.org/2001/XMLSchema-instance">
            <FirstLogonCommands>
                <SynchronousCommand wcm:action="add">
                    <Description>Control Panel View</Description>
                    <CommandLine>reg add HKEY_CURRENT_USER\Software\Microsoft\Windows\CurrentVersion\Explorer\ControlPanel /v StartupPage /t REG_DWORD /d 1 /f</CommandLine>
                    <Order>1</Order>
                    <RequiresUserInput>true</RequiresUserInput>
                </SynchronousCommand>
                <SynchronousCommand wcm:action="add">
                    <CommandLine>reg add HKEY_CURRENT_USER\Software\Microsoft\Windows\CurrentVersion\Explorer\ControlPanel /v AllItemsIconView /t REG_DWORD /d 0 /f</CommandLine>
                    <Description>Control Panel Icon Size</Description>
                    <Order>2</Order>
                    <RequiresUserInput>true</RequiresUserInput>
                </SynchronousCommand>
            </FirstLogonCommands>
            <OOBE>
                <HideEULAPage>true</HideEULAPage>
                <NetworkLocation>Work</NetworkLocation>
                <ProtectYourPC>3</ProtectYourPC>
                <HideWirelessSetupInOOBE>true</HideWirelessSetupInOOBE>
            </OOBE>
            <TaskbarLinks>
                <Link0>%programdata%\Microsoft\Windows\Start Menu\Programs\Microsoft Edge.lnk</Link0>
                <Link1>%programdata%\Microsoft\Windows\Start Menu\Programs\Google Chrome.lnk</Link1>
                <Link2></Link2>
            </TaskbarLinks>
            <UserAccounts>
                <LocalAccounts>
                    <LocalAccount wcm:action="add">
                        <Password>
                            <Value>123456a@</Value>
                            <PlainText>true</PlainText>
                        </Password>
                        <Description>Admin</Description>
                        <DisplayName>Nguyen Duc Manh</DisplayName>
                        <Group>Administrators</Group>
                        <Name>manhnd</Name>
                    </LocalAccount>
                </LocalAccounts>
            </UserAccounts>
            <TimeZone>SE Asia Standard Time</TimeZone>
        </component>
        <component name="Microsoft-Windows-Shell-Setup" processorArchitecture="amd64" publicKeyToken="31bf3856ad364e35" language="neutral" versionScope="nonSxS" xmlns:wcm="http://schemas.microsoft.com/WMIConfig/2002/State" xmlns:xsi="http://www.w3.org/2001/XMLSchema-instance">
            <FirstLogonCommands>
                <SynchronousCommand wcm:action="add">
                    <Description>Control Panel View</Description>
                    <CommandLine>reg add HKEY_CURRENT_USER\Software\Microsoft\Windows\CurrentVersion\Explorer\ControlPanel /v StartupPage /t REG_DWORD /d 1 /f</CommandLine>
                    <Order>1</Order>
                    <RequiresUserInput>true</RequiresUserInput>
                </SynchronousCommand>
                <SynchronousCommand wcm:action="add">
                    <CommandLine>reg add HKEY_CURRENT_USER\Software\Microsoft\Windows\CurrentVersion\Explorer\ControlPanel /v AllItemsIconView /t REG_DWORD /d 0 /f</CommandLine>
                    <Description>Control Panel Icon Size</Description>
                    <Order>2</Order>
                    <RequiresUserInput>true</RequiresUserInput>
                </SynchronousCommand>
            </FirstLogonCommands>
            <OOBE>
                <HideEULAPage>true</HideEULAPage>
                <NetworkLocation>Work</NetworkLocation>
                <ProtectYourPC>3</ProtectYourPC>
                <HideWirelessSetupInOOBE>true</HideWirelessSetupInOOBE>
            </OOBE>
            <TaskbarLinks>
                <Link0>%programdata%\Microsoft\Windows\Start Menu\Programs\Microsoft Edge.lnk</Link0>
                <Link1>%programdata%\Microsoft\Windows\Start Menu\Programs\Google Chrome.lnk</Link1>
                <Link2></Link2>
            </TaskbarLinks>
            <UserAccounts>
                <LocalAccounts>
                    <LocalAccount wcm:action="add">
                        <Password>
                            <Value>123456a@</Value>
                            <PlainText>true</PlainText>
                        </Password>
                        <Description>Admin</Description>
                        <DisplayName>Nguyen Duc Manh</DisplayName>
                        <Group>Administrators</Group>
                        <Name>manhnd</Name>
                    </LocalAccount>
                </LocalAccounts>
            </UserAccounts>
            <TimeZone>SE Asia Standard Time</TimeZone>
        </component>
    </settings>
Mô tả:
1. component name="Microsoft-Windows-International-Core": Dùng để cấu hình Ngôn ngữ và địa điểm.
2. component name="Microsoft-Windows-Shell-Setup":
+ <FirstLogonCommands>: Chạy một số lệnh khi lần đầu đăng nhập.
+ <OOBE>: cấu hình các thiết lập: EULAPage, NetworkLocation, ProtectYourPC, WirelessSetup.
+ <TaskbarLinks>: Thêm các icon vào taskbar (tối đa 3 icon).
+ <UserAccounts>: Cấu hình tài khoản người dùng mới.
+ <TimeZone>: Thiết lập múi giờ.
XML:
<settings pass="oobeSystem">
        <component name="Microsoft-Windows-International-Core" processorArchitecture="amd64" publicKeyToken="31bf3856ad364e35" language="neutral" versionScope="nonSxS" xmlns:wcm="http://schemas.microsoft.com/WMIConfig/2002/State" xmlns:xsi="http://www.w3.org/2001/XMLSchema-instance">
            <InputLocale>1033:00000409</InputLocale>
            <SystemLocale>en-US</SystemLocale>
            <UILanguage>en-US</UILanguage>
            <UILanguageFallback>en-US</UILanguageFallback>
            <UserLocale>en-US</UserLocale>
        </component>
        <component name="Microsoft-Windows-International-Core" processorArchitecture="x86" publicKeyToken="31bf3856ad364e35" language="neutral" versionScope="nonSxS" xmlns:wcm="http://schemas.microsoft.com/WMIConfig/2002/State" xmlns:xsi="http://www.w3.org/2001/XMLSchema-instance">
            <InputLocale>1033:00000409</InputLocale>
            <SystemLocale>en-US</SystemLocale>
            <UILanguage>en-US</UILanguage>
            <UILanguageFallback>en-US</UILanguageFallback>
            <UserLocale>en-US</UserLocale>
        </component>
        <component name="Microsoft-Windows-Shell-Setup" processorArchitecture="amd64" publicKeyToken="31bf3856ad364e35" language="neutral" versionScope="nonSxS" xmlns:wcm="http://schemas.microsoft.com/WMIConfig/2002/State" xmlns:xsi="http://www.w3.org/2001/XMLSchema-instance">
            <FirstLogonCommands>
                <SynchronousCommand wcm:action="add">
                    <Order>1</Order>
                    <Description>Open File Explorer to This PC</Description>
                    <CommandLine>reg add "HKEY_CURRENT_USER\Software\Microsoft\Windows\CurrentVersion\Explorer\Advanced" /v LaunchTo /t REG_DWORD /d 1 /f</CommandLine>
                </SynchronousCommand>
                <SynchronousCommand wcm:action="add">
                    <Order>2</Order>
                    <Description>Control Panel 1</Description>
                    <CommandLine>reg add "HKEY_CURRENT_USER\SOFTWARE\Microsoft\Windows\CurrentVersion\Explorer\ControlPanel" /v AllItemsIconView /t REG_DWORD /d 0 /f</CommandLine>
                </SynchronousCommand>
                <SynchronousCommand wcm:action="add">
                    <Order>3</Order>
                    <Description>Control Panel 2</Description>
                    <CommandLine>reg add "HKEY_CURRENT_USER\SOFTWARE\Microsoft\Windows\CurrentVersion\Explorer\ControlPanel" /v StartupPage /t REG_DWORD /d 1 /f</CommandLine>
                </SynchronousCommand>
            </FirstLogonCommands>
            <OOBE>
                <HideEULAPage>true</HideEULAPage>
                <ProtectYourPC>1</ProtectYourPC>
                <HideLocalAccountScreen>true</HideLocalAccountScreen>
                <HideOEMRegistrationScreen>true</HideOEMRegistrationScreen>
                <HideOnlineAccountScreens>true</HideOnlineAccountScreens>
                <HideWirelessSetupInOOBE>true</HideWirelessSetupInOOBE>
                <NetworkLocation>Work</NetworkLocation>
                <UnattendEnableRetailDemo>false</UnattendEnableRetailDemo>
            </OOBE>
            <TaskbarLinks>
                <Link0>%programdata%\Microsoft\Windows\Start Menu\Programs\Google Chrome.lnk</Link0>
                <Link1>%programdata%\Microsoft\Windows\Start Menu\Programs\Word.lnk</Link1>
                <Link2>%programdata%\Microsoft\Windows\Start Menu\Programs\Excel.lnk</Link2>
            </TaskbarLinks>
            <UserAccounts>
                <LocalAccounts>
                    <LocalAccount wcm:action="add">
                        <Password>
                            <Value>123456a@</Value>
                            <PlainText>true</PlainText>
                        </Password>
                        <Description>Local admin account</Description>
                        <DisplayName>Nguyen Duc Manh</DisplayName>
                        <Group>Administrators</Group>
                        <Name>manhnd</Name>
                    </LocalAccount>
                    <LocalAccount wcm:action="add">
                        <Description>Daily standard account</Description>
                        <DisplayName>Vuong Viet Dung</DisplayName>
                        <Group>Users</Group>
                        <Name>dungvv</Name>
                    </LocalAccount>
                </LocalAccounts>
            </UserAccounts>
            <TimeZone>SE Asia Standard Time</TimeZone>
        </component>
        <component name="Microsoft-Windows-Shell-Setup" processorArchitecture="x86" publicKeyToken="31bf3856ad364e35" language="neutral" versionScope="nonSxS" xmlns:wcm="http://schemas.microsoft.com/WMIConfig/2002/State" xmlns:xsi="http://www.w3.org/2001/XMLSchema-instance">
            <FirstLogonCommands>
                <SynchronousCommand wcm:action="add">
                    <Order>1</Order>
                    <Description>Open File Explorer to This PC</Description>
                    <CommandLine>reg add "HKEY_CURRENT_USER\Software\Microsoft\Windows\CurrentVersion\Explorer\Advanced" /v LaunchTo /t REG_DWORD /d 1 /f</CommandLine>
                </SynchronousCommand>
                <SynchronousCommand wcm:action="add">
                    <Order>2</Order>
                    <Description>Control Panel 1</Description>
                    <CommandLine>reg add "HKEY_CURRENT_USER\SOFTWARE\Microsoft\Windows\CurrentVersion\Explorer\ControlPanel" /v AllItemsIconView /t REG_DWORD /d 0 /f</CommandLine>
                </SynchronousCommand>
                <SynchronousCommand wcm:action="add">
                    <Order>3</Order>
                    <Description>Control Panel 2</Description>
                    <CommandLine>reg add "HKEY_CURRENT_USER\SOFTWARE\Microsoft\Windows\CurrentVersion\Explorer\ControlPanel" /v StartupPage /t REG_DWORD /d 1 /f</CommandLine>
                </SynchronousCommand>
            </FirstLogonCommands>
            <OOBE>
                <HideEULAPage>true</HideEULAPage>
                <ProtectYourPC>1</ProtectYourPC>
                <HideLocalAccountScreen>true</HideLocalAccountScreen>
                <HideOEMRegistrationScreen>true</HideOEMRegistrationScreen>
                <HideOnlineAccountScreens>true</HideOnlineAccountScreens>
                <HideWirelessSetupInOOBE>true</HideWirelessSetupInOOBE>
                <NetworkLocation>Work</NetworkLocation>
                <UnattendEnableRetailDemo>false</UnattendEnableRetailDemo>
            </OOBE>
            <TaskbarLinks>
                <Link0>%programdata%\Microsoft\Windows\Start Menu\Programs\Google Chrome.lnk</Link0>
                <Link1>%programdata%\Microsoft\Windows\Start Menu\Programs\Word.lnk</Link1>
                <Link2>%programdata%\Microsoft\Windows\Start Menu\Programs\Excel.lnk</Link2>
            </TaskbarLinks>
            <UserAccounts>
                <LocalAccounts>
                    <LocalAccount wcm:action="add">
                        <Password>
                            <Value>123456a@</Value>
                            <PlainText>true</PlainText>
                        </Password>
                        <Description>Local admin account</Description>
                        <DisplayName>Nguyen Duc Manh</DisplayName>
                        <Group>Administrators</Group>
                        <Name>manhnd</Name>
                    </LocalAccount>
                    <LocalAccount wcm:action="add">
                        <Description>Daily standard account</Description>
                        <DisplayName>Vuong Viet Dung</DisplayName>
                        <Group>Users</Group>
                        <Name>dungvv</Name>
                    </LocalAccount>
                </LocalAccounts>
            </UserAccounts>
            <TimeZone>SE Asia Standard Time</TimeZone>
        </component>
    </settings>
Mô tả:
1. component name="Microsoft-Windows-International-Core": Dùng để cấu hình Ngôn ngữ và địa điểm.
2. component name="Microsoft-Windows-Shell-Setup":
+ <FirstLogonCommands>: Chạy một số lệnh khi lần đầu đăng nhập.
+ <OOBE>: Cấu hình các thiết lập: EULAPage, NetworkLocation, ProtectYourPC, AccountScreen, WirelessSetup,...
+ <TaskbarLinks>: Thêm các icon vào taskbar (tối đa 3 icon).
+ <UserAccounts>: Cấu hình tài khoản người dùng mới.
+ <TimeZone>: Thiết lập múi giờ.
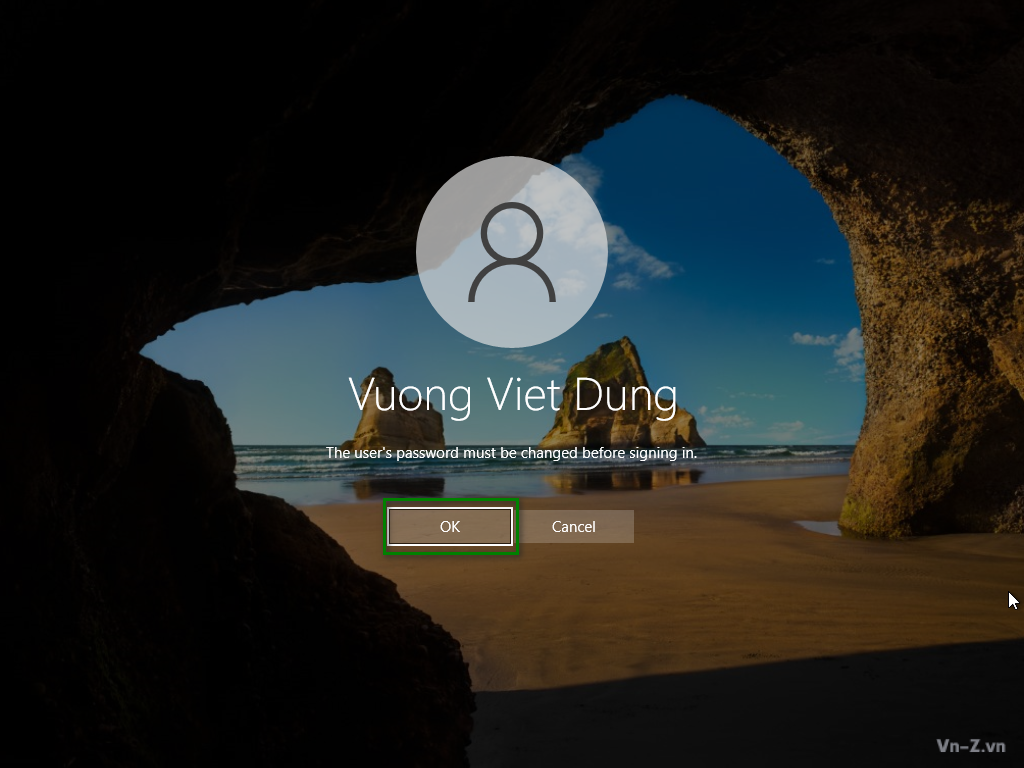
Ảnh demo khi tạo tài khoản bằng file trả lời tự động:
Trong phần này mình sẽ chia sẻ một số thủ thuật và component khác mà bạn có thể sử dụng.
1. File autounattend.xml tổng hợp
1.1 Windows 7
1.2 Windows 10
Cách sử dụng:
1. Save lại nội dung bên trên với tên file autounattend.xml. Đưa file này vào root iso/usb. Chú ý khi bộ cài có 2 folder x64 và x86 thì file này cũng nằm ngang hàng với 2 folder x64 và x86.
2. Sử dụng trong quá trình sysprep bằng lệnh: sysprep.exe /generalize /shutdown /oobe /unattend:unattend.xml. Chú ý copy file unattend.xml vào C:\Windows\System32\Sysprep\
3. Khi sử dụng file trả lời tự động trong quá trình sysprep thì nên tách riêng <settings pass="windowsPE"> ra 1 file để ở root iso/usb.
2. Một số component tham khảo
2.1 Thêm driver vào bộ cài (không tích hợp vào file install)
+ Tạo folder $WinPEDriver$ ngang hàng với folder sources.
+ Thêm vào file AutoUnattend.xml bên dưới <settings pass="windowsPE">
2.2 OEMInformation
Việc thêm thông tin OEM vào hệ điều hành ngoài cách chạy lệnh add vào registry thì chúng ta còn có cách sử dụng lệnh <OEMInformation>
hoặc:
2.3 <DiskConfiguration>
Lệnh này chỉ dùng khi bạn triển khai hàng loạt cho nhiều máy tính mới. Không sử dụng khi cài lại windows mà trên đĩa cứng đang có dữ liệu.
2.4. <Themes>
2.5 Enable tài khoản Administrator built-in
2.6 SYSTEM VARIABLES
2.7 Một số lệnh tạo Partitions
CreatePartitions-BIOS:
CreatePartitions-BIOS-FFU:
CreatePartitions-UEFI:
CreatePartitions-UEFI-FFU:
CreateRecoveryPartitions-BIOS:
CreateRecoveryPartitions-UEFI:
HideRecoveryPartitions-BIOS:
HideRecoveryPartitions-UEFI:
1. File autounattend.xml tổng hợp
1.1 Windows 7
XML:
<?xml version="1.0" encoding="utf-8"?>
<unattend xmlns="urn:schemas-microsoft-com:unattend">
    <settings pass="windowsPE">
        <component name="Microsoft-Windows-International-Core-WinPE" processorArchitecture="x86" publicKeyToken="31bf3856ad364e35" language="neutral" versionScope="nonSxS" xmlns:wcm="http://schemas.microsoft.com/WMIConfig/2002/State" xmlns:xsi="http://www.w3.org/2001/XMLSchema-instance">
            <SetupUILanguage>
                <UILanguage>en-US</UILanguage>
            </SetupUILanguage>
            <InputLocale>1033:00000409</InputLocale>
            <SystemLocale>en-US</SystemLocale>
            <UILanguage>en-US</UILanguage>
            <UserLocale>en-US</UserLocale>
        </component>
        <component name="Microsoft-Windows-International-Core-WinPE" processorArchitecture="amd64" publicKeyToken="31bf3856ad364e35" language="neutral" versionScope="nonSxS" xmlns:wcm="http://schemas.microsoft.com/WMIConfig/2002/State" xmlns:xsi="http://www.w3.org/2001/XMLSchema-instance">
            <SetupUILanguage>
                <UILanguage>en-US</UILanguage>
            </SetupUILanguage>
            <InputLocale>1033:00000409</InputLocale>
            <SystemLocale>en-US</SystemLocale>
            <UILanguage>en-US</UILanguage>
            <UserLocale>en-US</UserLocale>
        </component>
        <component name="Microsoft-Windows-Setup" processorArchitecture="x86" publicKeyToken="31bf3856ad364e35" language="neutral" versionScope="nonSxS" xmlns:wcm="http://schemas.microsoft.com/WMIConfig/2002/State" xmlns:xsi="http://www.w3.org/2001/XMLSchema-instance">
            <UserData>
                <AcceptEula>true</AcceptEula>
            </UserData>
            <EnableFirewall>true</EnableFirewall>
        </component>
        <component name="Microsoft-Windows-Setup" processorArchitecture="amd64" publicKeyToken="31bf3856ad364e35" language="neutral" versionScope="nonSxS" xmlns:wcm="http://schemas.microsoft.com/WMIConfig/2002/State" xmlns:xsi="http://www.w3.org/2001/XMLSchema-instance">
            <UserData>
                <AcceptEula>true</AcceptEula>
            </UserData>
            <EnableFirewall>true</EnableFirewall>
        </component>
    </settings>
    <settings pass="generalize">
        <component name="Microsoft-Windows-Security-SPP" processorArchitecture="x86" publicKeyToken="31bf3856ad364e35" language="neutral" versionScope="nonSxS" xmlns:wcm="http://schemas.microsoft.com/WMIConfig/2002/State" xmlns:xsi="http://www.w3.org/2001/XMLSchema-instance">
            <SkipRearm>1</SkipRearm>
        </component>
    </settings>
    <settings pass="generalize">
        <component name="Microsoft-Windows-Security-SPP" processorArchitecture="amd64" publicKeyToken="31bf3856ad364e35" language="neutral" versionScope="nonSxS" xmlns:wcm="http://schemas.microsoft.com/WMIConfig/2002/State" xmlns:xsi="http://www.w3.org/2001/XMLSchema-instance">
            <SkipRearm>1</SkipRearm>
        </component>
    </settings>
    <settings pass="specialize">
        <component name="Microsoft-Windows-Security-SPP-UX" processorArchitecture="x86" publicKeyToken="31bf3856ad364e35" language="neutral" versionScope="nonSxS" xmlns:wcm="http://schemas.microsoft.com/WMIConfig/2002/State" xmlns:xsi="http://www.w3.org/2001/XMLSchema-instance">
            <SkipAutoActivation>true</SkipAutoActivation>
        </component>
        <component name="Microsoft-Windows-Security-SPP-UX" processorArchitecture="amd64" publicKeyToken="31bf3856ad364e35" language="neutral" versionScope="nonSxS" xmlns:wcm="http://schemas.microsoft.com/WMIConfig/2002/State" xmlns:xsi="http://www.w3.org/2001/XMLSchema-instance">
            <SkipAutoActivation>true</SkipAutoActivation>
        </component>
        <component name="Microsoft-Windows-SystemRestore-Main" processorArchitecture="x86" publicKeyToken="31bf3856ad364e35" language="neutral" versionScope="nonSxS" xmlns:wcm="http://schemas.microsoft.com/WMIConfig/2002/State" xmlns:xsi="http://www.w3.org/2001/XMLSchema-instance">
            <DisableSR>1</DisableSR>
        </component>
        <component name="Microsoft-Windows-SystemRestore-Main" processorArchitecture="amd64" publicKeyToken="31bf3856ad364e35" language="neutral" versionScope="nonSxS" xmlns:wcm="http://schemas.microsoft.com/WMIConfig/2002/State" xmlns:xsi="http://www.w3.org/2001/XMLSchema-instance">
            <DisableSR>1</DisableSR>
        </component>
        <component name="Microsoft-Windows-Deployment" processorArchitecture="x86" publicKeyToken="31bf3856ad364e35" language="neutral" versionScope="nonSxS" xmlns:wcm="http://schemas.microsoft.com/WMIConfig/2002/State" xmlns:xsi="http://www.w3.org/2001/XMLSchema-instance">
            <RunSynchronous>
                <RunSynchronousCommand wcm:action="add">
                    <Description>Add This PC Desktop Icon 1</Description>
                    <Order>1</Order>
                    <Path>cmd /c  reg add HKLM\SOFTWARE\Microsoft\Windows\CurrentVersion\Explorer\HideDesktopIcons\ClassicStartMenu /v {871C5380-42A0-1069-A2EA-08002B30309D}.default /t REG_DWORD /d 0 /f</Path>
                </RunSynchronousCommand>
                <RunSynchronousCommand wcm:action="add">
                    <Description>Add This PC Desktop Icon 2</Description>
                    <Order>2</Order>
                    <Path>cmd /c  reg add HKLM\SOFTWARE\Microsoft\Windows\CurrentVersion\Explorer\HideDesktopIcons\NewStartPanel /v {20D04FE0-3AEA-1069-A2D8-08002B30309D} /t REG_DWORD /d 0 /f</Path>
                </RunSynchronousCommand>
                <RunSynchronousCommand wcm:action="add">
                    <Description>Support URL</Description>
                    <Order>3</Order>
                    <Path>cmd /c  reg add HKLM\SOFTWARE\Microsoft\Windows\CurrentVersion\OEMInformation /v Manufacturer /t REG_SZ /d AKIO /f</Path>
                </RunSynchronousCommand>
                <RunSynchronousCommand wcm:action="add">
                    <Description>Support URL</Description>
                    <Order>4</Order>
                    <Path>cmd /c  reg add HKLM\SOFTWARE\Microsoft\Windows\CurrentVersion\OEMInformation /v SupportURL /t REG_SZ /d https://vn-z.vn/tags/manhnd/ /f</Path>
                </RunSynchronousCommand>
                <RunSynchronousCommand wcm:action="add">
                    <Description>Support URL</Description>
                    <Order>5</Order>
                    <Path>cmd /c  reg add HKLM\SOFTWARE\Microsoft\Windows\CurrentVersion\OEMInformation /v SupportHours /t REG_SZ /d 24/7 /f</Path>
                </RunSynchronousCommand>
                <RunSynchronousCommand wcm:action="add">
                    <Description>Support URL</Description>
                    <Order>6</Order>
                    <Path>cmd /c  reg add HKLM\SOFTWARE\Microsoft\Windows\CurrentVersion\OEMInformation /v SupportPhone /t REG_SZ /d "+84 91 664 8537" /f</Path>
                </RunSynchronousCommand>
            </RunSynchronous>
        </component>
        <component name="Microsoft-Windows-Deployment" processorArchitecture="amd64" publicKeyToken="31bf3856ad364e35" language="neutral" versionScope="nonSxS" xmlns:wcm="http://schemas.microsoft.com/WMIConfig/2002/State" xmlns:xsi="http://www.w3.org/2001/XMLSchema-instance">
            <RunSynchronous>
                <RunSynchronousCommand wcm:action="add">
                    <Description>Add This PC Desktop Icon 1</Description>
                    <Order>1</Order>
                    <Path>cmd /c  reg add HKLM\SOFTWARE\Microsoft\Windows\CurrentVersion\Explorer\HideDesktopIcons\ClassicStartMenu /v {871C5380-42A0-1069-A2EA-08002B30309D}.default /t REG_DWORD /d 0 /f</Path>
                </RunSynchronousCommand>
                <RunSynchronousCommand wcm:action="add">
                    <Description>Add This PC Desktop Icon 2</Description>
                    <Order>2</Order>
                    <Path>cmd /c  reg add HKLM\SOFTWARE\Microsoft\Windows\CurrentVersion\Explorer\HideDesktopIcons\NewStartPanel /v {20D04FE0-3AEA-1069-A2D8-08002B30309D} /t REG_DWORD /d 0 /f</Path>
                </RunSynchronousCommand>
                <RunSynchronousCommand wcm:action="add">
                    <Description>Support URL</Description>
                    <Order>3</Order>
                    <Path>cmd /c  reg add HKLM\SOFTWARE\Microsoft\Windows\CurrentVersion\OEMInformation /v Manufacturer /t REG_SZ /d AKIO /f</Path>
                </RunSynchronousCommand>
                <RunSynchronousCommand wcm:action="add">
                    <Description>Support URL</Description>
                    <Order>4</Order>
                    <Path>cmd /c  reg add HKLM\SOFTWARE\Microsoft\Windows\CurrentVersion\OEMInformation /v SupportURL /t REG_SZ /d https://vn-z.vn/tags/manhnd/ /f</Path>
                </RunSynchronousCommand>
                <RunSynchronousCommand wcm:action="add">
                    <Description>Support URL</Description>
                    <Order>5</Order>
                    <Path>cmd /c  reg add HKLM\SOFTWARE\Microsoft\Windows\CurrentVersion\OEMInformation /v SupportHours /t REG_SZ /d 24/7 /f</Path>
                </RunSynchronousCommand>
                <RunSynchronousCommand wcm:action="add">
                    <Description>Support URL</Description>
                    <Order>6</Order>
                    <Path>cmd /c  reg add HKLM\SOFTWARE\Microsoft\Windows\CurrentVersion\OEMInformation /v SupportPhone /t REG_SZ /d "+84 91 664 8537" /f</Path>
                </RunSynchronousCommand>
            </RunSynchronous>
        </component>
        <component name="Microsoft-Windows-Shell-Setup" processorArchitecture="x86" publicKeyToken="31bf3856ad364e35" language="neutral" versionScope="nonSxS" xmlns:wcm="http://schemas.microsoft.com/WMIConfig/2002/State" xmlns:xsi="http://www.w3.org/2001/XMLSchema-instance">
            <ComputerName>*</ComputerName>
            <copyprofile>true</copyprofile>
            <RegisteredOrganization>AKIO</RegisteredOrganization>
            <RegisteredOwner>Users</RegisteredOwner>
            <TimeZone>SE Asia Standard Time</TimeZone>
        </component>
        <component name="Microsoft-Windows-Shell-Setup" processorArchitecture="amd64" publicKeyToken="31bf3856ad364e35" language="neutral" versionScope="nonSxS" xmlns:wcm="http://schemas.microsoft.com/WMIConfig/2002/State" xmlns:xsi="http://www.w3.org/2001/XMLSchema-instance">
            <ComputerName>*</ComputerName>
            <copyprofile>true</copyprofile>
            <RegisteredOrganization>AKIO</RegisteredOrganization>
            <RegisteredOwner>Users</RegisteredOwner>
            <TimeZone>SE Asia Standard Time</TimeZone>
        </component>
    </settings>
    <settings pass="oobeSystem">
        <component name="Microsoft-Windows-International-Core" processorArchitecture="x86" publicKeyToken="31bf3856ad364e35" language="neutral" versionScope="nonSxS" xmlns:wcm="http://schemas.microsoft.com/WMIConfig/2002/State" xmlns:xsi="http://www.w3.org/2001/XMLSchema-instance">
            <InputLocale>1033:00000409</InputLocale>
            <SystemLocale>en-US</SystemLocale>
            <UILanguage>en-US</UILanguage>
            <UILanguageFallback>en-US</UILanguageFallback>
            <UserLocale>en-US</UserLocale>
        </component>
        <component name="Microsoft-Windows-International-Core" processorArchitecture="amd64" publicKeyToken="31bf3856ad364e35" language="neutral" versionScope="nonSxS" xmlns:wcm="http://schemas.microsoft.com/WMIConfig/2002/State" xmlns:xsi="http://www.w3.org/2001/XMLSchema-instance">
            <InputLocale>1033:00000409</InputLocale>
            <SystemLocale>en-US</SystemLocale>
            <UILanguage>en-US</UILanguage>
            <UILanguageFallback>en-US</UILanguageFallback>
            <UserLocale>en-US</UserLocale>
        </component>
        <component name="Microsoft-Windows-Shell-Setup" processorArchitecture="x86" publicKeyToken="31bf3856ad364e35" language="neutral" versionScope="nonSxS" xmlns:wcm="http://schemas.microsoft.com/WMIConfig/2002/State" xmlns:xsi="http://www.w3.org/2001/XMLSchema-instance">
            <FirstLogonCommands>
                <SynchronousCommand wcm:action="add">
                    <Description>Control Panel View</Description>
                    <CommandLine>reg add HKEY_CURRENT_USER\Software\Microsoft\Windows\CurrentVersion\Explorer\ControlPanel /v StartupPage /t REG_DWORD /d 1 /f</CommandLine>
                    <Order>1</Order>
                    <RequiresUserInput>true</RequiresUserInput>
                </SynchronousCommand>
                <SynchronousCommand wcm:action="add">
                    <CommandLine>reg add HKEY_CURRENT_USER\Software\Microsoft\Windows\CurrentVersion\Explorer\ControlPanel /v AllItemsIconView /t REG_DWORD /d 0 /f</CommandLine>
                    <Description>Control Panel Icon Size</Description>
                    <Order>2</Order>
                    <RequiresUserInput>true</RequiresUserInput>
                </SynchronousCommand>
            </FirstLogonCommands>
            <OOBE>
                <HideEULAPage>true</HideEULAPage>
                <NetworkLocation>Work</NetworkLocation>
                <ProtectYourPC>3</ProtectYourPC>
                <HideWirelessSetupInOOBE>true</HideWirelessSetupInOOBE>
            </OOBE>
            <TaskbarLinks>
                <Link0>%programdata%\Microsoft\Windows\Start Menu\Programs\Microsoft Edge.lnk</Link0>
                <Link1>%programdata%\Microsoft\Windows\Start Menu\Programs\Google Chrome.lnk</Link1>
                <Link2></Link2>
            </TaskbarLinks>
            <UserAccounts>
                <LocalAccounts>
                    <LocalAccount wcm:action="add">
                        <Password>
                            <Value>123456a@</Value>
                            <PlainText>true</PlainText>
                        </Password>
                        <Description>Admin</Description>
                        <DisplayName>Nguyen Duc Manh</DisplayName>
                        <Group>Administrators</Group>
                        <Name>manhnd</Name>
                    </LocalAccount>
                </LocalAccounts>
            </UserAccounts>
            <TimeZone>SE Asia Standard Time</TimeZone>
        </component>
        <component name="Microsoft-Windows-Shell-Setup" processorArchitecture="amd64" publicKeyToken="31bf3856ad364e35" language="neutral" versionScope="nonSxS" xmlns:wcm="http://schemas.microsoft.com/WMIConfig/2002/State" xmlns:xsi="http://www.w3.org/2001/XMLSchema-instance">
            <FirstLogonCommands>
                <SynchronousCommand wcm:action="add">
                    <Description>Control Panel View</Description>
                    <CommandLine>reg add HKEY_CURRENT_USER\Software\Microsoft\Windows\CurrentVersion\Explorer\ControlPanel /v StartupPage /t REG_DWORD /d 1 /f</CommandLine>
                    <Order>1</Order>
                    <RequiresUserInput>true</RequiresUserInput>
                </SynchronousCommand>
                <SynchronousCommand wcm:action="add">
                    <CommandLine>reg add HKEY_CURRENT_USER\Software\Microsoft\Windows\CurrentVersion\Explorer\ControlPanel /v AllItemsIconView /t REG_DWORD /d 0 /f</CommandLine>
                    <Description>Control Panel Icon Size</Description>
                    <Order>2</Order>
                    <RequiresUserInput>true</RequiresUserInput>
                </SynchronousCommand>
            </FirstLogonCommands>
            <OOBE>
                <HideEULAPage>true</HideEULAPage>
                <NetworkLocation>Work</NetworkLocation>
                <ProtectYourPC>3</ProtectYourPC>
                <HideWirelessSetupInOOBE>true</HideWirelessSetupInOOBE>
            </OOBE>
            <TaskbarLinks>
                <Link0>%programdata%\Microsoft\Windows\Start Menu\Programs\Microsoft Edge.lnk</Link0>
                <Link1>%programdata%\Microsoft\Windows\Start Menu\Programs\Google Chrome.lnk</Link1>
                <Link2></Link2>
            </TaskbarLinks>
            <UserAccounts>
                <LocalAccounts>
                    <LocalAccount wcm:action="add">
                        <Password>
                            <Value>123456a@</Value>
                            <PlainText>true</PlainText>
                        </Password>
                        <Description>Admin</Description>
                        <DisplayName>Nguyen Duc Manh</DisplayName>
                        <Group>Administrators</Group>
                        <Name>manhnd</Name>
                    </LocalAccount>
                </LocalAccounts>
            </UserAccounts>
            <TimeZone>SE Asia Standard Time</TimeZone>
        </component>
    </settings>
</unattend>
1.2 Windows 10
XML:
<?xml version="1.0" encoding="utf-8"?>
<unattend xmlns="urn:schemas-microsoft-com:unattend">
    <settings pass="windowsPE">
        <component name="Microsoft-Windows-International-Core-WinPE" processorArchitecture="amd64" publicKeyToken="31bf3856ad364e35" language="neutral" versionScope="nonSxS" xmlns:wcm="http://schemas.microsoft.com/WMIConfig/2002/State" xmlns:xsi="http://www.w3.org/2001/XMLSchema-instance">
            <InputLocale>1033:00000409</InputLocale>
            <SystemLocale>en-US</SystemLocale>
            <UILanguage>en-US</UILanguage>
            <UserLocale>en-US</UserLocale>
        </component>
        <component name="Microsoft-Windows-International-Core-WinPE" processorArchitecture="x86" publicKeyToken="31bf3856ad364e35" language="neutral" versionScope="nonSxS" xmlns:wcm="http://schemas.microsoft.com/WMIConfig/2002/State" xmlns:xsi="http://www.w3.org/2001/XMLSchema-instance">
            <InputLocale>1033:00000409</InputLocale>
            <SystemLocale>en-US</SystemLocale>
            <UILanguage>en-US</UILanguage>
            <UserLocale>en-US</UserLocale>
        </component>
                <component name="Microsoft-Windows-Setup" processorArchitecture="x86" publicKeyToken="31bf3856ad364e35" language="neutral" versionScope="nonSxS" xmlns:wcm="http://schemas.microsoft.com/WMIConfig/2002/State" xmlns:xsi="http://www.w3.org/2001/XMLSchema-instance">
            <UserData>
                <AcceptEula>true</AcceptEula>
            </UserData>
        </component>
        <component name="Microsoft-Windows-Setup" processorArchitecture="amd64" publicKeyToken="31bf3856ad364e35" language="neutral" versionScope="nonSxS" xmlns:wcm="http://schemas.microsoft.com/WMIConfig/2002/State" xmlns:xsi="http://www.w3.org/2001/XMLSchema-instance">
            <UserData>
                <AcceptEula>true</AcceptEula>
            </UserData>
        </component>
    </settings>
    <settings pass="generalize">
        <component name="Microsoft-Windows-Security-SPP" processorArchitecture="amd64" publicKeyToken="31bf3856ad364e35" language="neutral" versionScope="nonSxS" xmlns:wcm="http://schemas.microsoft.com/WMIConfig/2002/State" xmlns:xsi="http://www.w3.org/2001/XMLSchema-instance">
            <SkipRearm>1</SkipRearm>
        </component>
        <component name="Microsoft-Windows-Security-SPP" processorArchitecture="x86" publicKeyToken="31bf3856ad364e35" language="neutral" versionScope="nonSxS" xmlns:wcm="http://schemas.microsoft.com/WMIConfig/2002/State" xmlns:xsi="http://www.w3.org/2001/XMLSchema-instance">
            <SkipRearm>1</SkipRearm>
        </component>
        <component name="Microsoft-Windows-WorkstationService" processorArchitecture="amd64" publicKeyToken="31bf3856ad364e35" language="neutral" versionScope="nonSxS" xmlns:wcm="http://schemas.microsoft.com/WMIConfig/2002/State" xmlns:xsi="http://www.w3.org/2001/XMLSchema-instance">
            <AllowInsecureGuestAuth>1</AllowInsecureGuestAuth>
        </component>
        <component name="Microsoft-Windows-WorkstationService" processorArchitecture="x86" publicKeyToken="31bf3856ad364e35" language="neutral" versionScope="nonSxS" xmlns:wcm="http://schemas.microsoft.com/WMIConfig/2002/State" xmlns:xsi="http://www.w3.org/2001/XMLSchema-instance">
            <AllowInsecureGuestAuth>1</AllowInsecureGuestAuth>
        </component>
    </settings>
    <settings pass="specialize">
        <component name="Microsoft-Windows-Deployment" processorArchitecture="amd64" publicKeyToken="31bf3856ad364e35" language="neutral" versionScope="nonSxS" xmlns:wcm="http://schemas.microsoft.com/WMIConfig/2002/State" xmlns:xsi="http://www.w3.org/2001/XMLSchema-instance">
            <RunSynchronous>
                <RunSynchronousCommand wcm:action="add">
                    <Description>Allow Insecure Guest Auth</Description>
                    <Order>1</Order>
                    <Path>cmd /c  reg add HKLM\SYSTEM\CurrentControlSet\Services\LanmanWorkstation\Parameters /v AllowInsecureGuestAuth /t REG_DWORD /d 1 /f</Path>
                </RunSynchronousCommand>
                <RunSynchronousCommand wcm:action="add">
                    <Description>Disable Reserves</Description>
                    <Order>2</Order>
                    <Path>cmd /c  reg add HKLM\SOFTWARE\Microsoft\Windows\CurrentVersion\ReserveManager /v ShippedWithReserves /t REG_DWORD /d 0 /f</Path>
                </RunSynchronousCommand>
                <RunSynchronousCommand wcm:action="add">
                    <Description>Disable Acrylic Background On Logon</Description>
                    <Order>3</Order>
                    <Path>cmd /c  reg add HKLM\SOFTWARE\Policies\Microsoft\Windows\System /v DisableAcrylicBackgroundOnLogon /t REG_DWORD /d 1 /f</Path>
                </RunSynchronousCommand>
                <RunSynchronousCommand wcm:action="add">
                    <Description>Copy To folder</Description>
                    <Order>4</Order>
                    <Path>cmd /c  reg add HKCR\AllFilesystemObjects\shellex\ContextMenuHandlers\{C2FBB630-2971-11D1-A18C-00C04FD75D13} /f</Path>
                </RunSynchronousCommand>
                <RunSynchronousCommand wcm:action="add">
                    <Description>Move To folder</Description>
                    <Order>5</Order>
                    <Path>cmd /c  reg add HKCR\AllFilesystemObjects\shellex\ContextMenuHandlers\{C2FBB631-2971-11D1-A18C-00C04FD75D13} /f</Path>
                </RunSynchronousCommand>
                <RunSynchronousCommand wcm:action="add">
                    <Description>Add This PC Desktop Icon 1</Description>
                    <Order>6</Order>
                    <Path>cmd /c  reg add HKLM\SOFTWARE\Microsoft\Windows\CurrentVersion\Explorer\HideDesktopIcons\ClassicStartMenu /v {871C5380-42A0-1069-A2EA-08002B30309D}.default /t REG_DWORD /d 0 /f</Path>
                </RunSynchronousCommand>
                <RunSynchronousCommand wcm:action="add">
                    <Description>Add This PC Desktop Icon 2</Description>
                    <Order>7</Order>
                    <Path>cmd /c  reg add HKLM\SOFTWARE\Microsoft\Windows\CurrentVersion\Explorer\HideDesktopIcons\NewStartPanel /v {20D04FE0-3AEA-1069-A2D8-08002B30309D} /t REG_DWORD /d 0 /f</Path>
                </RunSynchronousCommand>
                <RunSynchronousCommand wcm:action="add">
                    <Description>Support URL</Description>
                    <Order>8</Order>
                    <Path>cmd /c  reg add HKLM\SOFTWARE\Microsoft\Windows\CurrentVersion\OEMInformation /v Manufacturer /t REG_SZ /d AKIO /f</Path>
                </RunSynchronousCommand>
                <RunSynchronousCommand wcm:action="add">
                    <Description>Support URL</Description>
                    <Order>9</Order>
                    <Path>cmd /c  reg add HKLM\SOFTWARE\Microsoft\Windows\CurrentVersion\OEMInformation /v SupportURL /t REG_SZ /d https://vn-z.vn/tags/manhnd/ /f</Path>
                </RunSynchronousCommand>
                <RunSynchronousCommand wcm:action="add">
                    <Description>Support URL</Description>
                    <Order>10</Order>
                    <Path>cmd /c  reg add HKLM\SOFTWARE\Microsoft\Windows\CurrentVersion\OEMInformation /v SupportHours /t REG_SZ /d 24/7 /f</Path>
                </RunSynchronousCommand>
                <RunSynchronousCommand wcm:action="add">
                    <Description>Support URL</Description>
                    <Order>11</Order>
                    <Path>cmd /c  reg add HKLM\SOFTWARE\Microsoft\Windows\CurrentVersion\OEMInformation /v SupportPhone /t REG_SZ /d "+84 91 664 8537" /f</Path>
                </RunSynchronousCommand>
            </RunSynchronous>
        </component>
        <component name="Microsoft-Windows-Deployment" processorArchitecture="x86" publicKeyToken="31bf3856ad364e35" language="neutral" versionScope="nonSxS" xmlns:wcm="http://schemas.microsoft.com/WMIConfig/2002/State" xmlns:xsi="http://www.w3.org/2001/XMLSchema-instance">
            <RunSynchronous>
                <RunSynchronousCommand wcm:action="add">
                    <Description>Allow Insecure Guest Auth</Description>
                    <Order>1</Order>
                    <Path>cmd /c  reg add HKLM\SYSTEM\CurrentControlSet\Services\LanmanWorkstation\Parameters /v AllowInsecureGuestAuth /t REG_DWORD /d 1 /f</Path>
                </RunSynchronousCommand>
                 <RunSynchronousCommand wcm:action="add">
                    <Description>Disable Reserves</Description>
                    <Order>2</Order>
                    <Path>cmd /c  reg add HKLM\SOFTWARE\Microsoft\Windows\CurrentVersion\ReserveManager /v ShippedWithReserves /t REG_DWORD /d 0 /f</Path>
                </RunSynchronousCommand>
                <RunSynchronousCommand wcm:action="add">
                    <Description>Disable Acrylic Background On Logon</Description>
                    <Order>3</Order>
                    <Path>cmd /c  reg add HKLM\SOFTWARE\Policies\Microsoft\Windows\System /v DisableAcrylicBackgroundOnLogon /t REG_DWORD /d 1 /f</Path>
                </RunSynchronousCommand>
                <RunSynchronousCommand wcm:action="add">
                    <Description>Copy To folder</Description>
                    <Order>4</Order>
                    <Path>cmd /c  reg add HKCR\AllFilesystemObjects\shellex\ContextMenuHandlers\{C2FBB630-2971-11D1-A18C-00C04FD75D13} /f</Path>
                </RunSynchronousCommand>
                <RunSynchronousCommand wcm:action="add">
                    <Description>Move To folder</Description>
                    <Order>5</Order>
                    <Path>cmd /c  reg add HKCR\AllFilesystemObjects\shellex\ContextMenuHandlers\{C2FBB631-2971-11D1-A18C-00C04FD75D13} /f</Path>
                </RunSynchronousCommand>
                <RunSynchronousCommand wcm:action="add">
                    <Description>Add This PC Desktop Icon 1</Description>
                    <Order>6</Order>
                    <Path>cmd /c  reg add HKLM\SOFTWARE\Microsoft\Windows\CurrentVersion\Explorer\HideDesktopIcons\ClassicStartMenu /v {871C5380-42A0-1069-A2EA-08002B30309D}.default /t REG_DWORD /d 0 /f</Path>
                </RunSynchronousCommand>
                <RunSynchronousCommand wcm:action="add">
                    <Description>Add This PC Desktop Icon 2</Description>
                    <Order>7</Order>
                    <Path>cmd /c  reg add HKLM\SOFTWARE\Microsoft\Windows\CurrentVersion\Explorer\HideDesktopIcons\NewStartPanel /v {20D04FE0-3AEA-1069-A2D8-08002B30309D} /t REG_DWORD /d 0 /f</Path>
                </RunSynchronousCommand>
                <RunSynchronousCommand wcm:action="add">
                    <Description>Support URL</Description>
                    <Order>8</Order>
                    <Path>cmd /c  reg add HKLM\SOFTWARE\Microsoft\Windows\CurrentVersion\OEMInformation /v Manufacturer /t REG_SZ /d AKIO /f</Path>
                </RunSynchronousCommand>
                <RunSynchronousCommand wcm:action="add">
                    <Description>Support URL</Description>
                    <Order>9</Order>
                    <Path>cmd /c  reg add HKLM\SOFTWARE\Microsoft\Windows\CurrentVersion\OEMInformation /v SupportURL /t REG_SZ /d https://vn-z.vn/tags/manhnd/ /f</Path>
                </RunSynchronousCommand>
                <RunSynchronousCommand wcm:action="add">
                    <Description>Support URL</Description>
                    <Order>10</Order>
                    <Path>cmd /c  reg add HKLM\SOFTWARE\Microsoft\Windows\CurrentVersion\OEMInformation /v SupportHours /t REG_SZ /d 24/7 /f</Path>
                </RunSynchronousCommand>
                <RunSynchronousCommand wcm:action="add">
                    <Description>Support URL</Description>
                    <Order>11</Order>
                    <Path>cmd /c  reg add HKLM\SOFTWARE\Microsoft\Windows\CurrentVersion\OEMInformation /v SupportPhone /t REG_SZ /d "+84 91 664 8537" /f</Path>
                </RunSynchronousCommand>
            </RunSynchronous>
        </component>
        <component name="Microsoft-Windows-Shell-Setup" processorArchitecture="x86" publicKeyToken="31bf3856ad364e35" language="neutral" versionScope="nonSxS" xmlns:wcm="http://schemas.microsoft.com/WMIConfig/2002/State" xmlns:xsi="http://www.w3.org/2001/XMLSchema-instance">
            <ComputerName>*</ComputerName>
            <copyprofile>true</copyprofile>
            <RegisteredOrganization>AKIO</RegisteredOrganization>
            <RegisteredOwner>Users</RegisteredOwner>
            <TimeZone>SE Asia Standard Time</TimeZone>
        </component>
        <component name="Microsoft-Windows-Shell-Setup" processorArchitecture="amd64" publicKeyToken="31bf3856ad364e35" language="neutral" versionScope="nonSxS" xmlns:wcm="http://schemas.microsoft.com/WMIConfig/2002/State" xmlns:xsi="http://www.w3.org/2001/XMLSchema-instance">
            <ComputerName>*</ComputerName>
            <copyprofile>true</copyprofile>
            <RegisteredOrganization>AKIO</RegisteredOrganization>
            <RegisteredOwner>Users</RegisteredOwner>
            <TimeZone>SE Asia Standard Time</TimeZone>
        </component>
    </settings>
    <settings pass="oobeSystem">
        <component name="Microsoft-Windows-International-Core" processorArchitecture="amd64" publicKeyToken="31bf3856ad364e35" language="neutral" versionScope="nonSxS" xmlns:wcm="http://schemas.microsoft.com/WMIConfig/2002/State" xmlns:xsi="http://www.w3.org/2001/XMLSchema-instance">
            <InputLocale>1033:00000409</InputLocale>
            <SystemLocale>en-US</SystemLocale>
            <UILanguage>en-US</UILanguage>
            <UILanguageFallback>en-US</UILanguageFallback>
            <UserLocale>en-US</UserLocale>
        </component>
        <component name="Microsoft-Windows-International-Core" processorArchitecture="x86" publicKeyToken="31bf3856ad364e35" language="neutral" versionScope="nonSxS" xmlns:wcm="http://schemas.microsoft.com/WMIConfig/2002/State" xmlns:xsi="http://www.w3.org/2001/XMLSchema-instance">
            <InputLocale>1033:00000409</InputLocale>
            <SystemLocale>en-US</SystemLocale>
            <UILanguage>en-US</UILanguage>
            <UILanguageFallback>en-US</UILanguageFallback>
            <UserLocale>en-US</UserLocale>
        </component>
        <component name="Microsoft-Windows-Shell-Setup" processorArchitecture="amd64" publicKeyToken="31bf3856ad364e35" language="neutral" versionScope="nonSxS" xmlns:wcm="http://schemas.microsoft.com/WMIConfig/2002/State" xmlns:xsi="http://www.w3.org/2001/XMLSchema-instance">
            <FirstLogonCommands>
                <SynchronousCommand wcm:action="add">
                    <Order>1</Order>
                    <Description>Open File Explorer to This PC</Description>
                    <CommandLine>reg add "HKEY_CURRENT_USER\Software\Microsoft\Windows\CurrentVersion\Explorer\Advanced" /v LaunchTo /t REG_DWORD /d 1 /f</CommandLine>
                </SynchronousCommand>
                <SynchronousCommand wcm:action="add">
                    <Order>2</Order>
                    <Description>Control Panel 1</Description>
                    <CommandLine>reg add "HKEY_CURRENT_USER\SOFTWARE\Microsoft\Windows\CurrentVersion\Explorer\ControlPanel" /v AllItemsIconView /t REG_DWORD /d 0 /f</CommandLine>
                </SynchronousCommand>
                <SynchronousCommand wcm:action="add">
                    <Order>3</Order>
                    <Description>Control Panel 2</Description>
                    <CommandLine>reg add "HKEY_CURRENT_USER\SOFTWARE\Microsoft\Windows\CurrentVersion\Explorer\ControlPanel" /v StartupPage /t REG_DWORD /d 1 /f</CommandLine>
                </SynchronousCommand>
            </FirstLogonCommands>
            <OOBE>
                <HideEULAPage>true</HideEULAPage>
                <ProtectYourPC>1</ProtectYourPC>
                <HideLocalAccountScreen>true</HideLocalAccountScreen>
                <HideOEMRegistrationScreen>true</HideOEMRegistrationScreen>
                <HideOnlineAccountScreens>true</HideOnlineAccountScreens>
                <HideWirelessSetupInOOBE>true</HideWirelessSetupInOOBE>
                <NetworkLocation>Work</NetworkLocation>
                <UnattendEnableRetailDemo>false</UnattendEnableRetailDemo>
            </OOBE>
            <TaskbarLinks>
                <Link0>%programdata%\Microsoft\Windows\Start Menu\Programs\Google Chrome.lnk</Link0>
                <Link1>%programdata%\Microsoft\Windows\Start Menu\Programs\Word.lnk</Link1>
                <Link2>%programdata%\Microsoft\Windows\Start Menu\Programs\Excel.lnk</Link2>
            </TaskbarLinks>
            <UserAccounts>
                <LocalAccounts>
                    <LocalAccount wcm:action="add">
                        <Password>
                            <Value>123456a@</Value>
                            <PlainText>true</PlainText>
                        </Password>
                        <Description>Local admin account</Description>
                        <DisplayName>Nguyen Duc Manh</DisplayName>
                        <Group>Administrators</Group>
                        <Name>manhnd</Name>
                    </LocalAccount>
                    <LocalAccount wcm:action="add">
                        <Description>Daily standard account</Description>
                        <DisplayName>Vuong Viet Dung</DisplayName>
                        <Group>Users</Group>
                        <Name>dungvv</Name>
                    </LocalAccount>
                </LocalAccounts>
            </UserAccounts>
            <TimeZone>SE Asia Standard Time</TimeZone>
        </component>
        <component name="Microsoft-Windows-Shell-Setup" processorArchitecture="x86" publicKeyToken="31bf3856ad364e35" language="neutral" versionScope="nonSxS" xmlns:wcm="http://schemas.microsoft.com/WMIConfig/2002/State" xmlns:xsi="http://www.w3.org/2001/XMLSchema-instance">
            <FirstLogonCommands>
                <SynchronousCommand wcm:action="add">
                    <Order>1</Order>
                    <Description>Open File Explorer to This PC</Description>
                    <CommandLine>reg add "HKEY_CURRENT_USER\Software\Microsoft\Windows\CurrentVersion\Explorer\Advanced" /v LaunchTo /t REG_DWORD /d 1 /f</CommandLine>
                </SynchronousCommand>
                <SynchronousCommand wcm:action="add">
                    <Order>2</Order>
                    <Description>Control Panel 1</Description>
                    <CommandLine>reg add "HKEY_CURRENT_USER\SOFTWARE\Microsoft\Windows\CurrentVersion\Explorer\ControlPanel" /v AllItemsIconView /t REG_DWORD /d 0 /f</CommandLine>
                </SynchronousCommand>
                <SynchronousCommand wcm:action="add">
                    <Order>3</Order>
                    <Description>Control Panel 2</Description>
                    <CommandLine>reg add "HKEY_CURRENT_USER\SOFTWARE\Microsoft\Windows\CurrentVersion\Explorer\ControlPanel" /v StartupPage /t REG_DWORD /d 1 /f</CommandLine>
                </SynchronousCommand>
            </FirstLogonCommands>
            <OOBE>
                <HideEULAPage>true</HideEULAPage>
                <ProtectYourPC>1</ProtectYourPC>
                <HideLocalAccountScreen>true</HideLocalAccountScreen>
                <HideOEMRegistrationScreen>true</HideOEMRegistrationScreen>
                <HideOnlineAccountScreens>true</HideOnlineAccountScreens>
                <HideWirelessSetupInOOBE>true</HideWirelessSetupInOOBE>
                <NetworkLocation>Work</NetworkLocation>
                <UnattendEnableRetailDemo>false</UnattendEnableRetailDemo>
            </OOBE>
            <TaskbarLinks>
                <Link0>%programdata%\Microsoft\Windows\Start Menu\Programs\Google Chrome.lnk</Link0>
                <Link1>%programdata%\Microsoft\Windows\Start Menu\Programs\Word.lnk</Link1>
                <Link2>%programdata%\Microsoft\Windows\Start Menu\Programs\Excel.lnk</Link2>
            </TaskbarLinks>
            <UserAccounts>
                <LocalAccounts>
                    <LocalAccount wcm:action="add">
                        <Password>
                            <Value>123456a@</Value>
                            <PlainText>true</PlainText>
                        </Password>
                        <Description>Local admin account</Description>
                        <DisplayName>Nguyen Duc Manh</DisplayName>
                        <Group>Administrators</Group>
                        <Name>manhnd</Name>
                    </LocalAccount>
                    <LocalAccount wcm:action="add">
                        <Description>Daily standard account</Description>
                        <DisplayName>Vuong Viet Dung</DisplayName>
                        <Group>Users</Group>
                        <Name>dungvv</Name>
                    </LocalAccount>
                </LocalAccounts>
            </UserAccounts>
            <TimeZone>SE Asia Standard Time</TimeZone>
        </component>
    </settings>
</unattend>1. Save lại nội dung bên trên với tên file autounattend.xml. Đưa file này vào root iso/usb. Chú ý khi bộ cài có 2 folder x64 và x86 thì file này cũng nằm ngang hàng với 2 folder x64 và x86.
2. Sử dụng trong quá trình sysprep bằng lệnh: sysprep.exe /generalize /shutdown /oobe /unattend:unattend.xml. Chú ý copy file unattend.xml vào C:\Windows\System32\Sysprep\
3. Khi sử dụng file trả lời tự động trong quá trình sysprep thì nên tách riêng <settings pass="windowsPE"> ra 1 file để ở root iso/usb.
2. Một số component tham khảo
2.1 Thêm driver vào bộ cài (không tích hợp vào file install)
+ Tạo folder $WinPEDriver$ ngang hàng với folder sources.
+ Thêm vào file AutoUnattend.xml bên dưới <settings pass="windowsPE">
XML:
        <component name="Microsoft-Windows-PnpCustomizationsWinPE" processorArchitecture="amd64" publicKeyToken="31bf3856ad364e35" language="neutral" versionScope="nonSxS" xmlns:wcm="http://schemas.microsoft.com/WMIConfig/2002/State" xmlns:xsi="http://www.w3.org/2001/XMLSchema-instance">
            <DriverPaths>
                <PathAndCredentials wcm:action="add" wcm:keyValue="1">
                    <Path>$WinPEDriver$</Path>
                </PathAndCredentials>
            </DriverPaths>
        </component>
        <component name="Microsoft-Windows-PnpCustomizationsWinPE" processorArchitecture="x86" publicKeyToken="31bf3856ad364e35" language="neutral" versionScope="nonSxS" xmlns:wcm="http://schemas.microsoft.com/WMIConfig/2002/State" xmlns:xsi="http://www.w3.org/2001/XMLSchema-instance">
            <DriverPaths>
                <PathAndCredentials wcm:action="add" wcm:keyValue="1">
                    <Path>$WinPEDriver$</Path>
                </PathAndCredentials>
            </DriverPaths>
        </component>
2.2 OEMInformation
Việc thêm thông tin OEM vào hệ điều hành ngoài cách chạy lệnh add vào registry thì chúng ta còn có cách sử dụng lệnh <OEMInformation>
XML:
<settings pass="specialize">
        <component name="Microsoft-Windows-Shell-Setup" processorArchitecture="amd64" publicKeyToken="31bf3856ad364e35" language="neutral" versionScope="nonSxS" xmlns:wcm="http://schemas.microsoft.com/WMIConfig/2002/State" xmlns:xsi="http://www.w3.org/2001/XMLSchema-instance">
            <OEMInformation>
                <Logo>%windir%\Windows\System32\oemlogo.bmp</Logo>
                <Manufacturer>AKIO</Manufacturer>
                <SupportHours>08:30 - 16:30</SupportHours>
                <SupportPhone>+84 91 664 8537</SupportPhone>
                <SupportURL>https://akioway.com</SupportURL>
            </OEMInformation>
     </component>
<component name="Microsoft-Windows-Shell-Setup" processorArchitecture="x86" publicKeyToken="31bf3856ad364e35" language="neutral" versionScope="nonSxS" xmlns:wcm="http://schemas.microsoft.com/WMIConfig/2002/State" xmlns:xsi="http://www.w3.org/2001/XMLSchema-instance">
            <OEMInformation>
                <Logo>%windir%\Windows\System32\oemlogo.bmp</Logo>
                <Manufacturer>AKIO</Manufacturer>
                <SupportHours>08:30 - 16:30</SupportHours>
                <SupportPhone>+84 91 664 8537</SupportPhone>
                <SupportURL>https://akioway.com</SupportURL>
            </OEMInformation>
     </component>
</settings>
hoặc:
XML:
<settings pass="oobe">
        <component name="Microsoft-Windows-Shell-Setup" processorArchitecture="amd64" publicKeyToken="31bf3856ad364e35" language="neutral" versionScope="nonSxS" xmlns:wcm="http://schemas.microsoft.com/WMIConfig/2002/State" xmlns:xsi="http://www.w3.org/2001/XMLSchema-instance">
            <OEMInformation>
                <Logo>%windir%\Windows\System32\oemlogo.bmp</Logo>
                <Manufacturer>AKIO</Manufacturer>
                <SupportHours>08:30 - 16:30</SupportHours>
                <SupportPhone>+84 91 664 8537</SupportPhone>
                <SupportURL>https://akioway.com</SupportURL>
            </OEMInformation>
     </component>
<component name="Microsoft-Windows-Shell-Setup" processorArchitecture="x86" publicKeyToken="31bf3856ad364e35" language="neutral" versionScope="nonSxS" xmlns:wcm="http://schemas.microsoft.com/WMIConfig/2002/State" xmlns:xsi="http://www.w3.org/2001/XMLSchema-instance">
            <OEMInformation>
                <Logo>%windir%\Windows\System32\oemlogo.bmp</Logo>
                <Manufacturer>AKIO</Manufacturer>
                <SupportHours>08:30 - 16:30</SupportHours>
                <SupportPhone>+84 91 664 8537</SupportPhone>
                <SupportURL>https://akioway.com</SupportURL>
            </OEMInformation>
     </component>
</settings>
2.3 <DiskConfiguration>
Lệnh này chỉ dùng khi bạn triển khai hàng loạt cho nhiều máy tính mới. Không sử dụng khi cài lại windows mà trên đĩa cứng đang có dữ liệu.
2.4. <Themes>
XML:
<settings pass="oobeSystem">
        <component name="Microsoft-Windows-Shell-Setup" processorArchitecture="amd64" publicKeyToken="31bf3856ad364e35" language="neutral" versionScope="nonSxS" xmlns:wcm="http://schemas.microsoft.com/WMIConfig/2002/State" xmlns:xsi="http://www.w3.org/2001/XMLSchema-instance">
            <Themes>
                <DesktopBackground>%windir%\system32\OEM\akio.bmp</DesktopBackground>
                <ThemeName>AKIO Theme</ThemeName>
            </Themes>
        </component>
        <component name="Microsoft-Windows-Shell-Setup" processorArchitecture="x86" publicKeyToken="31bf3856ad364e35" language="neutral" versionScope="nonSxS" xmlns:wcm="http://schemas.microsoft.com/WMIConfig/2002/State" xmlns:xsi="http://www.w3.org/2001/XMLSchema-instance">
            <Themes>
                <DesktopBackground>%windir%\system32\OEM\akio.bmp</DesktopBackground>
                <ThemeName>AKIO Theme</ThemeName>
            </Themes>
         </component>
   </settings>
2.5 Enable tài khoản Administrator built-in
XML:
<component name="Microsoft-Windows-Deployment" processorArchitecture="amd64" publicKeyToken="31bf3856ad364e35" language="neutral" versionScope="nonSxS" xmlns:wcm="http://schemas.microsoft.com/WMIConfig/2002/State" xmlns:xsi="http://www.w3.org/2001/XMLSchema-instance">
            <RunSynchronous>
                <RunSynchronousCommand wcm:action="add">
                    <Description>EnableAdmin</Description>
                    <Order>1</Order>
                    <Path>cmd /c net user Administrator /active:yes</Path>
                </RunSynchronousCommand>
            </RunSynchronous>
        </component>
<component name="Microsoft-Windows-Deployment" processorArchitecture="x86" publicKeyToken="31bf3856ad364e35" language="neutral" versionScope="nonSxS" xmlns:wcm="http://schemas.microsoft.com/WMIConfig/2002/State" xmlns:xsi="http://www.w3.org/2001/XMLSchema-instance">
            <RunSynchronous>
                <RunSynchronousCommand wcm:action="add">
                    <Description>EnableAdmin</Description>
                    <Order>1</Order>
                    <Path>cmd /c net user Administrator /active:yes</Path>
                </RunSynchronousCommand>
            </RunSynchronous>
        </component>
2.6 SYSTEM VARIABLES
Mã:
SYSTEM:
%systemdrive%             > C:
%homedrive%               > C:
%windir%                  > C:\Windows
%systemroot%              > C:\Windows
%programfiles%            > C:\Program Files
%programfiles(x86)%       > C:\Program Files (x86)
%commonprogramfiles%      > C:\Program Files\Common Files
%commonprogramfiles(x86)% > C:\Program Files (x86)\Common Files
%programdata%             > C:\ProgramData
%allusersprofile%         > C:\ProgramData
USER:
%userprofile%             > C:\Users\manhnd
%homepath%                > \Users\manhnd
%appdata%                 > C:\Users\manhnd\AppData\Roaming
%localappdata%            > C:\Users\manhnd\AppData\Local
%public%                  > C:\Users\Public
2.7 Một số lệnh tạo Partitions
CreatePartitions-BIOS:
Bash:
rem == CreatePartitions-BIOS.txt ==
rem == These commands are used with DiskPart to
rem    create three partitions
rem    for a BIOS/MBR-based computer.
rem    Adjust the partition sizes to fill the drive
rem    as necessary. ==
select disk 0
clean
rem == 1. System partition ======================
create partition primary size=100
format quick fs=ntfs label="System"
assign letter="S"
active
rem == 2. Windows partition =====================
rem ==    a. Create the Windows partition =======
create partition primary
rem ==    b. Create space for the recovery tools
shrink minimum=500
rem       ** NOTE: Update this size to match the
rem                size of the recovery tools
rem                (winre.wim)                 **
rem ==    c. Prepare the Windows partition ======
format quick fs=ntfs label="Windows"
assign letter="W"
rem == 3. Recovery partition ====================
create partition primary
format quick fs=ntfs label="Recovery image"
assign letter="R"
set id=27
list volume
exit
CreatePartitions-BIOS-FFU:
Bash:
rem == CreatePartitions-BIOS-FFU.txt ==
rem == These commands are used with DiskPart to
rem    create three partitions
rem    for a BIOS/MBR-based computer.
rem    Adjust the partition sizes to fill the drive
rem    as necessary. ==
select disk 0
clean
rem == 1. System partition ======================
create partition primary size=100
format quick fs=ntfs label="System"
assign letter="S"
active
rem == 2. Windows partition =====================
rem ==    a. Create the Windows partition =======
create partition primary
rem ==    c. Prepare the Windows partition ======
format quick fs=ntfs label="Windows"
assign letter="W"
list volume
exit
CreatePartitions-UEFI:
Bash:
rem == CreatePartitions-UEFI.txt ==
rem == These commands are used with DiskPart to
rem    create four partitions
rem    for a UEFI/GPT-based PC.
rem    Adjust the partition sizes to fill the drive
rem    as necessary. ==
select disk 0
clean
convert gpt
rem == 1. System partition =========================
create partition efi size=100
rem    ** NOTE: For Advanced Format 4Kn drives,
rem               change this value to size = 260 **
format quick fs=fat32 label="System"
assign letter="S"
rem == 2. Microsoft Reserved (MSR) partition =======
create partition msr size=16
rem == 3. Windows partition ========================
rem ==    a. Create the Windows partition ==========
create partition primary
rem ==    b. Create space for the recovery tools ===
shrink minimum=500
rem       ** NOTE: Update this size to match the
rem                size of the recovery tools
rem                (winre.wim)                    **
rem ==    c. Prepare the Windows partition =========
format quick fs=ntfs label="Windows"
assign letter="W"
rem === 4. Recovery partition ======================
create partition primary
format quick fs=ntfs label="Recovery"
assign letter="R"
set id="de94bba4-06d1-4d40-a16a-bfd50179d6ac"
gpt attributes=0x8000000000000001
list volume
exit
CreatePartitions-UEFI-FFU:
Bash:
rem == CreatePartitions-UEFI-FFU.txt ==
rem == These commands are used with DiskPart to
rem    create four partitions
rem    for a UEFI/GPT-based PC.
rem    Adjust the partition sizes to fill the drive
rem    as necessary. ==
select disk 0
clean
convert gpt
rem == 1. System partition =========================
create partition efi size=100
rem    ** NOTE: For Advanced Format 4Kn drives,
rem               change this value to size = 260 **
format quick fs=fat32 label="System"
assign letter="S"
rem == 2. Microsoft Reserved (MSR) partition =======
create partition msr size=16
rem == 3. Windows partition ========================
rem ==    a. Create the Windows partition ==========
create partition primary
rem ==    c. Prepare the Windows partition =========
format quick fs=ntfs label="Windows"
assign letter="W"
list volume
exit
CreateRecoveryPartitions-BIOS:
Bash:
rem == CreateRecoveryPartitions-BIOS.txt ==
select disk 0
select partition 2
assign letter="W"
rem == extend the Windows partition ==
shrink minimum=500
extend
rem ==    b. Create space for the recovery tools
shrink minimum=500
rem       ** NOTE: Update this size to match the
rem                size of the recovery tools
rem                (winre.wim)                 **
rem ==    c. Prepare the Recovery partition ======
select disk 0
create partition primary
format quick fs=ntfs label="Recovery image"
assign letter="R"
set id=27
list volume
exit
CreateRecoveryPartitions-UEFI:
Bash:
rem == CreateRecoveryPartitions-UEFI.txt ==
select disk 0
select partition 3
assign letter="W"
rem == extend the Windows partition ==
shrink minimum=500
extend
rem ==    b. Create space for the recovery tools
shrink minimum=500
rem       ** NOTE: Update this size to match the
rem                size of the recovery tools
rem                (winre.wim)                 **
rem === Create Recovery partition ======================
create partition primary
format quick fs=ntfs label="Recovery"
assign letter="R"
set id="de94bba4-06d1-4d40-a16a-bfd50179d6ac"
gpt attributes=0x8000000000000001
list volume
exit
HideRecoveryPartitions-BIOS:
Bash:
rem === HideRecoveryPartitions-BIOS.txt ===
select disk 0
select partition 3
set id=27
remove
list volume
exit
HideRecoveryPartitions-UEFI:
Bash:
rem === HideRecoveryPartitions-UEFI.txt ===
select disk 0
select partition 4
set id=de94bba4-06d1-4d40-a16a-bfd50179d6ac
gpt attributes=0x8000000000000001
remove
list volume
exit
Mã:
https://manhpc.com/huong-dan-cau-hinh-file-tra-loi-tu-dong/Tổng hợp các bản windows 10, 8.1 và 7 do mình build từ bản gốc:
Mã:
https://manhpc.com/he-dieu-hanh/manhpc/
Sửa lần cuối: