Vn-Z.vn ngày 7 tháng 11 năm 2021, Microsoft và Intel gần đây thông báo rằng Hệ thống Windows Linux (WSL2) đã hỗ trợ phần cứng tăng tốc đồ họa của Intel oneAPI Level Zero và Inlel OpenCL.
Cũng giống như Nvidia đã giới thiệu công nghệ CUDA hỗ trợ tăng tốc GPU cho WSL2, phần cứng của Intel giờ đây cũng có thể thực hiện các phép tính chuyên nghiệp thông qua WSL2. Sau khi sử dụng các bản cập nhật và trình điều khiển mới nhất, bạn có thể đạt đến mức hiệu suất của hệ thống Linux nguyên bản.
Đáng chú ý là Microsoft cho phép mã nguồn mở Compute-Runtime của Intel hoạt động trên trình điều khiển hạt nhân nguồn mở nhưng không phải là mainline của Microsoft. Đây là tham chiếu đến trình điều khiển DirectX "dxgkrnl", được phát hành vào năm 2020. Triển vọng của quá trình lồng ghép là rất mong manh, phần lớn là do thiếu các máy khách mã nguồn mở. Giờ đây với mã Compute-Runtime của Intel, Microsoft có thể cố gắng hợp nhất trình điều khiển DXGKRNL của họ vào dòng chính.
 www.intel.com
Vn-Z.vn team tổng hợp
Cũng giống như Nvidia đã giới thiệu công nghệ CUDA hỗ trợ tăng tốc GPU cho WSL2, phần cứng của Intel giờ đây cũng có thể thực hiện các phép tính chuyên nghiệp thông qua WSL2. Sau khi sử dụng các bản cập nhật và trình điều khiển mới nhất, bạn có thể đạt đến mức hiệu suất của hệ thống Linux nguyên bản.
Đáng chú ý là Microsoft cho phép mã nguồn mở Compute-Runtime của Intel hoạt động trên trình điều khiển hạt nhân nguồn mở nhưng không phải là mainline của Microsoft. Đây là tham chiếu đến trình điều khiển DirectX "dxgkrnl", được phát hành vào năm 2020. Triển vọng của quá trình lồng ghép là rất mong manh, phần lớn là do thiếu các máy khách mã nguồn mở. Giờ đây với mã Compute-Runtime của Intel, Microsoft có thể cố gắng hợp nhất trình điều khiển DXGKRNL của họ vào dòng chính.
Người dùng có thể đọc bài hướng dẫn chi tiết tạiAt Microsoft Build 2021, we displayed how you can access iGPU through Windows Subsystem for Linux (WSL2) and it’s as simple as 1, 2...3.
To start, using iGPU you need four things:
1. Windows subsystem for Linux WSL2 installed on your machine
2. New iGPU drivers (installed on host machine)
3. New OpenCL™ Drivers (installed inside WSL2)
4. OpenVINO, which comes in two flavors.
a. OpenVINO™ toolkit–which provides native OpenVINO™ APIs– and its runtime for maximum performance, efficiency, tooling customization, and hardware control.
b. OpenVINO™ integration with TensorFlow*–for TensorFlow developers who want to accelerate their TensorFlow application using OpenVINO inline optimizations, which requires just two additional lines of code.
Steps to Install WSL2
We tested this setup on following flavors of windows:
First thing is to get WSL2 installed on your machine, as per windows documentation there are two ways of doing this. We recommend you follow the simplified installation, which uses Windows Insider program. For now, only with the Windows OS builds distributed with Windows Insider program you can run your inference on iGPU.
- Windows 10/11 Insider preview
- Windows Internet of Things Enterprise LTSC 2H21 (Build 19044)
Windows Insider program:
o Available only for preview build of Windows 10 with OS build 20262 or higher
o Detailed steps are mentioned at this link https://insider.windows.com/getting-started
o To start the WSL2, perform following steps also mentioned here https://docs.microsoft.com/en-us/wi...#simplified-installation-for-windows-insiders:
- Open up the command window with administrator privileges
- wsl --update
- wsl --shutdown
- wsl --install --d Ubuntu-20.04 or wsl --install --d Ubuntu-18.04
- wsl --list --v
- Check that the output of this command shows version as “2” for the Ubuntu installed
Steps to Install iGPU Drivers
- Download and install GPU host driver from https://downloadcenter.intel.com/download/30579/Intel-Graphics-Windows-DCH-Drivers
- Make sure driver the version is 30.0.100.9684, executable file igfx_win_100.9684.exe
Steps to Install OpenCL™ Drivers
- Start WSL2 env by typing WSL icon in the search
- Please follow the steps described in https://github.com/intel/compute-runtime/releases/tag/21.35.20826
Steps to Install Package Manager for Python (pip)
- sudo apt-get update
- sudo apt-get upgrade
- sudo apt install python3-pip
- pip3 install pip --upgrade
- sudo apt install ocl-icd-opencl-dev
Steps to Install OpenVINO™ Toolkit and Run Sample
1. pip3 install openvino-dev
2. cd ~
3. git clone https://github.com/openvinotoolkit/open_model_zoo.git
4. cd ~/open_model_zoo/tools/downloader
5. python3 -mpip install --user -r ./requirements.in
6. ./downloader.py --name yolo-v2-ava-0001 --precisions=FP32
7. cd ~
8. git clone https://github.com/intel-iot-devkit/sample-videos.git
9. python3 (instructions to run the demo are also available at https://docs.openvinotoolkit.org/latest/omz_demos_object_detection_demo_python.html)
10. Demo Video
- ~/open_model_zoo/demos/object_detection_demo/python/object_detection_demo.py -m <path where model downloader downloaded the model>.xml -at yolo -i <location of your video file>/people-detection.mp4 --labels <location of your labelfile>/ coco.names -d GPU -nireq 2 -nthreads 4 --loop
Remaining Time -0:00
Why You Should Use OpenVINO™ Integration with TensorFlow*

How to Use OpenVINO™ Integration with TensorFlow*
1. pip3 install -U pip==21.0.1
2. pip3 install -U tensorflow==2.5.1
3. pip3 install openvino-tensorflow
4. git clone https://github.com/openvinotoolkit/openvino_tensorflow.git
5. cd ~/openvino_tensorflow
6. Follow instructions on the link below to run image classification or object detection examples https://github.com/openvinotoolkit/openvino_tensorflow/tree/master/examples
Remaining Time -0:00
Conclusion:
We hope that with this blog, we were able to show you just how easy it is to:
1. Run your applications in Linux VMs using WSL2 on Windows hosts
2. Tap into the power of iGPU and offload your inferencing workloads to it
3. Get a significant performance boost by simply using OpenVINO either in native format or through TensorFlow integrations.
Troubleshooting:
o Windows iGPU drivers are in Beta preview stage at the time of publishing this blog, hence windows system updates might remove them and revert to old drivers. Follow the steps mentioned in “Steps to install iGPU drivers” in the section above.
- Windows update removed iGPU drivers.
o For some brands of laptops, you must turn off secure boot from BIOS settings and will need windows recovery key from your Microsoft account to start windows again.
- Windows iGPU drivers not getting installed.
o Then remove the existing display drivers and restart the machine.
- Might have to do this step twice, as windows might not remove the drivers right away. Once removed, the display will be using default windows display drivers.
- Then install the new iGPU driver. You might have to do this step twice for some machines.
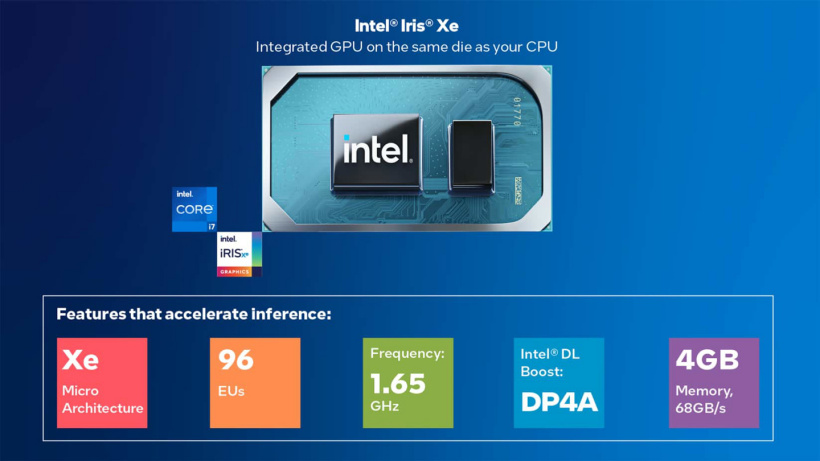
Harness the power of Intel iGPU on your machine
Have you wished for extra processing power to run your inference faster on your laptop? Well, you can do it now, without any extra investment!
www.intel.com
Vn-Z.vn team tổng hợp